Identifying ATM Terminals
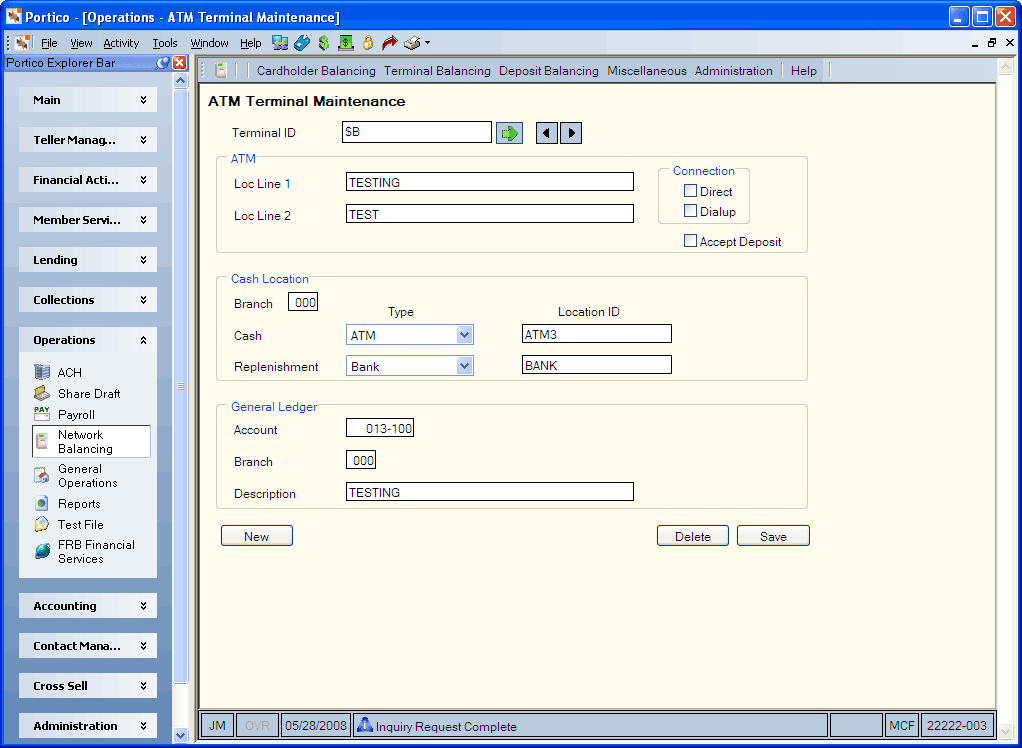
The ATM Terminal Maintenance window identifies each terminal location by a Fiserv Card Services-assigned terminal ID and provides the terminal ID, physical location of the terminal, and the associated general ledger accounts for the daily GL moves. The ATM Terminal Maintenance window must be setup in order to verify and correct deposits, review suspect transactions, and process the daily GL moves for a specific terminal. The information from the ATM Terminal Maintenance window is extracted in the back-office cycle.
To access the ATM Terminal Maintenance window, click Network Balancing within the Operations menu on the Portico Explorer Bar. On the Network Balancing top menu bar, click Administration, then click ATM Terminal Maintenance.

How do I? and Field Help
Enter a terminal ID in the Terminal ID field and click the green arrow to view the terminal information. Click the left and right arrow to scroll through the ATM terminals.
Complete the following steps to set up an ATM terminal.
- Click New to add a new ATM terminal.
- Enter the Fiserv Card Services-assigned terminal ID in the Terminal ID field (Length: 9 alphanumeric).
- In the Loc Line 1 and Loc Line 2 fields, enter the terminal location (Length: 21 alphanumeric). Portico recommends entering the state and city in this field to conform to the format used on the Fiserv Card Services terminal reports.
- In the Connection group box, select the Direct check box if this ATM terminal has a direct connection to Fiserv Card Services. Select the Dialup check box if this ATM terminal has a dial up connection to Fiserv Card Services.
- If this ATM terminal accepts deposits or payment enclosed envelopes, select the Accept Deposit check box.
- In the Cash Location group box, enter the branch of the cash location used for the ATM settlement moves in the Branch field (Length: 3 numeric).
- Click the Cash Type down arrow to select the cash location of the last shipment. The valid options are:
A - ATM
B - Bank
C - Correction (non-intransit)
D - Drawer
M - Member Clearing (non-intransit)
V - Vault
Then, enter the cash location ID in the ID field (Length: 8 alphanumeric). If your credit union does not use Cash Control, this field will contain a general ledger account. - Click the Replenishment Type down arrow to select the cash location receiving the shipment. The valid options are:
A - ATM
B - Bank
C - Correction (non-intransit)
D - Drawer
M - Member Clearing (non-intransit)
V - Vault
Then, enter the location ID in the ID field (Length: 10 alphanumeric). If your credit union does not use Cash Control, this field will contain a general ledger account. - In the General Ledger group box, enter the general ledger account to be debited or credited in the Account field (Length: 6 numeric).
- Enter the branch where the general ledger account resides in the Branch field (Length: 3 numeric).
- In the Description field, enter the description of the general ledger entry (Length: 30 alphanumeric).
- Click Save to save your changes to the ATM terminal.
Click Reset to clear the fields when setting up a new ATM terminal.
Click Delete to delete the ATM terminal from Network Balancing.
The specified general ledger accounts will be affected by the daily cash moves and the posting of deposits if the Accept Deposit check box is selected.
Financial Transaction Register Report 420
none
Portico Host: 56M