Share Close and Transfer Process
The Share Close and Transfer process guides you through a progressive series of tabs to help you close a share account and transfer products and services to a new share account or an existing share account under the same member number.
If a member wishes to change his/her share account to a different account type (share type change), you can use the Share Close and Transfer process to close the old share account, open a new share account, and transfer all or part of the same product/services to the new share account.
You can also complete a share account close including the financial and non-financial transactions that will remove products/services that are sometimes overlooked. This process helps you remove the products/services associated with an account so that the account will purge successfully. Be sure to delete any external ATM/debit card, bill pay, or online banking records.
The Transactions - Close Share Account tab can be used to close an account but this method will not remove associated products/services. Some products/services, if not removed, will prevent a share account from purging.
To launch the Share Close and Transfer process, click the Share Close and Transfer button on the Overview tab, or click the Close Share and Transfer button in the Close Account group box on the Shares – General tab.
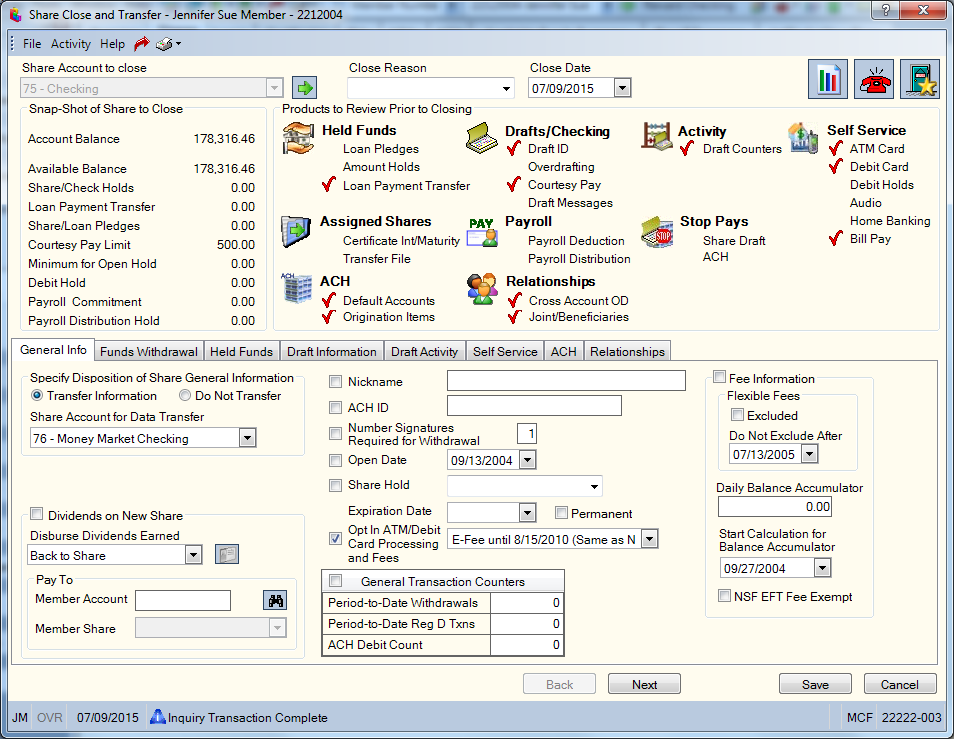
From the Share Account to Close drop-down list, select the share account to close and click the green arrow.
How do I? and Field Help
From the Close Reason drop-down list, select the credit-union defined reason the account will be closed. Reporting Analytics: Close Reason (Closed Shares subject in the Share folder)
Click the Close Date down arrow select the close date from the pop-up calendar or enter a date in MM/DD/YYYY format. Reporting Analytics: Close Date (Closed Shares subject in the Share folder)
The Snap-Shot of Share to Close group box displays essential information about the share account that will be closed. The Products to Review Prior to Closing group box displays all the possible products a member can have, but only the products directly related to the share account selected to be closed will appear with a check mark. As a product/service is transferred or removed, the check marks next to the product/service disappear.
Click the Contact Manager icon to display the Member Event dialog box and set up a new event.
If the closing share account is included in Account Analysis, the Account Analysis icon will appear to alert you that maintenance may need to be completed outside of the Share Close and Transfer process. Click the Account Analysis icon to display the Account Analysis dialog box.
You can add the member to the closed account file by clicking the Close File icon button and opening the Closed Account Cross Reference Detail dialog box.
The Share Close and Transfer dialog box features the following tabs at the bottom of the dialog box depending on the products/services associated with the share account that will be closed.
- General Info - contains general information about the share account such as dividends, account nickname and fee information. This tab is used to open a new account or to select an existing account to transfer the products/services.
- Funds Withdrawal – lets you complete a financial transaction. This tab closes the share account and places a 9 hold code on the account.
- Held Funds – contains share pledges, share holds and loan pledges information.
- Draft Information – contains draft ID, overdraft information, Courtesy Pay and draft messages.
- Draft Activity - contains the draft activity counters.
- Relationships – contains cross-account overdraft information and joint/beneficiary information.
- EFT – contains ATM, debit card, debit hold, and audio information.
- Online Banking – contains online banking and bill pay information.
- Assigned Shares – contains certificate interest/maturity and automated transfer information.
- Payroll – contains payroll deduction and distribution information.
- Stop Pays – contains share draft and ACH stop pay information.
- ACH – contains default account and ACH origination information.
The information presented on each tab should be reviewed carefully before any action is taken. If the share account is re-opened, the products/services that were removed from the share account using the Share Close and Transfer process will not be added back to the share account.
Click Save or Submit on each tab to save your changes or complete the share withdrawal or transfer. Then, click Next to move to the next tab. Click Back to move the previous tab.
Click Cancel to close the dialog box without saving your changes.
The General Info tab contains general information about the share account that will be closed. This tab is also used to open a new share account or select an existing share account to transfer the products/services. To open a new account or transfer to an existing account, you must select at least one item to transfer.

| Field | Description | ||||||||
|---|---|---|---|---|---|---|---|---|---|
|
Click this option to transfer the information from the account being closed to an existing account or a new account. Then, click the down arrow to select an existing share account or select a new share account to open. If the Transfer Information option is selected, the Share Account Targeted field in the Closed Account group box on the Shares – General tab displays the share account from the Share Account for Data Transfer field. If the Do Not Transfer option is selected, the Share Account Targeted field will be hidden. If the share account is closed using the Transactions – Close Share Account tab, the Share Account Targeted field will be hidden. |
|||||||||
|
Click this option to not transfer the information. |
|||||||||
|
Select this check box to select the disbursement method for dividends earned on the new or existing share account specified. |
|||||||||
|
Click the down arrow to change the method for disbursing dividends. If you select Dividend Paid by Check, click the envelope button to open the Alternate Check Address window and disburse a dividend check. |
|||||||||
|
To disburse dividends to another member account, enter the member number or click the member lookup icon to locate the member using the Member Search dialog box. Click the down arrow to select member share account to receive the dividends. |
|||||||||
|
Select this check box to transfer the nickname to the new or existing share account specified. To change the account nickname, select the check box and enter a new nickname up to 38 alphanumeric characters. |
|||||||||
|
Select this check box to transfer the ACH ID to the new or existing share account specified. To change the ACH ID, select the check box and enter a new alphanumeric ID to identify the ACH ID. If the Post by ACH ID check box is selected in the ACH section on the Credit Union Profile – ACH/Payroll tab, the system will post ACH items directly to the member share or share draft type using the unique alphanumeric ACH ID. Depending on your ACH table, the ACH ID must match the ID located within the individual ID or bank account number position on an incoming ACH file in order to post to the correct share type. |
|||||||||
|
Select this check box to transfer the number of signatures to the new or existing share account specified. To change the number of signatures, select the check box and enter the number of signatures required to withdraw funds from the account. |
|||||||||
|
Select this check box to transfer the open date to the new or existing share account specified. Select the check box and click the down arrow to select a new open date from the pop-up calendar or enter a new date in MM/DD/YYYY format. |
|||||||||
|
Select this check box to transfer the share hold to the new or existing share account specified. To change the share hold, select the check box and enter a new hold code. Then, enter an expiration date or select the Permanent check box. If the closing account has a share hold and the hold is transferred to another share account, an override is required to transfer the funds from the closing share to the transfer-to share account. |
|||||||||
|
To add an expiration date for the share hold, click the Expiration Date down arrow to select a date from the pop-up calendar. The share hold will automatically expire in the AM pass of the back-office cycle on the expiration date. For example, if the expiration date is 2/18/2017, the share hold will expire in the AM pass on 2/18/2017, after the nightly back office cycle on 2/17/2017. The funds will be available the morning of 2/18. The hold is removed prior to any financial processing, making the funds available for any share drafts or ACH items. |
|||||||||
|
Select the Permanent check box to add a permanent hold on a share account. |
|||||||||
|
Select the check box to transfer the overdraft processing option to the new or existing share account specified. You can choose to transfer the overdraft option selected on the closing account's Shares – Fees/Charge Off tab or you can select a new option from the drop-down list.
|
|||||||||
|
This grid displays the transaction counters on the account the being closed. Select this check box to transfer the counters to the new or existing share account specified. To change the transaction counters, select the check box and enter the new counters.
|
|||||||||
|
Select this check box to transfer the IRA withholding information to the new or existing share account specified. |
|||||||||
|
Select this check box to transfer the IRA state withholding to the new or existing share account specified. |
|||||||||
|
Select this check box to transfer the IRA Federal withholding to the new or existing share account specified. |
|||||||||
|
Select this check box to transfer the fee information to the new or existing share account specified. |
|||||||||
|
Select this check box to exclude the account from fees. |
|||||||||
|
Click the down arrow to select the last date fees will be excluded from the drop-down list or enter the date in MM/DD/YYYY format. This is an information-only field. Portico does not use this field to determine if Flexible Fees should be charged. |
|||||||||
|
The average daily balance amount of the account being closed. To change the average daily balance amount, enter a new amount. |
|||||||||
|
Click the down arrow to select the date to begin calculating the daily balance accumulator or enter the date in MM/DD/YYYY format. |
|||||||||
|
Select this check box to exempt the account from NSF EFT fees. |
|||||||||
|
Click the down arrow to select how dividends should be disbursed on the closed account. |
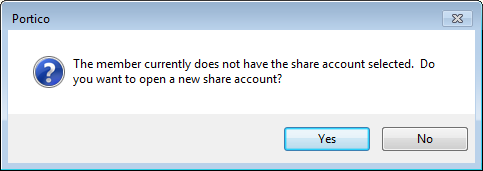
If you selected a new account from the Share Account for Data Transfer drop-down list, the following message when your click Save. Click Yes to continue.
The following examples illustrate some of the information that is presented on the tabs.
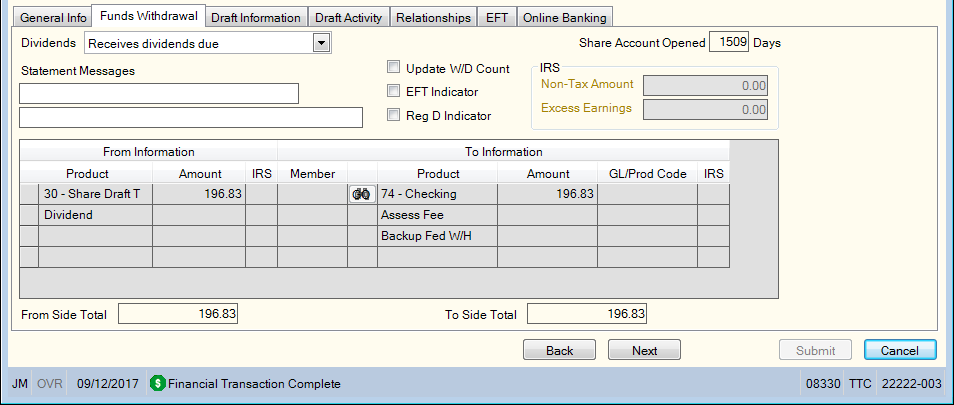
This tab is used to disburse funds and close the share account. Disbursals can be by cash, check, product code, GL account, or transfer. Dividends, for share accounts that pay DOD-DOW dividends, will be calculated and added to the withdrawal amount. If the share account being closed pays dividends using the ADB method, the dividends should be added to the closing share before you begin the Share Close and Transfer process. If dividends are manually added to the closing share balance (outside of the Share and Close process), select the appropriate option from the Dividends drop-down list.
| Field | Description | ||||||||||||||||||
|---|---|---|---|---|---|---|---|---|---|---|---|---|---|---|---|---|---|---|---|
|
If dividends are manually added to the closing share balance (outside of the Share and Close process), select the appropriate option from the Dividends drop-down list. |
|||||||||||||||||||
|
The number of days the share account has been opened. |
|||||||||||||||||||
|
Line 1 of the message that should be printed on the member's statement regarding this transaction. Length: 35 alphanumeric |
|||||||||||||||||||
|
Line 2 of the message that should be printed on the member's statement regarding this transaction. Length: 35 alphanumeric |
|||||||||||||||||||
|
Select the Update Withdrawal Counter check box to increment the share account's withdrawal counter (Keyword: WD). The number of withdrawals is stored in the Period-to-Date Withdrawals field on the Shares - Activity tab. |
|||||||||||||||||||
|
Select the EFT Indicator check box if this is an EFT transaction (Keyword: ET). The system will automatically select the Force at Month End Because of EFT/Misc Activity check box on the Stmts/Reporting/Notices tab. If the EFT Indicator check box is selected, you must type a statement message in the Statement Messages 1 field. |
|||||||||||||||||||
|
Select the Reg D Indicator check box to increment the share account's Regulation D transaction counter (Keyword: RD). The number of transactions is stored in the Period-to-Date Reg D Txns field on the Shares - Activity tab. If the share account's Period-to-Date Reg D Txns field on the Shares - Activity tab is greater than the limit defined in the Reg D Transactions field on the Share Profiles - Account Information tab, you must enter a teller override to complete the transaction. |
|||||||||||||||||||
|
In the IRA Non-Tax Amount field, enter the amount of the transaction that is considered non-taxable if the account is an IRA (Length: 12 numeric including decimal). |
|||||||||||||||||||
| In the Excess Earnings field, enter the amount of the IRA distribution that is excess earnings. Excess earnings is the dividend amounts earned on excess contributions during a given tax year. This amount is taxable. Keyword: EA / Length: 12 numeric including decimal. Enter an amount in this field only if you are using one of the following IRA distribution codes: Removal of excess contributions for same year (Traditional - 8, 81 (with exception); Roth - 8J; Coverdell - 8M) or Removal of excess contributions for prior year (Traditional - P, P1 (With exception); Roth - PJ; Coverdell - PM). | |||||||||||||||||||
|
Transaction Grid |
Use the Transaction Grid to transfer funds to another account or withdraw the funds.
|
||||||||||||||||||
|
The total amount of the From Side product codes. |
|||||||||||||||||||
|
The total amount of the To Side product codes. |
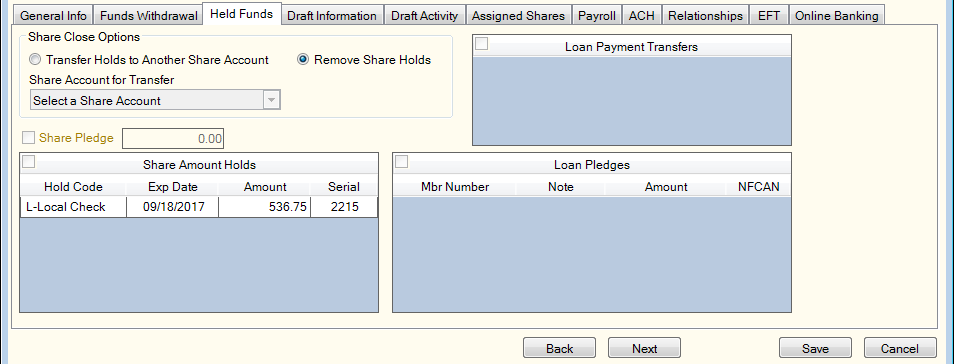
This tab contains information about funds that are held against the share account that will be closed. Held funds can be removed from the share account that will be closed or transferred to a new/existing share account. Any holds that are not transferred, will be removed.
In the Share Close Options group box...
- Click the Transfer Holds to Another Share Account option to transfer the holds from the account being closed to another share account. Then, click the Share Account for Transfer down arrow to select the share account.
- Click the Remove Share Holds option to remove the holds from the account being closed. All holds, share pledges, share amount holds and loan pledges will be removed from the account being closed.
Select the Share Pledge check box to transfer the share pledge from the account being closed to the account specified. To change the pledge amount, select the check box and enter a new pledge amount.
The Share Amount Holds grid displays the specific holds on the account being closed. Select the check box to transfer the holds from the account being closed to the account specified.
The Loan Pledges grid displays the pledges on the account being closed. Select the check box to transfer the pledges from the account being closed to the account specified.
The Loan Payment Transfers grid displays scheduled loan payments from the account being closed. Select the check box to transfer the loan payments from the account being closed to the account specified.
This tab contains draft ID, overdraft information, Courtesy Pay and draft messages associated with the share draft account that will be closed. You can remove or transfer the draft ID and overdraft information. If transferring options to an existing share draft account that has existing overdraft information, an additional dialog box will display the overdraft information for the share account being closed and the target share account. If the Transfer PTD Drafts Cleared counter is maintained and transferred to another share draft account on the Draft Information tab, this will not change the value of the Cleared Month-to-Date counter on the Draft Activity tab. You must maintain both the Transfer PTD Drafts Cleared counter and the Cleared Month-to-Date counter.
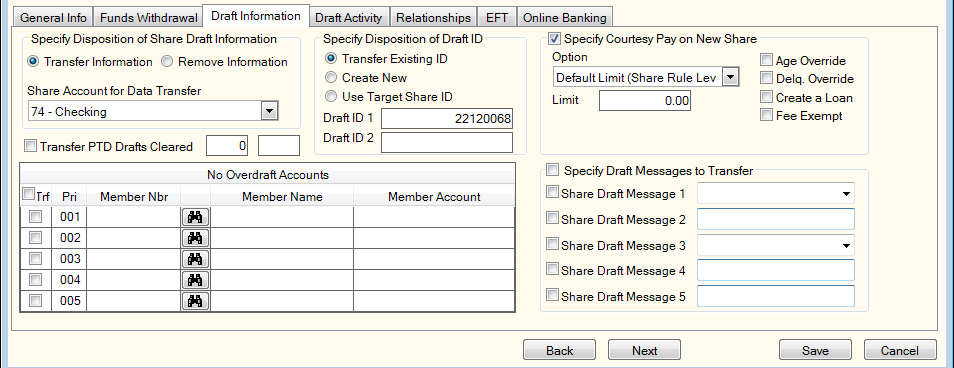
In the Share Close Options group box...
- Click the Transfer Information option to transfer the draft information from the account being closed to another share account. Then, click the Share Account for Data Transfer down arrow to select the share account.
- Click the Remove Information option to remove the draft information from the account being closed.
| Field | Description |
|---|---|
|
Click this option to use the share draft ID from the account being closed. |
|
|
Click this option to create a new draft ID. |
|
|
Select this check box to automatically calculate the draft ID check digit when a draft ID is added or maintained. Check digit support is determined by the Mod 10 Ck Digit field in the Share Drafts section on the Credit Union Profile - Shares tab. |
|
|
Click this option to use the share draft ID from the target share account specified. |
|
|
The draft ID for the share account. The draft ID identifies the member share draft account incoming drafts should post against. The share draft identification is MICR coded on all drafts. Length: 17 numeric |
|
|
Select the Transfer PTD Drafts Cleared check box to transfer the period-to-date drafts cleared counters for draft ID 1 and 2. You can also maintain the period-to-date drafts cleared counters for draft ID 1 and 2. If the Transfer PTD Drafts Cleared counter is maintained and transferred to another share draft account on the Draft Information tab, this will not change the value of the Cleared Month-to-Date counter on the Draft Activity tab. You must maintain both the Transfer PTD Drafts Cleared counter and the Cleared Month-to-Date counter. Length: 5 numeric |
|
|
Select this check box to transfer the closing share Courtesy Pay option and limit to the target share account specified, or indicate a different Courtesy Pay option and limit for the target share account. |
|
|
The existing Courtesy Pay option (if applicable). You can choose a different Courtesy Pay option for the target share. Click the down arrow to select the Courtesy Pay option. The valid options are:
After the data has been saved, an informational message will display the target share account's Courtesy Pay option and the Courtesy Pay available amount. |
|
|
The negative balance limit for an individual member. |
|
|
Select this check box to add Courtesy Pay to the share draft account, regardless of the member’s age. |
|
|
Select this check box to add Courtesy Pay to the share draft account, regardless if the member has a delinquent loan. |
|
|
Select this check box to create a Courtesy Pay loan when the member's share draft account is negative due to Courtesy Pay. Portico uses the Courtesy Pay Loan information from the Share Profiles - Courtesy Pay tab and the system defaults for a new loan to create the Courtesy Pay loan in the back-office cycle. The member's share draft account must be negative due to Courtesy Pay, the Went Negative field must contain a valid date, and the Create a Loan check box must be selected before a loan will automatically be created. |
|
|
Select this check box to exempt the member from Courtesy Pay fees. |
|
|
This grid displays the overdraft accounts associated with the account being closed. Select the Transfer check box in the grid header to transfer all the overdraft accounts to the new or existing account specified. To transfer individual accounts, select the Transfer check box in the desired row. |
|
|
This grid displays the draft messages associated with the account being closed. Select the Transfer check box in the grid header to transfer all the messages to the new or existing account specified. To transfer individual messages, select the Transfer check box in the desired row. |
If the share draft counters have a value greater than zero, then the Draft Counters label will appear with a red checkmark and the Draft Activity tab will appear. This tab contains the draft activity counters associated with the share draft account that will be closed. You can transfer the draft activity counters and maintain the counters as needed. Since the counters can affect fees charged to the member, you may choose to maintain the counters.
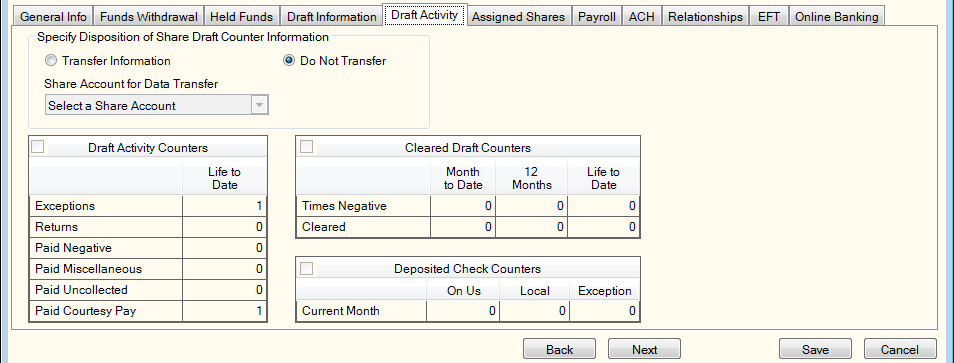
In the Specify Disposition of Share Draft Counter Information group box...
- To transfer the counters, click the Transfer Information option and select the share draft account to transfer the counters to from the drop-down list. If the existing activity counters for the target share draft account have a value greater than zero, a system edit will appear when you attempt to transfer the closed account activity counters to the target account. The message will indicate that the target share draft activity counters will be overlaid with the closed account activity counters.
- Click the Do not Transfer option to not transfer the counters to the target share draft account. The draft activity counters will remain on the closed account and will purge with the closed account.
To transfer the draft activity counters, select the Draft Activity Counters check box and click Save.
| Counter | Description |
|---|---|
| Exceptions Life to Date | The number of exceptions that have appeared on the Share Draft Exception Items window since opening the account. The number shown includes current month activity. The NSF Counters field on the Credit Union Profile - Shares tab specifies whether the system will increment the Life to Date Exceptions field based on the number of exceptions on a per day or per item basis. The system will reset this field to zero when the number of exceptions exceeds 99999. You can maintain this field. Length: 5 numeric |
| Returns Life to Date | The number drafts that have been returned since opening the account. The number shown includes current month activity. The NSF Counters field on the Credit Union Profile - Shares tab specifies whether the system will increment the Life to Date Returns field based on the number of returns on a per day or per item basis. The system will reset this field to zero when the number of returns exceeds 99999. You can maintain this field. Length: 5 numeric |
| Rejects Life to Date | This field will only appear if the NSF Counters field is I – Per Item in the Share Draft section of the Credit Union Profile – Shares tab. The number of share draft exception items that were not paid online or during back-office processing since opening the account. The number shown includes current month activity. The system will reset this field to zero when the number of rejects exceeds 99999. You can maintain this field. Length: 5 numeric |
| Paid Negative Life to Date | The number of times a member has had non return items paid bringing the account negative since opening the share draft account. The number shown includes current month activity. The NSF Counters field on the Credit Union Profile - Shares tab specifies whether the system will increment the Life to Date Paid Negative field based on the number of paid negative items on a per day or per item basis. The system will reset this field to zero when the number of paid negative items exceeds 99999. You can maintain this field. Length: 5 numeric |
| Paid Miscellaneous Life to Date | The number of times a member has had non return items paid using miscellaneous funds since opening the share draft account. The number shown includes current month activity. The NSF Counters field on the Credit Union Profile - Shares tab specifies whether the system will increment the Life to Date Paid Miscellaneous field based on the number of paid miscellaneous items on a per day or per item basis. The system will reset this field to zero when the number of paid miscellaneous items exceeds 99999. You can maintain this field. Length: 5 numeric |
| Paid Uncollected Life to Date | The number of times a member has had non return items paid using uncollected funds since opening the share draft account. The number shown includes current month activity. The NSF Counters field on the Credit Union Profile - Shares tab specifies whether the system will increment the Life to Date Paid Uncollected field based on the number of paid uncollected items on a per day or per item basis. The system will reset this field to zero when the number of paid uncollected items exceeds 99999. You can maintain this field. Length: 5 numeric |
| Paid Courtesy Pay Life to Date | The number of times a member has had non return items paid using Courtesy Pay funds since opening the share draft account. The number shown includes current month activity. The NSF Counters field on the Credit Union Profile - Shares tab specifies whether the system will increment the Life to Date Paid Courtesy Pay field based on the number of paid Courtesy Pay items on a per day or per item basis. The system will reset this field to zero when the number of paid Courtesy Pay items exceeds 99999. You can maintain this field. Length: 5 numeric |
To transfer the cleared draft counters, select the Cleared Draft Counters check box and click Save.
| Counter | Description |
|---|---|
| Times Negative Month to Date | The number of times during the current month that the share draft account has been brought negative. The system will add one to this field when the member's account goes from a positive balance to a negative balance because of online activity or activity during the back-office cycle; however, the system will not update this field if the account goes from a negative balance to a more negative balance. The system updates this field during the back-office cycle. You can maintain this field. Length: 3 numeric |
| Times Negative 12 Months | The number of times during the past 12 months that the share draft account has been brought negative. The twelve-month period does not include the current month. At month end, the system will reduce the count by the number of times the account was brought negative during the oldest month and increase the count by the number specified in the Month to Date Negative field. You can maintain this field. Length: 5 numeric |
| Times Negative Life to Date | The number of times since opening the account that the share draft account has been brought negative. The number shown includes current month activity. The system will add one to this field when the member's account goes from a positive balance to a negative balance because of online activity or activity during the back-office cycle; however, the system will not update this field if the account goes from a negative balance to a more negative balance. The system will reset this field to zero when the number exceeds 99999. Maintenance to this field occurs during the back-office cycle. You can maintain this field. Length: 5 numeric |
| Cleared Month to Date | The total number of drafts that have cleared during the current month. The number of drafts cleared includes drafts cleared by online and back-office processing. You can maintain this field. Length: 3 numeric |
| Cleared 12 Months |
The total number of drafts that have cleared during the past 12 months. The number of drafts cleared includes drafts cleared by online and back-office processing. The twelve-month period does not include the current month. At month end, the system will reduce the count by the number of cleared drafts for the oldest month and increase the count by the number specified in the Month to Date Cleared field. You can maintain this field. Length: 5 numeric |
| Cleared Life to Date | The total number of drafts that have cleared since opening the account. The number of drafts cleared includes drafts cleared by online and back-office processing. The number shown includes the current month. The system will reset this field to zero when the number of cleared drafts exceeds 99999. You can maintain this field. Length: 5 numeric |
To transfer the deposited check counters, select the Deposited Check Counters check box and click Save.
| Counter | Description |
|---|---|
| Current Month On Us | The number of on us checks presented by the member for the current month. Length: 5 numeric |
| Current Month Local | The number of local checks presented by the member for the current month. Length: 5 numeric |
| Current Month Exception | The number of exception checks presented by the member for the current month. Length: 5 numeric |
This tab contains cross-account overdraft information and joint/beneficiary information associated with the share account that will be closed. You can remove or transfer the co-owner/relationship information. The information in the Cross Account Overdrafting grid will not be removed and can not be transferred; however, the information can be maintained.
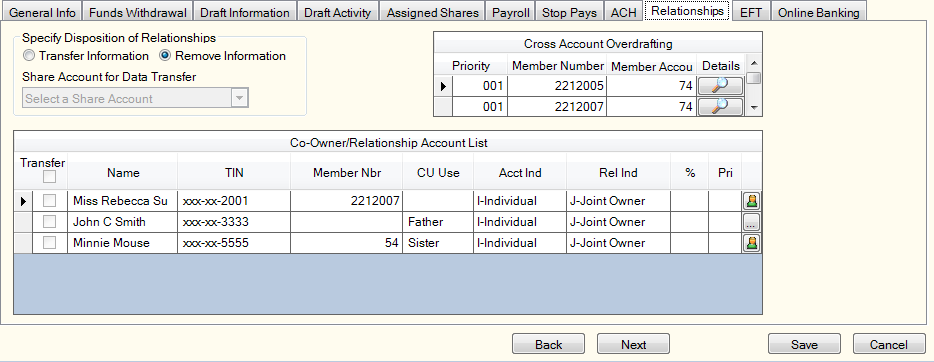
In the Specify Disposition of Relationships group box...
- Click the Transfer Information option to transfer the co-owner/relationship information to another share account. Then, click the down arrow to select the share account.
- Click the Remove Information option to remove the co-owner/relationship information from the account being closed.
The Co-Owner/Relationship Account List displays the members and non-members associated with the one or more of the member's accounts.
Members/non-members with relationships to all of a member's accounts (All Accounts) will not appear on the Share Close and Transfer - Relationships tab. When the share account is closed, the account relationship still exists for all remaining accounts. The Relationships tab will not appear for beneficial owner accounts.
| Column Heading | Description |
|---|---|
| Transfer | Select the Transfer check box to transfer the co-owner/relationship information. Select the Transfer check box in the grid heading to select all the co-owner/relationship information. |
| Name | The name of the co-owner. |
| TIN | The taxpayer ID number of the member or non-member. Portico partially masks taxpayer ID numbers. |
| Member Nbr | The member number, if the individual is a member of the credit union. |
| CU Use | A credit union-defined customized field. This field can be customized using the Customized Fields window. Keyword: CP |
| Account Ind |
The ownership type on the associated account. The valid values are:
Keyword: AI |
| Relationship Ind |
The individual's relationship to the member account. The valid values are:
To view the valid values based on account type, refer to the Account Relationships Table. Keyword: RI |
| % |
For a beneficiary relationship, this is the percentage of the account funds that the beneficiary on the account will receive. Valid option are 000-100. Length: 3 numeric |
| Account Relationships |
The ellipsis icon button indicates that the relationship is not a member of the credit union. The member icon button (green shirt) indicates that the relationship is a member of the credit union. Click the ellipsis icon button or the member icon button to display the Account Relationships dialog box. If the relationship was not added using the Account Relationships dialog box , the icon button will be disabled. |
The information in the Cross Account Overdrafting grid will not be removed and cannot be transferred; however, the information can be maintained.
This tab contains the self service products that are associated to the share account that will be closed. You can transfer the self service accounts to the new/existing share account. Be sure to delete any external debit card records.
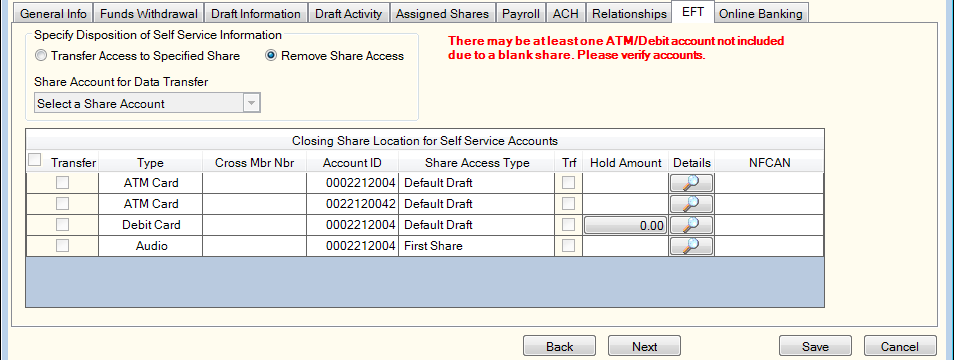
In the Specify Disposition of Self Service Information group box...
- Click the Transfer Access to Specified Share option to transfer self service access to another share account. Then, click the down arrow to select the share account.
- Click the Remove Share Access option to remove self service access from the account being closed.
In the Closing Share Location for Self Service Accounts...
This tab allows you to remove or transfer a co-owner's online banking access to the closed account.
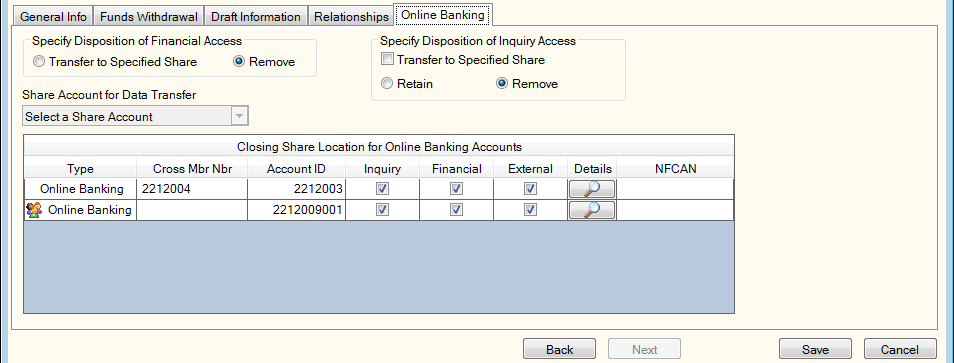
In the Specify Disposition of Financial Access group box...
- Click the Transfer to Specified Share option to transfer online banking financial and external access to another share account. Then, click the down arrow to select the share account. If the online banking user did not have financial and external access to account being closed, they will not have financial and external access to the transfer-to account.
- Click the Remove option to remove online banking financial access from the account being closed.
In the Specify Disposition of Inquiry Access group box...
- Select the Transfer to Specified Share check box to transfer online banking inquiry access to the share account specified in the Share Account for Data Transfer drop-down list. If the online banking user did not have inquiry access to account being closed, they will not have access to the transfer-to account.
- Click the Retain option to retain online banking inquiry access to the share account being closed. This option allows the online banking user to review the history of the closed account via online banking.
- Click the Remove option to remove online banking inquiry access from the account being closed. This option prevents the online banking user from reviewing the history of the closed account via online banking.
When you click Save, the transfer, retain and remove option selected will affect all the manually-added accounts in the Closing Share Location for Online Banking Accounts grid.
| Column Heading | Description |
|---|---|
|
Type |
Lists Online Banking as the type of self service access. An icon will appear if the member listed is an account relationship linked by taxpayer ID. |
|
Cross Mbr Nbr |
The member number associated with the online banking user ID. If blank, the online banking user ID is associated with the member's whose share account is being closed. |
|
Account ID |
The online banking user ID associated with the online banking profile |
|
Inquiry |
If selected, the online banking user has inquiry access to the share account being closed. |
|
Financial |
If selected, the online banking user has financial access to the share account being closed. |
|
External |
If selected, the online banking user has external movement access to the share account being closed. |
|
Details |
Click the Details button to display the Online Banking Maintenance dialog box and modify the account access permissions. |
|
NFCAN |
The non-financial computer-assigned number that appears after your click Save to process the access transfer or removal. |
When an online banking user ID is set up for a primary member, you can link the primary's member's account relationships to their new online banking user ID by selecting the primary member's taxpayer ID number from the TIN drop-down list and clicking Link on the Online Banking Maintenance dialog box. All the co-owner's with access to the primary member's accounts are added to the Online Banking Maintenance dialog box. Since the access to the share account is based on the co-owner relationship, the co-owner will appear on both the Relationships tab and the new Online Banking tab on the Share Close and Transfer dialog box.

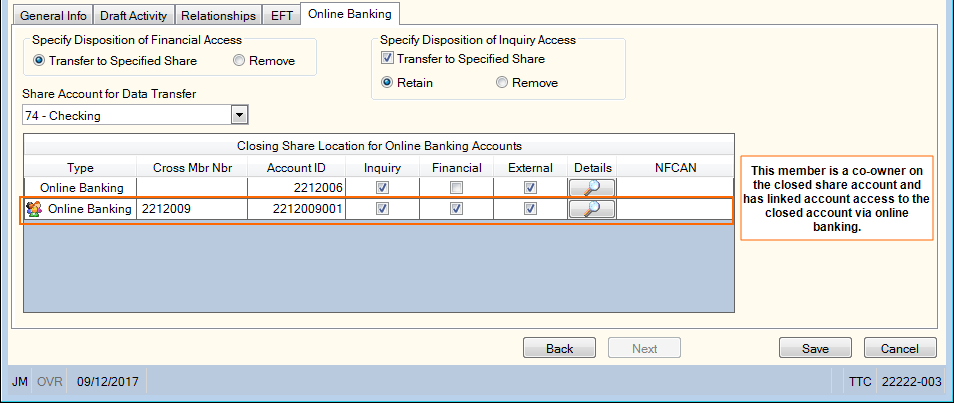
You can use the options on the Relationships tab to transfer or remove access to the closed account from both the Account Relationships dialog box and the Online Banking Maintenance dialog box at the same time. On the Relationships tab, select the Transfer Information option, then select the new share draft account from the drop-down list. Select the Transfer check box for the co-owner and click Save. When you transfer or remove the relationship to the closed share account, it is automatically removed from the Online Banking tab as well.
This tab contains certificate interest/maturity and automated transfer information associated to the share account that will be closed. You can remove or transfer the certificate interest/maturity or an automated transfer.
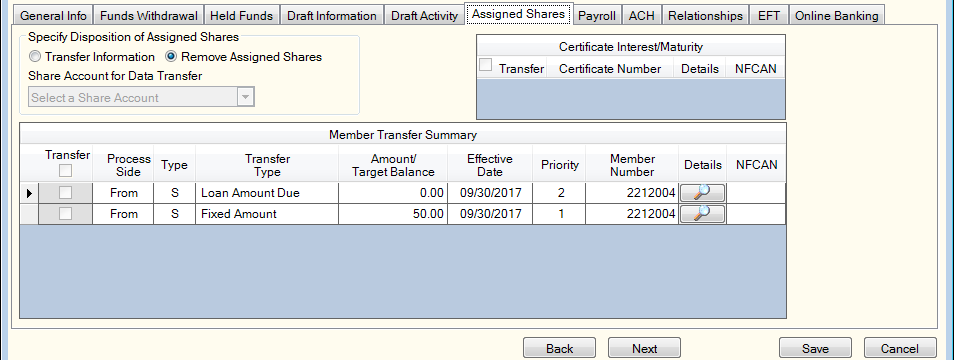
In the Specify Disposition of Assigned Shares group box...
- Click the Transfer Information option to transfer the certificate interest/maturity or an automated transfer to another share account. Then, click the down arrow to select the share account.
- Click the Removed Assigned Shares option to remove the certificate interest/maturity or an automated transfer from the account being closed.
In the Certificate Interest Maturity grid...
In the Member Transfer Summary grid...
This tab contains payroll deduction and distribution information associated with the share account that will be closed. You can transfer or remove payroll distributions. Any excess share payroll deductions must be manually maintained.
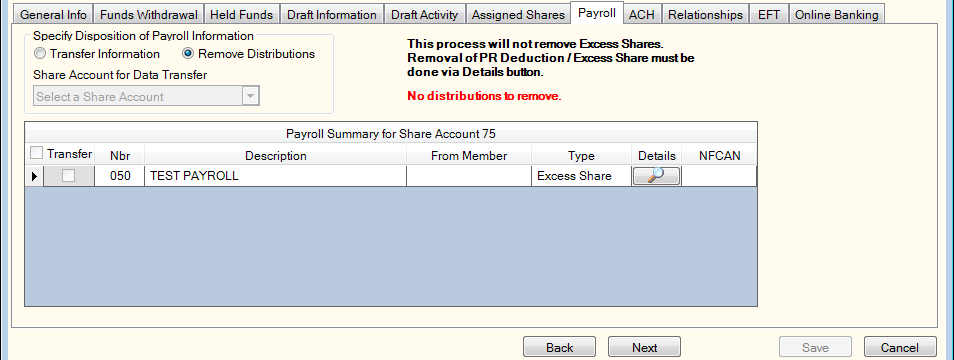
In the Specify Disposition of Payroll Information group box...
- Click the Transfer Information option to transfer the payroll distributions to another share account. Then, click the down arrow to select the share account.
- Click the Remove Distributions option to remove the payroll distributions from the account being closed.
The Payroll Summary grid displays the payroll information set up for the member.
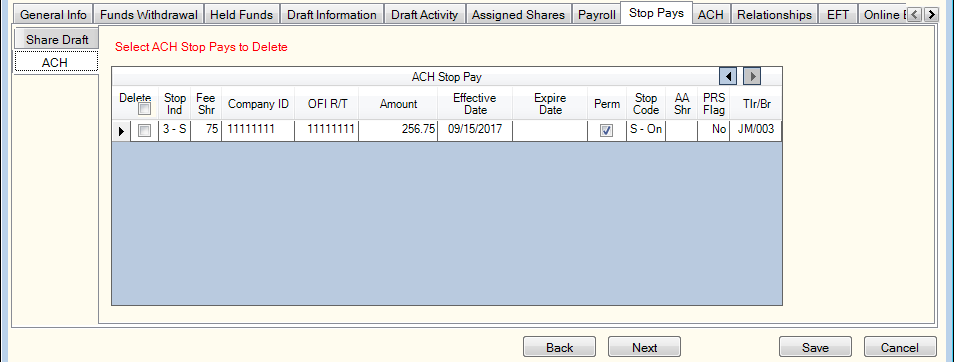
This tab will display share draft stop pays and ACH stop pays for the share account that will be closed. If the closing share account does not have any stop pays, the tab will not appear.

The stop pays on the Share Draft sub-tab can be maintained or deleted, they can not be transferred. If the share draft stop pays are not maintained or deleted, they will remain on the stop pay file with the share type and draft ID of the share account being closed.
The ACH sub-tab will display all the ACH stop pays associated with the member number, not just the ACH stop pays for the share account being closed. The ACH stop pays can be deleted or maintained. If the ACH stop pays are not deleted or maintained, they will remain on the ACH stop pay file. To delete a stop pay record, select the Delete check box and click Save. Click the left and right arrows to scroll through the list of stop pay records.
This tab contains all the ACH origination information associated to the member (not just the share account that will be closed). If an ACH item is not deleted, it will remain on the ACH file and maintenance to the ACH item will be required outside of the Share Close and Transfer process. If the share account being closed is listed in the Savings Account field or Draft Account field, a different share account can be selected.
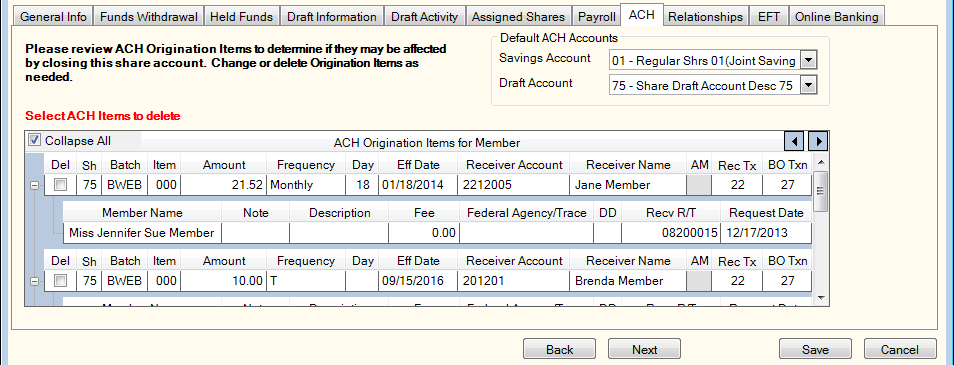
Click the Savings Account down arrow to select the new default savings account to use for posting ACH items.
Click the Draft Account down arrow to select the default share draft account to use for posting ACH items.
The ACH member items associated with the account being closed. Select the Expand All check box to view the item details. Select the Del check box to delete the item.
If the share account is closed (no transfer to new/existing share account), the only action required is to click Save. Clicking Save will remove the products/services from the closed share account.
If the share account that will be closed does not have any products/services, the General Info tab and the Funds Withdrawal tab will always be accessible. Once the funds are withdrawn from the account and the 9 hold code is placed on the account, only the General Info tab will be accessible.
Once a share account is closed, the financial and non-financial transaction history will be retained on the closed account until the account is purged. The retained history includes check images on closed draft/checking accounts.
A same-day reversal, using the existing reversal process, is allowed. The same-day reversal will only reverse the funds withdrawal transaction; it will not add the products/services back to the closed share account.
- Share Draft Closed Accounts Report 459
- Member Statements Report 390
The Exclude Zero Bal Clsd Shr field on the 390 Report Rules lets you choose to prevent zero balance closed share accounts from printing on member statements. Portico identifies zero balance closed share accounts using the following criteria:
- In the Close Account group box on the Shares - General tab, the Share Account Closed check box must be selected, and a valid date must appear in the Effective Date field. The Reason field is optional.
- In the Share Account Level Hold group box on the Shares - Holds Detail tab, the Share Hold field must be Permanent (9), a valid date must appear in the Add Date field, and the Permanent check box must be selected.
If the Exclude Zero Bal Clsd Shr field is Y on the 390 Report Rules and the zero balance closed share account meets the closed account criteria, the account may appear on the member statements depending on the activity during the statement period or current statement year.