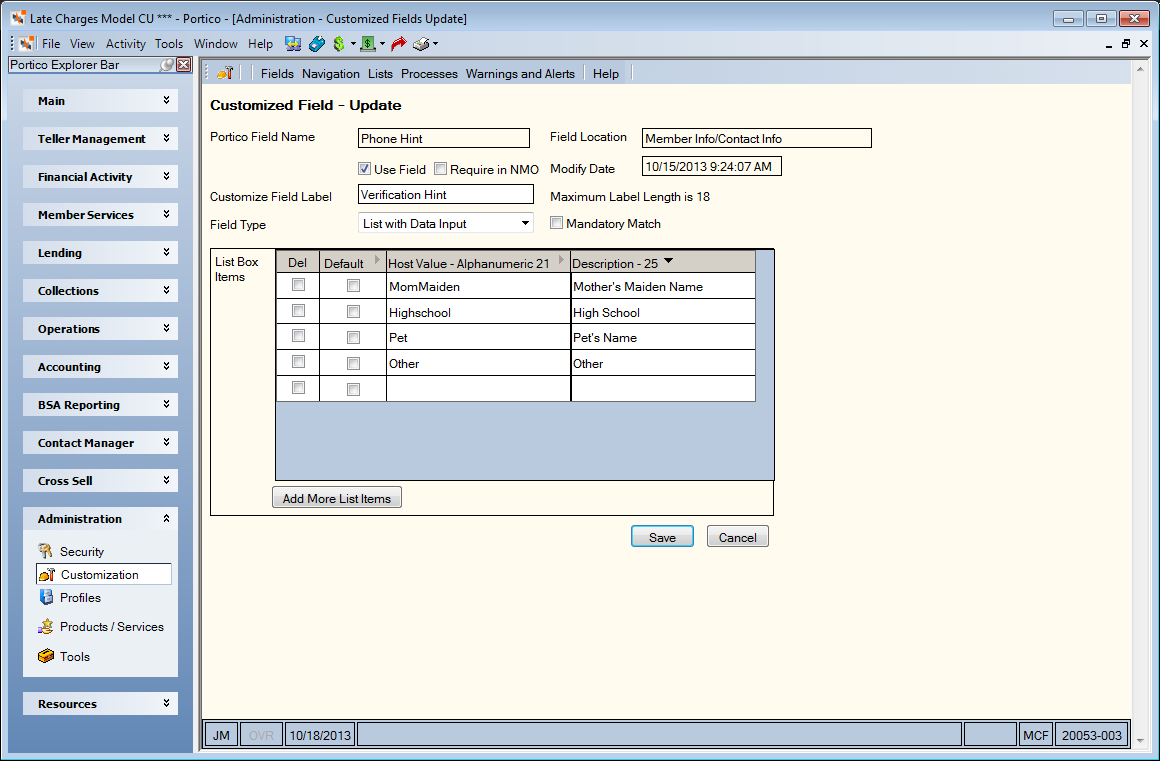
Customizing a Field
You can customize a Portico field on the Customized Field - Update window. To access the Customized Field - Update window, under Administration on the Portico Explorer Bar, click Customization. On the Customization top menu bar, click Fields on the menu bar, then click Customized Fields. The Customized Fields – List window appears. Click the Portico field name to open the Customized Field - Update window.

How do I?
On the Customized Field - Update window, you can:
- Make the field available for use
- Make the field required in New Members and Services
- Specify a credit union-defined field label
- Change the field type to a check box, text box, drop-down list, drop-down list with data input, or calendar
Click Add More List Items to add blank rows to the List Box Items grid.
Click Save to save the customized Portico field and close the window. Click Cancel to close the window without saving the customized Portico field.
Field Help
| Field | Description |
|---|---|
|
The standard Portico name of the field. |
|
|
The location of the field within Portico. |
|
|
Select this check box to make this field available to your credit union employees. |
|
|
Select this check box to make the field required in New Members and Services. An asterisk will appear next to the field in New Members and Services, and Yes will appear in the Required column on the Customized Fields – List window. If the Require in NMO check box is selected for the Driver's License field on the Customized Field - Update window, the Member has no DL information check box will appear on the Member Verification tab in New Members & Services. |
|
|
The date and time that the customized Portico field was last modified. |
|
|
Select the Yes or No option to indicate if the default value for the field in New Members and Services should be Yes or No. |
|
|
The credit union-defined field label. This label will replace the standard Portico field name in the Portico application. Length: 15 alphanumeric |
|
|
The type of field: check box, text box, list, list with data input, or calendar. For fields that can be a text box or a drop-down list, click the down arrow to select Text, List Only, or List with Data Input. If you select List Only or List with Data Input, the List Box Items frame will appear to let you create the list of valid values. The List with Data Input option allows a user to type in the field or click a down arrow to select a list of valid values. If the user types in the field instead of selecting a value from the list of valid values, the field entry will appear in green text to indicate that it was manually entered. The manual field entry may also appear in all upper case. |
|
|
Select this check box to require that any text manually entered match one of the valid values available in the drop-down list. For List with Data Input only. |
|
|
The list of valid values that will appear in the drop-down list. Select the Del check box to delete a valid value. |
|
|
Select this check box to specify the valid value as the default option. For List Only or List with Data Input only. |
|
|
Specify the valid value that will be saved to the Portico host. For List with Data Input only. The value must follow the length requirement of the standard field. For example, valid values for the Secondary ID field must be 9 characters is length. Length: Based on standard field length |
|
|
Specify a description of the valid value. For List Only or List with Data Input only. Length: 15 alphanumeric |