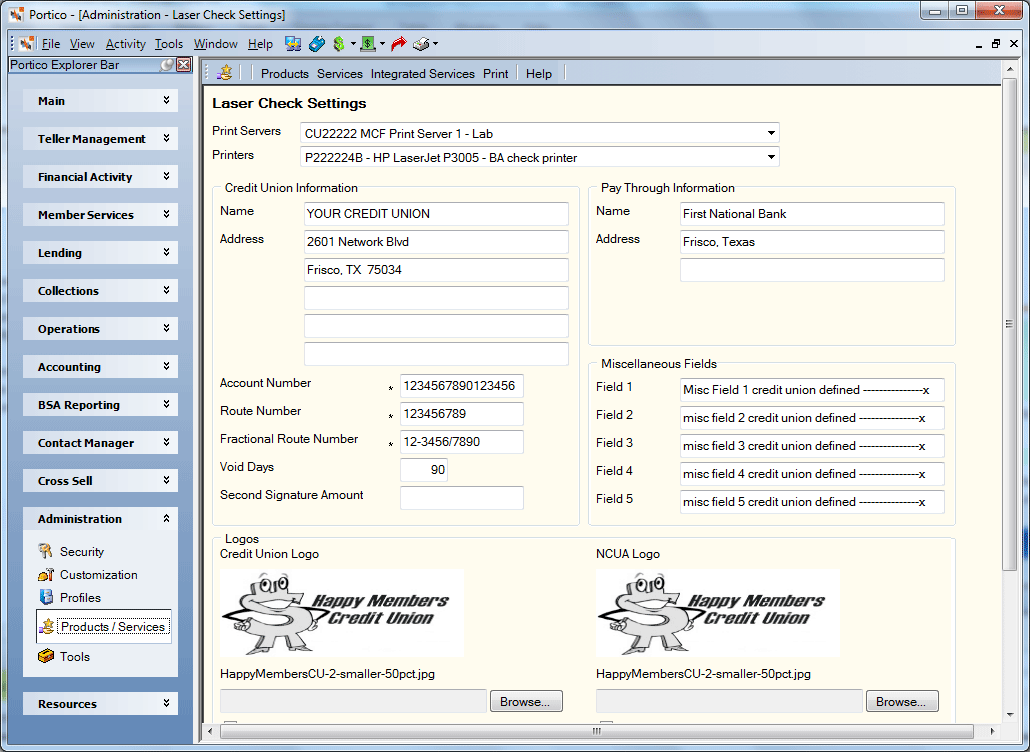
Setting Up Laser Checks
The Laser Check Settings window lets you define the credit union information, customized message and logo that should appear on laser checks. To access the Laser Check Settings window, click Products/Services within the Administration menu on the Portico Explorer Bar. On the Products/Services menu bar, click Print, then click Laser Checks.

How do I? and Field Help
Complete the following steps to define the laser check settings:
- From the Print Servers drop-down list, select the print server.
- Select the printer where the checks will be printed from the Printers drop-down list.
- In the Credit Union Information Name field, enter the name of the credit union that should appear on the check. (Length: 50 alphanumeric) If a logo is printed on the check, then in most cases the credit union name is not entered.
- In the Credit Union Information Address fields, enter the credit union address that should appear on the check. (Length: 50 alphanumeric per line)
- In the Pay Through Information Name field, enter the name of the pay through bank that should appear on the check. (Length: 50 alphanumeric)
- In the Pay Through Information Address fields, enter the pay through bank address that should appear on the check. (Length: 50 alphanumeric per line)
- In the Account Number field, enter the credit union account number at the pay through bank.
- Enter your credit union MICR routing number in the Route Number field.
- In the Fractional Route Number field, enter the credit union fractional route number, if applicable.
- In the Void Days field, enter the number of days the check is valid. After the specified number of days, the check is void.
- In the Second Signature Amount field, enter the dollar amount required to print the second signature line. Only one signature line will print for a check amount less than the specified amount.
- In the Miscellaneous Fields group box, enter additional messages that should appear on the checks (Length: 50 alphanumeric per line). The messages in the Miscellaneous Fields group box must also be added to the laser check template before they will print on the check. Submit a request to Portico Client Support to add the messages to the laser check template.
- In the Logos group box, click Browse to select the credit union logo and/or NCUA logo that should appear on the checks.
- Click Save to save your changes.
Select the Delete Credit Union Logo check box to remove the credit union logo from the check.
Select the Delete NCUA Logo check box to remove the NCUA logo from the check.
Click Cancel to disregard your changes.
The following permissions and security groups support access to the Laser Checks window.
| Permissions | Security Groups |
|---|---|
| Print - Print - Laser Checks - Menu Option |
Portico - Customization - Administrator Portico - Customization - View Only Print - Administrator |
| Print - Print - Laser Checks - View Only |
Portico - Customization - Administrator Portico - Customization - View Only Print - Administrator |
| Print - Print - Laser Checks - Maintain |
Portico - Customization - Administrator Print - Administrator |