Generating a Check
The Check Writer dialog box lets you issue credit union checks, cashiers check and operating checks for a member. You can print multiple checks for one financial transaction, or one check for multiple financial transactions.
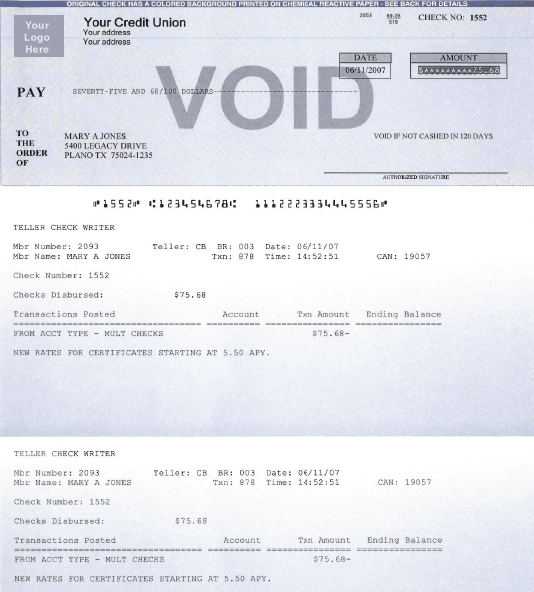
The Check Writer dialog box prints checks for refund checks, share withdrawals by check, closing share account by check, available funds withdrawal by check, new loan disbursement by check, loan advance by check, and certificate full or partial surrender by check. You can print one check for funds from multiple transactions. For example, the member wants to withdraw funds from share account 01 and also wants an advance from the open-end loan account. You would leave the Account Type field blank and type a description in the Check Stub field when printing one check for funds disbursed by multiple transactions. The system prints one check for the total amount withdrawn from the share account plus the loan advance amount. The account type and the CAN of the last transaction appear on the printed check. The checks will print to the printers specified on Print Profile - Assigned tabs. You must use the same teller ID for the disbursal transaction and the Check Writer dialog box.
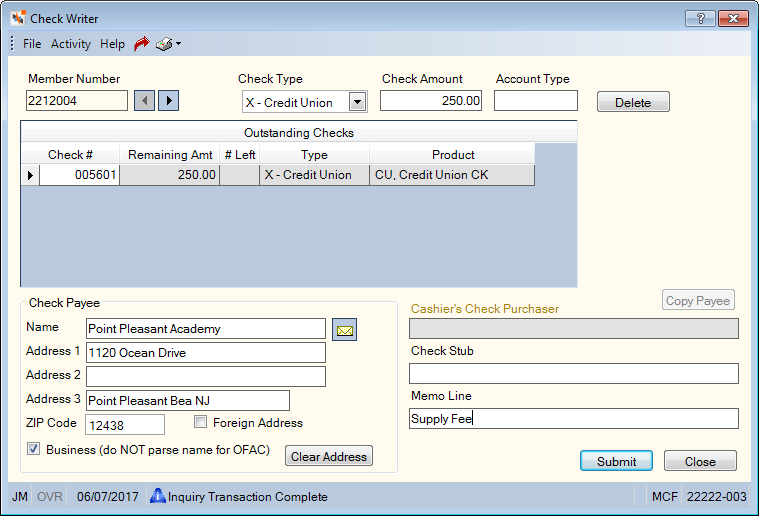
To access the Check Writer dialog box, locate the member using the search tool on the top menu bar. Click the down arrow to select the search method, then enter the search criteria. Click the green arrow or press ENTER to locate the member. On the top menu bar, click Activity, then click Check Writer. The Check Writer dialog box appears. Initially, the Check Writer dialog box will display the lowest member number with the remaining amount to disburse. Click the left and right arrows to scroll through the members with outstanding checks.

How do I? and Field Help
On the Check Writer dialog box, any outstanding checks for the member will appear in the Outstanding Checks grid. Click the left and right arrows to scroll through the outstanding to checks to generate. To generate checks, complete the following steps:
- Click the Check Type down arrow to select the type of check to generate (Keyword: DI). The valid options are:
- X - Disbursal is by a single credit union check. System default.
- Blank - Disbursal is by a single credit union check.
- C - Disbursal is by a single cashier's check.
- O - Disbursal is by a single operating check.
- P - Disbursal is by a single purchase draft.
- S - Disbursal is by a single sight draft.
- The Check Amount field displays the amount of the check to be disbursed. Change the amount in the Check Amount field to print multiple checks (Length: 12 numeric including decimal / Keyword: CK). To zero out the check amount, the Check Type field must be blank.
- In the Account Type field, enter the note number, share type or certificate number that will appear on the stub portion of the check (Length: 7 alphanumeric / Keyword: SA). Leave this field blank and type a description in the Check Stub field when printing one check for funds disbursed by multiple transactions.
The Outstanding Checks grid displays the list of checks that need to be generated.
| Column Heading | Description |
|---|---|
|
Check # |
The number on the check to be disbursed. The system uses the check number displayed on the Check Writer dialog box and not the one displayed when booking a loan with a multiple check disbursal. If necessary, change the check number listed in the Check# field. Length: 6 numeric Keyword: CN |
|
Remaining Amt |
The amount of checks remaining to be printed. Length: 12 numeric including decimal |
|
#Left |
The number of checks remaining to be printed for a given product. Valid only with the Branch Administration system. Length: 2 numeric |
|
Type |
The type of check to produce. The valid values are: X - Credit Union Check C - Cashier's Check P - Purchase Draft S - Sight Draft O - Operating Check |
|
Product |
The credit union-defined code used instead of the general ledger account number on Teller Administration transactions. Length: 2 alphanumeric |
- If needed, modify the name and address information in the Check Payee group box. The payee address will default to the primary or alternate address selected for use on the Contact Information tab. Click Clear Address to clear the address fields in the Check Payee group box.
| Field | Description |
|---|---|
|
Enter the name of the individual or organization receiving the check. The system will print the name specified in this field on the check instead of the name associated with the member number. Length: 32 alphanumeric Keyword: NM If your credit union uses OFAC Processing through ID Verification, the payee name will be sent to ID Verification when a check is disbursed. If there is an OFAC match on the payee name, Portico will respond with Financial Transaction Complete - Possible OFAC Match. |
|
|
Enter the first line of the check recipient's address. Portico will print the information specified in this field on the check instead of the member's address from the Contact Information tab. You can type a second payee name in this field instead of the address. Length: 24 alphanumeric Keyword: A1 |
|
|
Enter the second line of the check recipient's address. Portico will print the information specified in this field on the check instead of the member's address from the Contact Information tab. If the Foreign check box is checked, the foreign city's name must reside in this field. Length: 24 alphanumeric Keyword: A2 |
|
|
Enter the third line of the check recipient's address. Portico will print the information specified in this field on the check instead of the member's address from the Contact Information tab. This field is required if the Foreign check box is checked. On a foreign address, only the first 18 characters are allowed. If the Foreign check box is checked, the maximum field length is 18 alphanumeric. If the Foreign check box is selected, the foreign country's name must reside in the Address Line 3 field. Enter the foreign country code in the Address Line 3 field. field. For Canada, enter the country name and province code in the Address Line 3 field. Length: 20 alphanumeric Keyword: A3 or N2 (The keywords A3 and N2 cannot be used together if you perform the transaction using speed input.) |
|
|
Enter the postal ZIP Code for the address listed. Portico will print the ZIP code specified in this field on the check instead of the member's ZIP code from the Contact Information tab. For domestic addresses, the ZIP code must be either 5 or 9 digits. For foreign addresses, the ZIP code can be up to 10 characters. If the Address is Foreign check box is not selected:
If the Address is Foreign check box is selected:
Length: 9 numeric (10 alphanumeric if the Address is Foreign check box is selected.) Keyword: ZP Reporting Analytics: MBR Zip Code Dash (Located in Member Information/Member Base subject and Month-end Information/Member Month-end/ME Member Base subject) |
|
|
Select this check box if the alternate address is foreign. If the Foreign check box is selected, the foreign city's name must reside in the Address 2 field. In the Address Line 3 field, enter the foreign country code. For Canada, enter the province code in the Address Line 3 field. Keyword: FF |
|
|
If a business name is entered in the Name field of the Check Payee group box, you can select the Business (do NOT parse name for OFAC) check box to pass the name to ID Verification as a single data element. If the check box is not selected, the system will attempt to parse (break apart) the name into first, middle and last name data elements. |
- Enter a description of the check in the Check Stub field (Length: 40 alphanumeric / Keyword: S1).
- Enter additional information about the check in the Memo Line field (Length: 40 alphanumeric / Keyword: ML). The memo line will print in the stub area next to the check stub line. For Laser Check users, the memo line can also be printed on the face of the check. Your check template must be updated to print the memo line on the face of the check.
- For cashier's checks, enter the name of the cashier's check purchaser in the Cashier's Check Purchaser field (Length: 32 alphanumeric / Keyword: PN). Click Copy Payee to copy the name n the Check Payee group box to the Cashier's Check Purchaser field.
- Click Submit to generate the check.
Click Close to close the dialog box without generating the check. When you click the Close button and the remaining check amount is greater than 0.00, a warning message will appear.
The Delete button allows you to delete a check in the Outstanding Checks grid; however, the financial transaction remains. You will still need to reverse the financial transaction to ensure that the general ledger will not be out of balance the next day. If you do not reverse the transaction, the check is still pending and needs to be printed. When the teller tries to balance and close, an amount will appear in the Teller Pending Check Disbursal Check Amount field on the Balancing and Close tab. The FinancialTxns - Check Writer - Delete - Button - Maintain security permission (included in the Member Services - User, Teller - Advanced, and Teller - Basic security groups) controls access to the Delete button. When a user's assigned security groups do not have the FinancialTxn - Check Writer - Delete - Button - Maintain security permission, the Delete button will not appear. Users without access to the Delete button will need to reverse a check transaction made in error. The check will be voided during the reversal process.
none | Check Register Report 900
To reverse the transaction on the same day, perform the Reversals - Same Day Reversals tab. If there is a problem with one of the checks but not the financial transaction, void the check and manually type a new one. You can use the Check Register tab to void the checks if the Check Register check box is selected in the Products section on the Credit Union Profile - Products & Services tab.

Portico Host: 878