Using the Assignments Queue
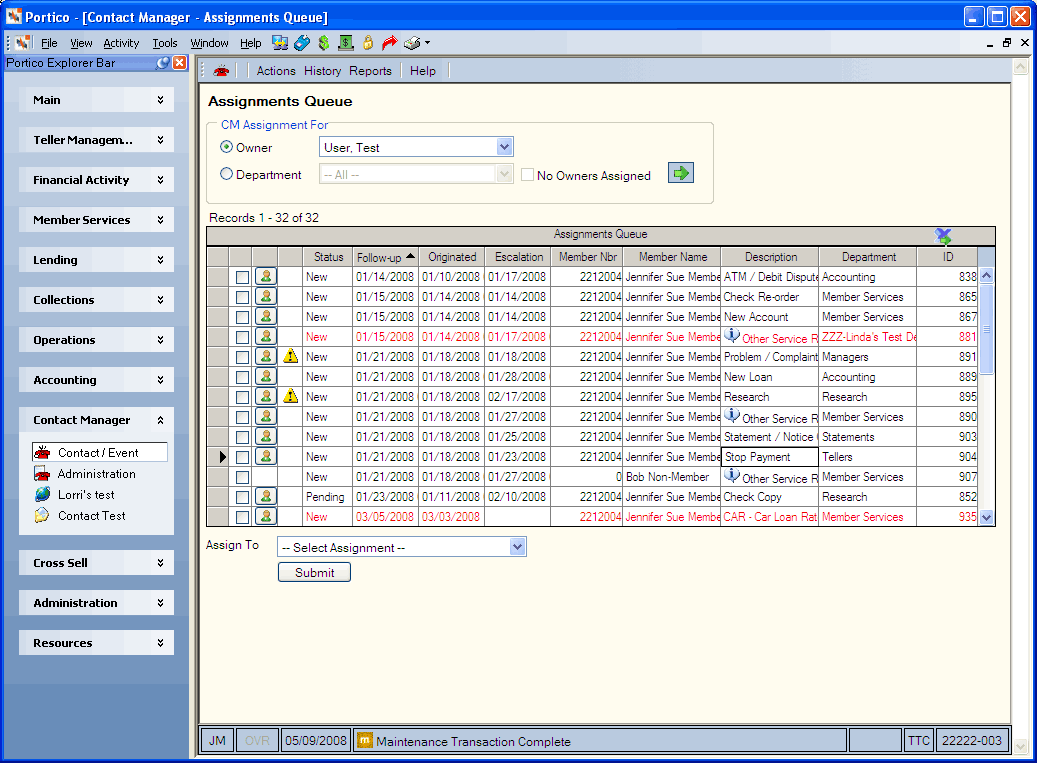
The Assignments Queue window lets you view the contact requests and events assigned to you or your department. To open the Assignments Queue window, under Contact Manager on the Portico Explorer Bar, select Contact/Event.

How do I? and Field Help
You can view the contact requests and events assigned to a specific owner or department, all owners, or all departments. You can also view the contact requests and events that you have not assigned to an owner or department. Select the green arrow to refresh the queue.
Select the Owner option and select a specific owner from the dropdown list to view the Assignments Queue for the specified owner. Select All to view all the contact records assigned to an owner. Select Unassigned to view the contact records that you have not assigned to any owner.
Select the Department option and select a credit union department from the dropdown list to view the Assignments Queue for the specified department. Select All to view all the contact records assigned to a department. Select Unassigned to view the contact records that you have not assigned to any department.
When viewing contact assignments by department on the Assignments Queue window, the system automatically selects the No Owners Assigned checkbox when you select a department from the Department dropdown list. When you select the green arrow, all the contacts that do not have assigned owners appear. Clear the No Owners Assigned checkbox and select the green arrow to view all the contacts in a department (with assigned and unassigned owners).
To access an assigned contact record or event, move your cursor over the contact record and select the underlined text.
You can assign multiple contact requests and events to a single owner on the Assignments Queue window. Select the checkboxes of the various contact requests and events, then select the Assign To down arrow to select a new owner. When you select Submit, the system assigns all the contact requests and events to that owner.
The Assignments Queue grid displays the contact requests assigned to you or your department. Select the left and right arrows to scroll through the list.
| Column Heading | Description |
|---|---|
| none/unlabeled | To assign multiple contact requests and events to a single owner, select the checkboxes of the various contact requests and events, then select the Assign To down arrow to select a new owner. When you select Submit, the system assigns all the contact requests and events to that owner. |
| none/unlabeled |
Select the member icon button to access the Contact Information dialog box. See the member’s contact information, specific contact record details, contact/event history, account information, ownership information, statements, and notes and messages.
|
| none/unlabeled | The sensitive icon appears if you select the Sensitive checkbox for the contact or event. |
| Status | The status of the contact or event. |
| Follow-up | The follow-up date of the contact or event. |
| Originated | The origination date of the contact or event. |
| Member Nbr | The member number associated with the contact or event. |
| Member Name | The member name associated with the contact or event. |
| Description | The description of the contact or event type. |
| Department | The department assigned to the contact or event. |
| ID | The unique computer-assigned number identifying the contact or event. |
