Remote Override
Remote Override lets a user send an override request to a remote user for approval without leaving their workstation or having someone personally review the transaction at their workstation. All the information needed to approve or deny the request, including a screen capture of the transaction, is sent to the remote user. The assigned users within an override group have the authority to remotely override a transaction for another user.
How do I? and Field Help
When Remote Override is activated and you click the teller override icon on the top menu bar, the User Override dialog box will appear. Complete the following steps to request a remote override.
- Click the teller override icon on the top menu bar. The User Override dialog box will appear. If you have set up and added a user to an override group and assigned the override group to the user, the users name will appear in the Override User drop-down list.
For “over-the-shoulder” overrides, supervisors can click the Override User down arrow to select their user name. Then, enter their password and click OK to override the transaction. If a user is assigned to a security group with the Override - User Can Override Self permission, you do not have to add the user to an override group and assign the override group to the user. The Override - User Can Override Self permission lets users override their own transactions.
The O/R AUTH field on the Teller Override Financial Activity Report 324 and Teller Critical Activity Report 326 reports the override user who authorized the override in Portico.
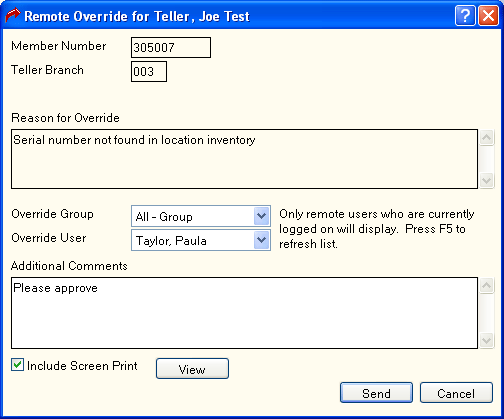
- Click Remote Override to display the Remote Override window. The member number associated with the override request, teller branch and the reason an override is required to complete the transaction appears in the Remote Override window.

- Click the Override Group down arrow to select the override group the teller is associated with.
- Click the Override User down arrow to select the override user.
- Enter additional information about the override request in the Additional Comments box.
- To include a screen print of the window, leave the Include Screen Print check box selected. Click View to view the screen print of the window.
- Then, click Send to send the remote override request.