Assigning the Teller Drawer
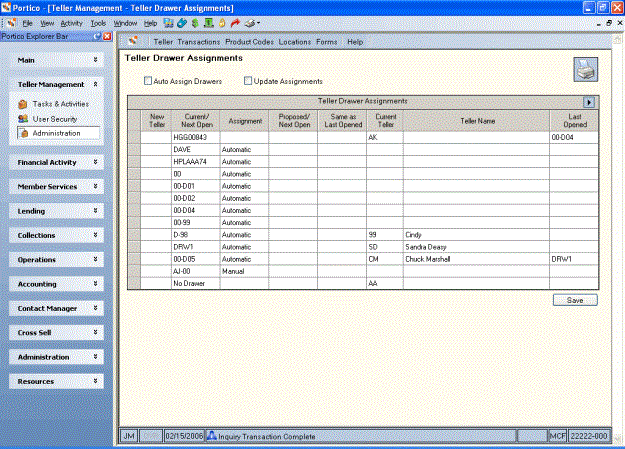
The Teller Drawer Assignments window lets you automatically or manually assign drawer locations to tellers. The drawer locations take effect when the teller opens using the Open tab. In order for a drawer to appear on the window, the Assignment Option field on the Location Information window must Y or M, and the Branch field on the Location Information window must be the same as the logged-into branch.
You must perform the Teller Drawer Assignments window when you are first implementing Teller Administration (before the teller opens), whenever the teller physically changes her drawer, or if you add a new teller. If tellers use the same cash drawer every day, complete the Teller Drawer Assignments window only when you want to change an existing drawer/teller ID assignment or implement a new assignment. The teller's location appears on the Open tab.
To access the Teller Drawer Assignments window, select Administration under Teller Management. On the Administration menu bar, select Teller, then select Teller Drawer Assignments.

How do I? and Field Help
All tellers displayed on the Tellers window will appear on the Teller Drawer Assignments window except for ATM $tellers. Unassigned tellers appear on the Teller Drawer Assignments window after the assigned tellers. Select the right and left arrows to scroll through the list.
| Column Heading | Description |
|---|---|
|
New Teller |
The teller ID to whom the cash drawer will be assigned. To manually assign the teller to a drawer, specify a teller ID in the New Teller column beside a drawer location. To change a teller to a "no drawer" status, specify two asterisks (**) in the New Teller column. For example, you would change the teller's status to "no drawer" while the teller is on vacation. Length: 2 alphanumeric |
|
Current/Next Open |
The current drawer location ID assigned to the teller. The message No Drawer appears in the Current/Next Open column if a teller ID is not assigned to the drawer. Teller IDs with a "no drawer" status will remain unassigned until you manually assign them to a drawer. |
|
Assignment |
Indicates if the drawer will be automatically assigned or manually assigned. If the drawer is a non-cash drawer that should always be assigned to the same teller, select the Assignment Option down arrow and select Drawer Displayed-Manual Assigned on the Location Information window to prevent Portico from reassigning the non-cash drawer(s). The Assignment column will specify Manual. |
|
Proposed/Next Open |
The drawer location ID that will be assigned to the teller the next time the teller opens using the Open tab if the Update Assignment check box is selected. |
|
Same as Last Opened |
Tellers manually assigned to the same drawer that they last opened will have Yes in the Same As Last Opened column. Multiple tellers assigned to the same drawer will be auto-assigned to the same new drawer. |
|
Current Teller |
The teller ID to whom the drawer is currently assigned. |
|
Teller Name |
The name of the teller to whom the drawer is currently assigned. |
|
Last Opened |
The last drawer assigned to the teller. |
Select the Update Assignments check box and select Save to update the drawer assignments. Manual or automatic drawer assignments must be completed prior to the update.
If you select the Auto Assign Drawers check box, Portico will automatically assign your tellers to a different cash drawer the next time the teller completes the Open tab. You can select this option when you want to rotate the drawers among your tellers for security purposes. Drawers not previously assigned to a teller will be auto-assigned first.
Select Save to save the drawer assignments.
Select the Print icon button to print the contents of the Teller Drawer Assignments grid.
none | none
Portico Host: ADD