Defining the CTR Threshold and Filing Options
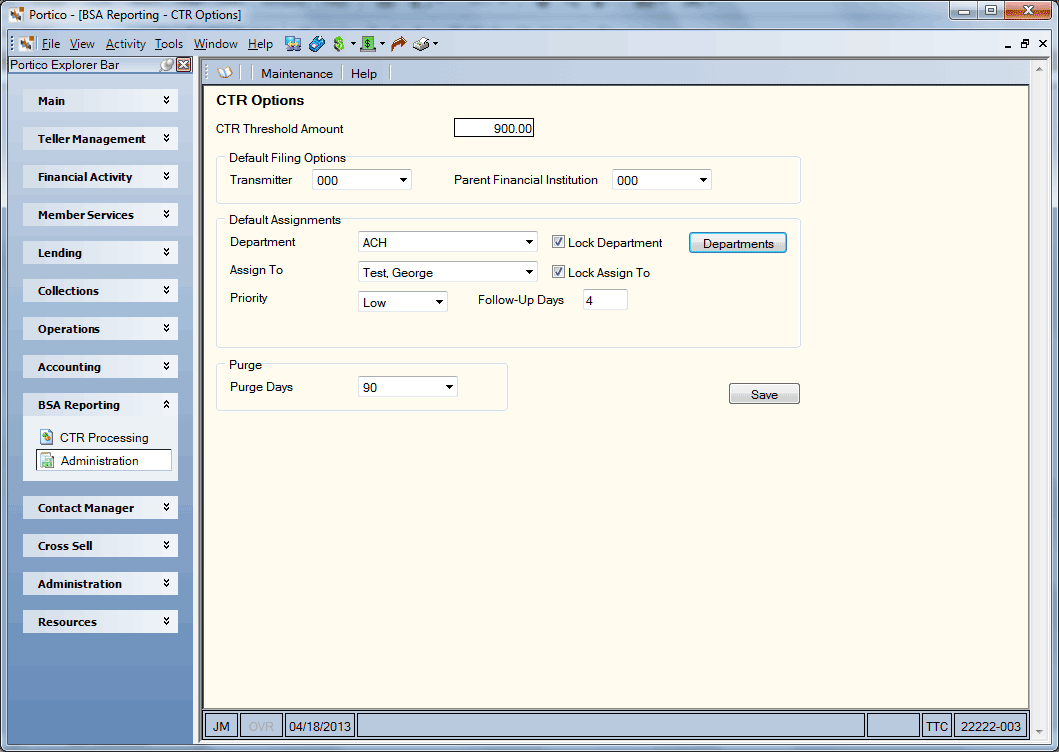
The CTR Options window lets you define the CTR threshold amount, establish default e-filing branch options and My Queue default assignments for the new CTR format. To access the CTR Options window, click Administration within the BSA Reporting menu on the Portico Explorer Bar. On the Administration menu, click Maintenance, then click CTR Options.

How do I? and Field Help
Complete the following steps to setup the CTR report options:
- In the CTR Threshold Amount field, specify an amount less than 10,000.00. Once an individual’s total cash in or cash out exceeds this amount for a single business day the CTR process will begin. The amount can be less than 10,000.00, but cannot be blank or greater than 10,000.00.
- From the Transmitter drop-down list, select the institution responsible for submitting the CTR batch. This will be the system default for the CTR- Create Batch window.
- Select the credit union and branch responsible for reporting the CTR from the Parent Financial Institution drop-down list. This will be the system default for the CTR- Create Batch window.
- Click Save to save your CTR report options.
Complete the following steps to define the default assignments for the CTR.
- Click the Department down arrow to select the default department that the CTR will be assigned to.
- Select the Lock Department check box to prevent users from changing the department.
- Click the Assign To down arrow to select the default individual assigned to the CTR. If the notification options are set up on the User Profile - My Queue tab, the individual selected in the Assign To field will be notified of CTRs on his/her My Queue window. To allow multiple users to receive CTR notifications on their My Queue window, leave the Assign To field blank, ensure that the individual users are members of the department selected in the Department field, and verify that the users are set up to receive notifications on the User Profile - My Queue tab.
- Select the Lock Assign To check box to prevent users from changing the assigned individual.
- Click the Priority down arrow to select the default priority.
- In the Follow-Up Days field, specify the default follow-up days. The number of days will be added to the origination date to calculate the date that appears in the Follow-up Date field.
Click Departments to add employees to a department on the Department - Update window.
Click the Purge Days down arrow to select the purge criteria for CTR reports. The valid values are: 45 Days, 90 Days (system default), 180 Days, and 365 Days.
The CTR purge process runs monthly after 12:00 AM Central Time on the last Saturday of the month. After 45 days, CTRs with a status of new, in progress, approved or pending eFile are changed to a canceled status with a canceled date of the current date and moved from the CTR Queue and My Queue to CTR History. Once a filed or canceled CTR reaches the purge days criteria defined on the CTR Options window, the CTR purges from the system and is no longer available in CTR History. Purged CTRs are reported on the Currency Transaction Reports Purge Report PNG961 found in the Reports Repository under Management Support in Nautilus Essentials.