Creating Notice Messages
You can customize many of the messages that appear on your member notices. On the Portico Explorer Bar, click Tools under the Administration menu. On the Tools menu bar, click Messages, point to Notices and click the type of notice. Click the message to edit the message.

Some notices contain system-generated message. These messages indicate the amount of fees assessed and appear above the message detail.
Messages can consist of alphanumeric characters. The system printer allows the following special characters:
|
@ At Sign ) Right Parenthesis |
; Semi colon |
The following lists the message details by report number:
| Report Number | Message Detail | Source Detail |
|---|---|---|
| 091 | C01, C02, D01 | 091 Report |
| 105 | M01, M02, M03, M04 | 100 Report |
| 106 | MXX | Certificate Profiles window |
| 175 | OAC | 170 Report |
| 176 | AOR | 173 Report |
| 271 | OEF, OSD | Credit Union Profile - Shares tab |
| 390 | S, J | 390 Report |
| 391 | S02, J | 391 Report |
| 440 | LC1, L01, L02, L03, LMB | 440 Report |
| 441 | KC1, K01, K02, K03 KMB |
440 Report 450 Report |
| 453 | ASF | 450 Report |
| 455 | O01 | Loan Profiles window |
| 456 | ASR | 450 Report |
| 461 | KXX, QXX | 461 Report |
| 464 | NXX | 464 Report |
| 466 | V01-V07 | 466 Report |
| 469 | R01, RIN, RXX, QXX, UXX | 469 Report |
| 510 | A01, A02 | 510 Report |
| 520 | P | 520 Report |
| 610 | Z | 610 Report |
| 646 | R02 | 646 Report |
| 648 | R03 | 648 Report |
| 650 | N01 | 650 Report |
| ATM Teller Location | T$X | None |
| CU Fee Message | F | None |
| System Fee Message | E | None |
| GL History Message | G, H | Basic Journal Voucher window |
| Marketing Message | B | None |
How do I? and Field Help
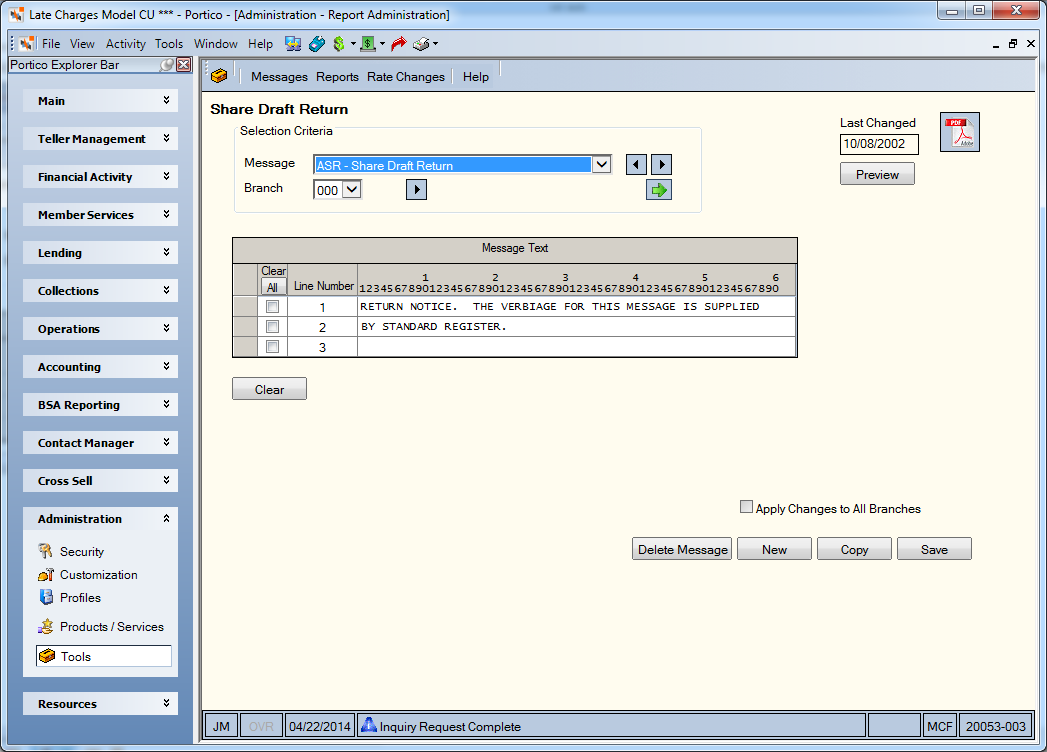
To create a customized notice message, enter the message in the Message Text grid.
| Column Heading | Description |
|---|---|
| Clear | Select the Clear check box to clear the text line. Click the All button to select all the check boxes. Click the All button again to clear all the check boxes. |
| Line Number | The line number of the text. |
| 1-6 | The character number of the text |
Select the Apply Changes to All Branches check box to change the message in all the credit union branches.
Click Save to save the message. The Last Changed field indicates the date the message was last changed.
Click Clear to clear the Message Text grid. Click Delete Message to delete the message.
Click New to create a new message. Click Copy to copy the message text to another branch.
To select another message, click the Message down arrow to select the message.
Click the Branch down arrow to select a different branch. Then, click the green arrow.
Click the PDF icon to view the report documentation.
To access the menus and windows, users must be assigned to the Portico - Tools - Messages security group or you can add these permissions to a credit union-defined security group using the Security Group Permissions – Update window.
- Portico - Messages - Menu Option
- Portico - Messages - Notices - Menu Option
- Portico - Messages - Notices - User Can View Notices
- Portico - Messages - Notices - User Can Maintain Notices
- Portico - Messages - Notices - User Can Delete Notices
If a notice is setup for Laser Notices or Electronic Notices, and you belong to a security group with the Print - Print - Laser/Electronic Notices - View Only security permission, a Preview button will appear on the Notice Messages window. Click the Preview button to preview the message.
The Print - Print - Laser/Electronic Notices - View Only security permission is included in the following security groups: Portico – Customization – Administrator, Portico – Customization – View Only, Print – Administrator, and Portico – All Functions – View Only.
Portico Host: 910