Defining Security Restrictions
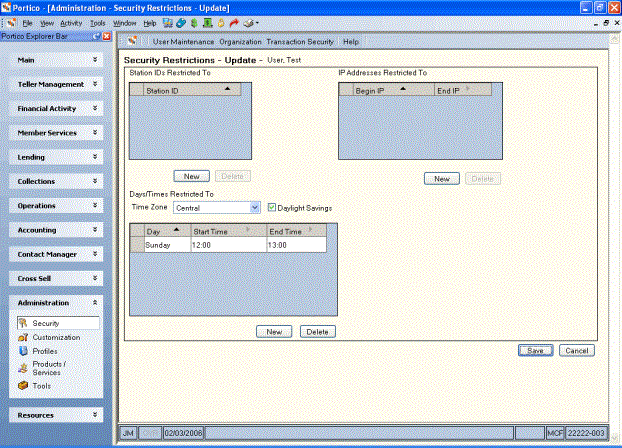
The Security Restrictions window lets you define user restrictions by station ID, IP address, and day and time. To open the Security Restrictions window, under Administration on the Portico Explorer Bar, select Security. On the Security top menu bar, select User Maintenance, then select Users. The Users - List window appears. On the Users List window, select the user, then select the restrictions icon button. The Security Restrictions window appears.

How do I? and Field Help
Complete the following information to set up the security restrictions for a user.
The Station IDs Restricted To box lists the current station IDs the user can access.
- Select New to open the Station ID - New window and add a new station ID restriction. On the Station ID - New window, enter the station ID in the Station ID field and select Save.
- Select the station ID to open the Station ID - Update window and modify the station ID restriction. On the Station ID - Update window, modify the station ID and select Save.
- To delete a station ID from the list, select a station ID and select Delete.
The IP Addresses Restricted To box lists the current IP addresses the user can access.
- Select New to open the IP Access - New window and add a new IP address or range of IP addresses.
- Select the IP address to open the IP Access - Update window and modify the IP address.
- To add a single IP address on the IP Access - New/Update window , enter the IP address in the IP Address (Single or Beginning IP Address) field and select Save.
- To add a range of IP addresses on the IP Access - New/Update window, enter the beginning IP address in the IP Address (Single or Beginning IP Address) field and the ending IP address in the End IP Address field. Then, select Save.
- To delete an IP address from the list, select an IP address and select Delete.
The Day/Times Restricted To box lists the days and times the user can access Portico.
- Select the Time Zone down arrow to select the user's time zone.
- Select the Daylight Savings check box if the user resides in an area that practices Daylight Savings.
- Select New to open the Day/Time Access - New window and add a new day and time.
- Select the day and time to open the Day/Time Access - Update window and modify the day and time.
- On the Day/Time Access - New/Update window, select the Day down-arrow and select a day of the week. Using a 24-hour clock in HH:MM:SS format, enter a start time in the Start Time field and an end time in the End Time field. Then, select Save.
- To delete a day and time from the list, select a day and time and select Delete.
Select any of the column headings with an arrow to sort the grid in ascending or descending order by the column headin The column heading with the bold arrow indicates the column the grid is currently sorted by. by.
Select Save to save the security restrictions and close the window. Select Cancel to close the window without saving the security restrictions.