Printing Electronic and Laser Notices
The Laser/Electronic Notices window lets you view which electronic and/or laser notices were created during the back-office cycle. You can choose to print select back-office notices on your credit union laser printer. You can even reprint a single notice for a member.
Laser notices are designed to print on credit union letterhead or standard 8-1/2 x 11 stock paper. You can add a logo by branch (if the report can be scheduled at the branch level and the notices are printed on different printers for different branches). You can also add a credit union-defined marketing message and a credit union-defined notice message to your notices using the Notice Messages window. Notices support both upper and lower case letters and Portico’s secure member number option. The name and address is formatted to fit in a standard #10 window envelope allowing you to use the same envelope type for mailing all laser notices.
To access the Laser Notices window, on the Portico Explorer Bar, click Tools under the Administration menu. On the Tools menu bar, click Reports, and click Laser/Electronic Notices.

How do I? and Field Help
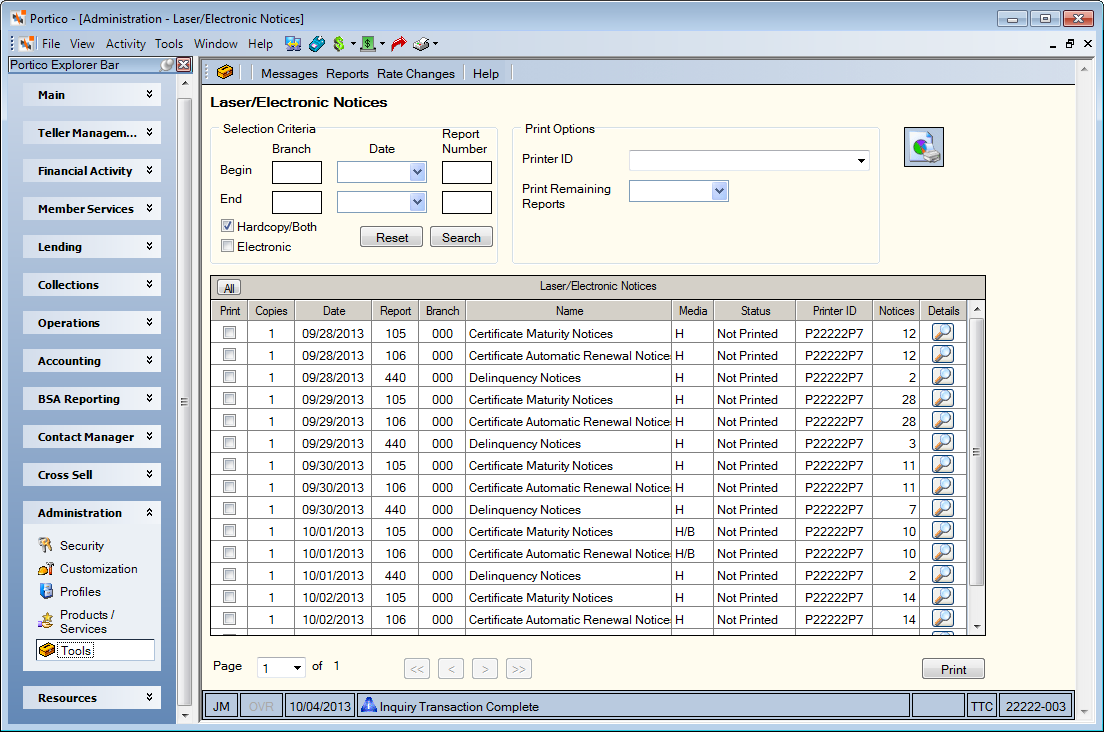
On the Laser/Electronic Notices window, click Search to display all the notices available. You can refine your search by defining a branch, date, and/or report range in the Selection Criteria group box.
- To search for notices in a specific branch or in a range of branches, enter the beginning branch number in the Begin Branch field. Then, enter the ending branch number in the range in the End Branch field.
- To search for notices for a date or in a date range, click the Begin Date down arrow to select the beginning date from the pop-up calendar or enter the date in MM/DD/YYYY format. Then, click the End Date down arrow to select the ending date from the pop-up calendar or enter the date in MM/DD/YYYY format.
- To search for a specific notice or a range of notices, enter the beginning report number associated with the notice in the Begin Report Number field. Then, enter the ending report number associated with the notice in the End Report Number field.
- To search for hardcopy notices or hardcopy and electronic notices, select the Hardcopy/Both check box.
- To search for electronic notices, select the Electronic check box.
Click Search to display the list of notices. Click Reset to clear the Selection Criteria group box.
The Laser/Electronic Notices grid displays the electronic and/or laser notices that were created during the back-office cycle.
| Column Heading | Description |
|---|---|
|
Select the Print check box next to the notices you wish to print. Click the All button on the grid column header to select all the notices. |
|
|
Copies |
The number of copies if the value being displayed is not the quantity that should be printed. |
|
Date |
The date the notices were generated. |
|
Report |
The report number associated with the notice. |
|
Branch |
The branch where the notices were generated. |
|
Name |
The report name associated with the notice. |
|
Media |
The Media column indicates if notices were produced in hardcopy and/or electronic format. The valid values are: H/B – Hardcopy or Both. Hardcopy notices and/or both hardcopy and electronic notices were generated for the specific notice if the member was enrolled for both hardcopies and Electronic Notices. E – Electronic. Only electronic notices were generated for the specific notice if the member was enrolled for Electronic Notices. |
|
Status |
Indicates if hardcopy notices have been printed, not printed or partially printed. The Media column must be H/B. If the Media column is E, notices will not automatically print. You can print electronic notices by clicking the Print button. |
|
Printer ID |
The printer ID where the notices will be printed. |
|
Notices |
The number of electronic notices generated for the notice. If the Media column is H/B, the Notices column indicates the number of hardcopy notices generated for the notice. If the member is enrolled for both hardcopies and Electronic Notices, the member’s hardcopy and electronic notice would be counted once. If the Media column is E, the Notices column indicates the number of electronic notices generated for the notice. |
|
Details |
Click the icon button in the Details column to display the Laser/Electronic Notice Details View dialog box. You can view and/or select individual notices to print that were generated during a specific back-office cycle. |
If multiple pages of notices appear, select a page from the Page drop-down list to view the desired page. Click the left and right arrows to scroll through the list.
You can view and/or select individual notices to print that were generated during a specific back-office cycle. To print a notice, complete the following steps:
- In the Print Options group box, enter the printer ID in the Printer ID field.
- Select the Print check box next to the notices you wish to print.
- In the Copies field, enter the number of copies if the value being displayed is not the quantity that should be printed.
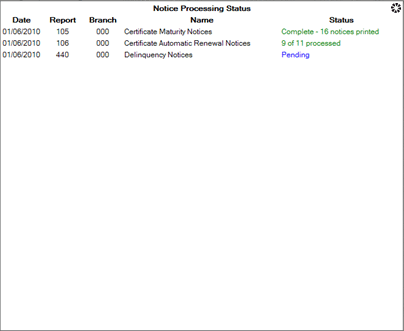
- Then, click Print. The Notice Processing Status message appears. If notices are printing but not complete, the Status column displays the number of notices completed out of the total number of notices. If the notices have not started printing, the Status column displays Pending. When notices have completed printing, the Status column displays Complete followed by the number of notices printed. After all the selected notices have printed, the Laser/Electronic Notices window reappears.

To print all notices for a specific date where the Status field is either Not Printed or Partially Printed, click the Print Remaining Reports down arrow to select a notice date from the pop-up calendar or enter the date in MM/DD/YYYY format and print the remaining notices for that date. Select the Print check box on the grid column header to print all the notices.
Click the View Automated Short Report Print Schedule icon button to display the Automated Short Report Print Schedule window.