Setting Up Local Laser Printer Options
|
|
|
|
|
The Printer Configuration dialog box lets you maintain the local printer options for laser checks, notices, receipts, and envelopes.
- On the menu bar, select Tools.
- Navigate to Profiles > Print Profile > Printers. The Print Profile dialog box appears.
- The Defined tab lets set-up the list of available printers. Select the magnifying glass icon in the Configure column to display the Printer Configuration dialog box.

How do I? and Field Help
On the Laser Documents - General Settings tab, select your receipt layout, check stock and source trays, check stub layout, and envelope options.
In the Receipts group box, select the receipt layout from the Layout dropdown list. The valid values are Narrow or Wide.
In the Checks group box, indicate the check stock information and the stub layout.
Select the stub layout from the Stub Layout dropdown list. The valid values are Narrow or Wide.
In the Laser Envelopes Option group box, if the selected printer has a separate envelope tray, the Envelope Tray field may need to indicate that specific tray number. If not, leave this field blank. Initially, select a standard #10 envelope from the Paper Size dropdown list. If the name and address do not print in an acceptable location on the envelope, adjust the Top Filler – Blank Lines field and/or Left Side Filler – Spaces field. The Top Filler – Blank Lines field defaults to 10 lines from the top of the envelope based on where the envelope margin is located. The Left Side Filler – Spaces field defaults to 90, which indicates the location from the left side of the envelope in which to begin printing. If the name and address is not positioned correctly, increase the number of spaces in the Left Side Filler – Spaces field. An increase of 30 (changing from 90 to 120) will move the name and address approximately 1 ¼ inches to the right.
On the Laser Documents - Laser Check Settings tab, enter your credit union information, pay-through information, and select the desired logos that should appear on the checks.

| Field | Description |
|---|---|
|
The name of the credit union that should appear on the check. If a logo is printed on the check, then in most cases the credit union name is not entered. Length: 50 alphanumeric |
|
|
The credit union address that should appear on the check. Length: 50 alphanumeric per line |
|
|
The credit union account number at the pay through bank. |
|
|
The credit union MICR routing number. |
|
|
The credit union fractional route number, if applicable. |
|
|
The number of days the check is valid. After the specified number of days, the check is void. |
|
|
The dollar amount required to print the second signature line. Only one signature line prints for a check amount less than the specified amount. |
|
|
The name of the pay through bank that should appear on the check. Length: 50 alphanumeric |
|
|
The pay through a bank address that should appear on the check. Length: 50 alphanumeric per line |
|
|
Additional messages that should appear on the check. Length: 50 alphanumeric per line |
To add a credit union logo, select the Find Logo button to select the credit union logo that should appear on the check. Select the Delete Logo button to remove the logo from the check.
To add the NCUA logo, select the Find Logo button to select the NCUA logo that should appear on the check. Select the Delete Logo button to remove the logo from the check.
On the Laser Documents - Temporary Checks tabs, you can define the credit union name, address, and logo you wanted printed on the member’s temporary checks.

| Field | Description |
|---|---|
|
The name of the credit union that should appear on the check. If a logo is printed on the check, then in most cases the credit union name is not entered. Length: 50 alphanumeric |
|
|
The credit union address that should appear on the check. Length: 50 alphanumeric per line |
|
|
The credit union MICR routing number. |
|
|
The credit union fractional route number, if applicable. |
Select the Find Logo button to select the credit union logo that should appear on the check. Select the Delete Logo button to remove the logo from the check.
On the Printer Configuration - Custom Templates tab, you can select the custom templates to be used with each document type.

Select the down arrow in the Credit Union Template column to select a template. Select the Clear button to clear the template selections.
| Column Heading | Description |
|---|---|
| Document Type | The type of laser document. |
| Credit Union Template | The name of the template, |
Select OK to save your changes and close the dialog box. Select Cancel to cancel your changes and close the dialog box.
In the Print Profile dialog box, select the icon button in the Configure column for the Receipt printer to display the Printer Configuration dialog box.
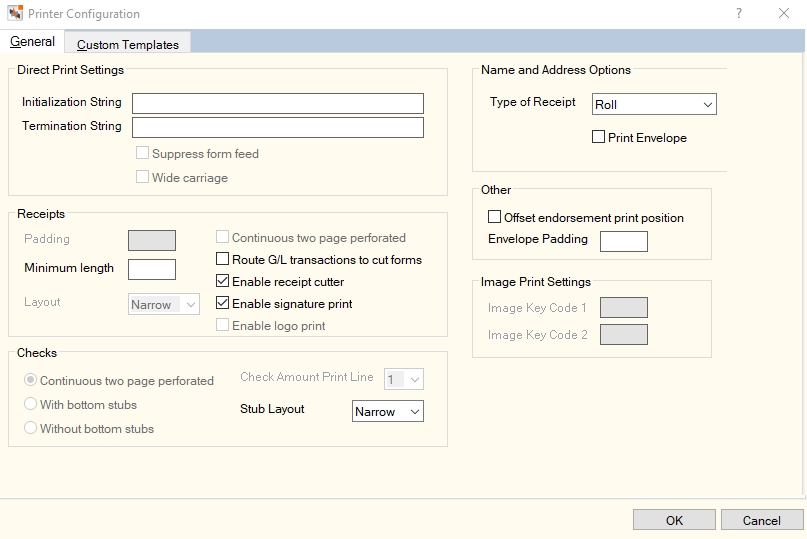
In the Direct Print Settings group box, enter the Initialization String and Termination String. In the Receipts group box, enter the Minimum Length. Select the Route G/L transactions to cut forms checkbox.
In the Checks group box, select the Stub Layout from the Layout dropdown list. The valid values are Narrow or Wide. In the Name and Address Options group box, select the Type of Receipt from the dropdown list. The valid values are Roll or Cut.
In the Other group box, select the Offset endorsement print position checkbox, and enter the Envelope padding.
Select OK to save your changes and close the dialog box. Select Cancel to cancel your changes and close the dialog box.