Viewing Contact History
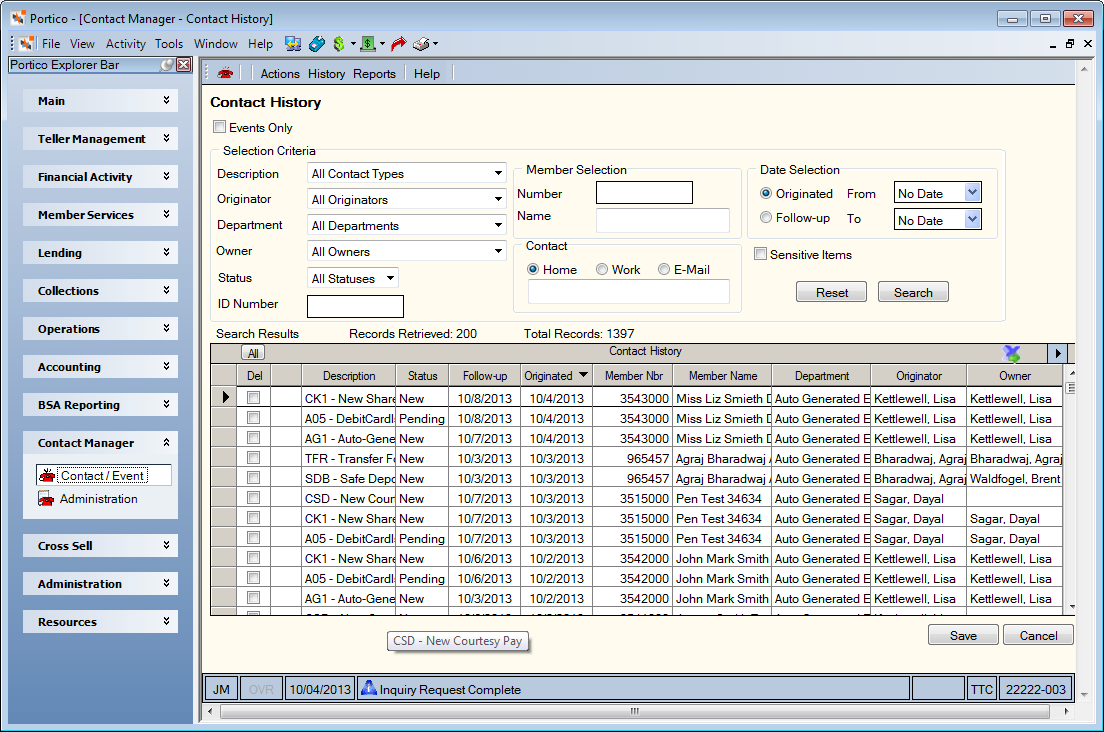
The Contact History window lets you review past contact records and events entered in Contact Manager and Event Tracking. To open the Contact History window, under Contact Manager on the Portico Explorer Bar, select Contact/Event. On the Contact/Event top menu bar, select History, then select Contact History. The Contact History window appears.

How do I? and Field Help
To view all the contact and history available, select Search. Select the Events Only checkbox to only view the events.
When you select a specific contact from the Description dropdown list, an additional export icon appears to the right of the Search button. Use this icon to export additional information to Microsoft Excel.
To refine your search, complete any of the following fields in the Selection Criteria group box and select Search.
- Select the Description down arrow to select the type of contact record or select Event.
- Select the Originator down arrow to select the individual who created the contact record or event.
- Select the Department down arrow to select the department associated with the contact record or event.
- Select the Owner down arrow to select the owner of the contact record or event.
- Select the Status down arrow to select the contact or event status.
- In the ID Number field, enter the ID number assigned to the contact record or event (Length: 9 numeric).
- In the Member Selection group box, enter the account number associated with the member in the Number field (Length: 12 numeric).
- In the Name field, enter the name of the member associated with the contact record or event (Length: 25 alphanumeric).
- In the Contact group box...
- Select the Home option, and then enter a home phone number in the field.
- Select the Work option, and then enter a business phone number in the field.
- Select the E-Mail option, and then enter an e-mail address in the field.
- In the Date Selection group box:
- Select the Originated option to enter a date range based on the origination date. Then, select the From down arrow to select a beginning date from the calendar or enter the date in MM/DD/YYYY format. Select the To down arrow to select an ending date from the calendar or enter the date in MM/DD/YYYY format.
- Select the Follow-up option to enter a date range based on the follow-up date. Then, select the From down arrow to select a beginning date from the calendar or enter the date in MM/DD/YYYY format. Select the To down arrow to select an ending date from the calendar or enter the date in MM/DD/YYYY format.
- Select the Sensitive Items checkbox to view contact records or events marked as Sensitive.
Select Search to search for the results. Select Reset to clear the Selection Criteria fields.
The Search Results grid displays the contact or event description, status, follow-up date, originated date, member number, member name, department, originator, and owner. Select any of the column headings with an arrow to sort the grid in ascending or descending order by the column heading. The column heading with the bold arrow indicates the column the grid is currently sorted by. Select the export icon to export items in the grid to Microsoft Excel.
| Column Heading | Description |
|---|---|
| Delete |
You can delete contact requests and events from the Contact History window if you are a member of the Contact Manager – Administrator security group or your security group contains the Contact Manager – User can delete Contact/Event permission. To delete an item, select the Del checkbox, then select Save. You can select one, several, or up to 200 records on the Contact History window. Select the All button in the header row to select all the records or select individual Delete checkboxes. Then select Save to delete the records. When completing a mass delete and there are more than 200 records, a More button appears at the top of the grid. Select the More button until the button disappears. Then, select the All button in the header row. Select Save and Portico delete 200 records at a time. When the confirmation message appears, select OK. The system adjusts the amount of Records Retrieved and Total Records when you select Save. To select all the Del checkboxes, users must belong to a security group containing the ContactManager-User Can Mass Delete security permission. |
| Unlabeled | The sensitive icon appears if you select the Sensitive checkbox for the contact or event. |
| Description | The description of the contact or event type. For an Other Service Request
contact record, move your point to the |
| Status | The status of the contact or event. |
| Follow-up | The follow-up date of the contact or event. |
| Originated | The origination date of the contact or event. |
| Member Nbr | The member number associated with the contact or event. |
| Member Name | The member name associated with the contact or event. |
| Department | The department assigned to the contact or event. |
| Originator | The individual who created the contact record or event. |
| Owner | The owner of the contact record or event. |