Setting Up IPS Integration
To set up and use the IPS Sendero Integration, you must first assign the Integrated Services - Import File Processing security group to one or more of your Portico users.
- On the Portico Explorer Bar, select Administration > Security > User Maintenance > Users.
- On the Users - List window, select the personnel that use the functionality. Then, select the Security Groups button.
- On the Security Groups window, select the desired security groups from the "Not a member of these user groups" list box. Then, select the left arrow.
- Select Save.
- Inform the users to log off and log back into Portico to view the new settings.
The Integrated Services - Import File Processing security group contains the following permissions:
- TxnProcessor - User Can Access Multiple Command Line Processor
- TxnProcessor - Profile - User Profile - Import Files
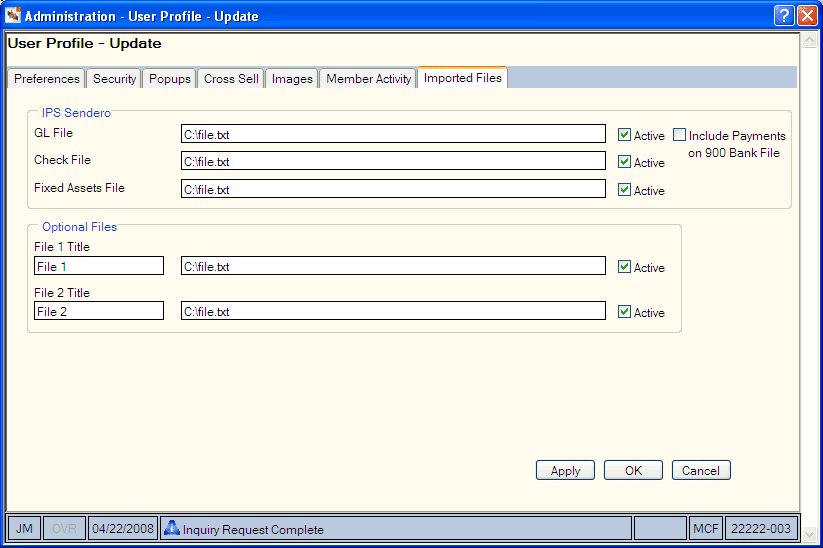
The Imported Files tab in the User Profile - Update dialog box lets you define the extract file location and icons that will appear on the Command Line – Multiple tab. The Optional Files group box lets you set up any type of custom or third-party reoccurring file that you need to process using the new formatted batch transaction process.

| IPS Sendero: GL File |
In the GL File field, enter the file used to upload Accounts Payable transactions from IPS Sendero.
Select the Active check box to display the IPS Accounts Payable Upload icon on the Multiple tab.
Select the Include Payments on 900 Bank File check box to specify if the keyword BF needs to be added to the file to include check disbursals on the 900 Report bank transmission file.
|
| IPS Sendero: Check File |
In the Check File field, enter the file used to upload voided check transactions (Check Register window).
Select the Active check box to display the IPS Check Extract Upload icon on the Multiple tab.
|
| IPS Sendero: Fixed Assets File |
In the Fixed Assets File field, enter the file used to upload Fixed Assets transactions from IPS Sendero.
Select the Active check box to display the IPS Fixed Assets Upload icon on the Multiple tab.
|
| Optional Files: File 1 |
In the File 1 Title field, enter the description of the optional file path that will appear as the tool tip for the Miscellaneous File Upload 1 icon on the Multiple tab. Then, enter the file used to upload the optional batch transactions.
Select the Active check box to display the Miscellaneous File Upload 1 icon on the Multiple tab.
|
| Optional Files: File 2 |
In the File 2 Title field, enter the description of the optional file path that will appear as the tool tip for the Miscellaneous File Upload 2 icon on the Multiple tab. Then, enter the file used to upload the optional batch transactions.
Select the Active check box to display the Miscellaneous File Upload 2 icon on the Multiple tab.
|
Files must have a .txt or .fil extension.
