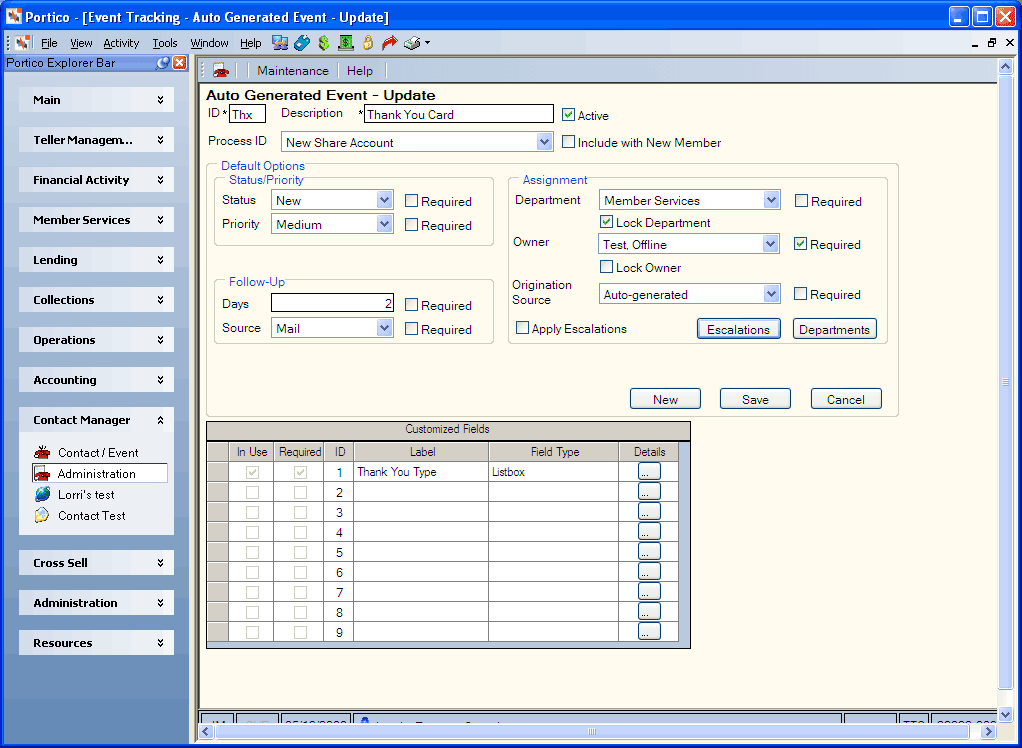
Adding Auto-Generated Events
You can also have Portico automatically create events based on a Portico process. The system generates events based on a process ID specified in the Process ID dropdown list.
To open the Auto-Generated Event - Update window, under Contact Manager on the Portico Explorer Bar, select Administration. On the Administration top menu bar, select Maintenance, then select Event Type. The Event Type - List window appears.
- Select an existing event to open the Event - Update window and modify the default values.
- To add a new autogenerated event, select New Auto-Generated.

Complete the following steps to set up an event using the Event - Update window:
- In the ID field, enter a three character ID for the event.
- Enter a description of the event in the Description field.
- Select the Active checkbox to activate the event.
- Select the Process ID down arrow to select the Portico process that generates the event in the user's Assignments Queue. The Portico process IDs available for autogenerated events are:
New Member Account
New Business Account
New Share Account
New IRA Share Account
New Club Account
New Holiday Share Account
New Draft Account
New Money Market Account
Overdraft Protection
Courtesy Pay
New Certificate
New IRA Certificate
Setup Payroll Deductions and Distributions New Transfer Setup
New/Inquiry ATM Account
Order ATM Card
New/Inquiry Debit Card Account
Order Debit Card
New/Inquiry Online Banking Account
New/Inquiry Bill Pay Account
New/Inquiry Self Service/Audio Account
New Relationship Pricing Plan Setup
New Escrow Share Account
New Account Analysis Setup
Safe Deposit Box Setup
The following process IDs are available for E-Mail Messaging:
Dormant Member
Member's Birthday
Member's Credit Union Anniversary Date
Member's Special Birthday
New Member Follow-up
New Member Welcome
Number of Loan Payments remaining
Past Due Loan
- Select the Include with New Member checkbox to generate an event for the specified process, in addition to the new member event automatically generated when a new member joins the credit union. Leave the checkbox blank to generate the new member event only.
- If the Process ID field is New/Inquiry Bill Pay Account, select the Include with Home Banking checkbox to generate an event when a member signs up for Bill Pay, in addition to the new Home Banking event automatically generated when a member signs up for Home Banking. Leave the checkbox blank to generate the Home Banking event only.
- In the Status/Priority group box, select the Status down arrow to select the default status. Select the Required checkbox to make this a required field.
- Select the Priority down arrow to select the default priority. Select the Required checkbox to make this a required field.
- If the default priority is Low and required, users can change the event priority to Low, Medium, or High.
- If the default priority is Medium and required, users can only change the event priority to Medium or High.
- If the default priority is High and required, users cannot change the event to a lower priority.
- If you set the default priority to Low, Medium, or High and not required, you can change the event priority to blank, Low, Medium, or High.
- If you set the default priority to blank and required, you must change the event priority to Low, Medium, or High.
- In the Follow-Up group box, specify the default follow-up days in the Days field. The number of days will be added to the origination date to calculate the date that appears in the Follow-up Date field. Select the Required checkbox to make this a required field.
- Select the Source down arrow to indicate the default follow-up source for the event. Select the Required checkbox to make this a required field.
- In the Assignment group box, select the Department down arrow to select the assigned default department for the event type. Portico filters the Owner dropdown list to only display the owners assigned to that department. Select the Required checkbox to make this a required field.
- Select the Lock Department checkbox to prevent users from changing the department.
- Select the Owner down arrow to select the default owner of the event type. Select the Required checkbox to make this a required field.
- Select the Lock Owner checkbox to prevent users from changing the owner.
- Select the Origination Source is the required checkbox to make the Origination Source field on the event windows a required field.
- In the Non-Member Required Data group box, select the checkboxes of the fields you want to make required.
- You can add up to 15 customized fields to an event. In the Customized Fields grid, select the button in the Details column to display the Customized Field dialog box. If customized fields 10-15 are added to an event, a vertical scroll bar appears on the Detail group box. Scroll down to view and complete the fields.
- On the Event - Update window, select Save to save the event type.
Select Departments to add employees to a department on the Department - Update window.