Setting Up Your User Profile
The User Profile dialog box lets you select your user preferences, including your default member lookup option, notification pop-ups, receipt options, and password reset. Select the tabs at the top of the User Profile dialog box to navigate through the different setup options.
To access the User Profile dialog box....
- Select Tools, and then select Profiles. Then select .
- Under Administration on the Portico Explorer Bar, select . On the Security top menu bar, select , and then select . On the Users - List window, select the user and select the profile icon button.
The User Profile dialog box appears with the Preferences tab on top.
How do I? and Field Help
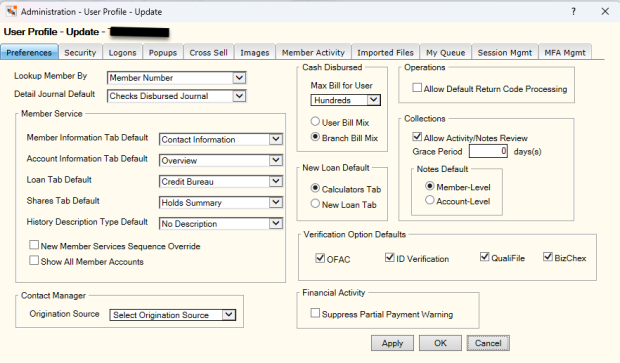
On the Preferences tab, you can select your member lookup preferences, the default tabs, and override the New Members & Services sequence.
| Lookup Member By |
Select
the Lookup Member By down
arrow to select the member lookup preference: ATM ID, Audio ID, Base
Number, Credit Card Number, Debit ID, Draft ID, Member Number, Phone Number, Secondary
ID, Short Name, Social Security Number, or VIN. |
| Detail Journal Default |
Select
the Detail Journal Default
down arrow to select which journal appears first when you select
Detail Journals on the Transaction Journal tab. |
| Member Information Tab Default |
Select
the Member Information Tab Default
down arrow to select which tab appears first when you select in the Member Services menu on the Portico Explorer Bar. |
| Account Information Tab Default |
Select
the Account Information Tab Default
down arrow to select which tab appears first when you select in the Member Services menu on the Portico Explorer Bar. |
| Loan Tab Default |
Select
the Loan Tab Default down
arrow to select the default Account
Information - Loans tab. |
| Shares Tab Default |
Select
the Shares Tab Default down
arrow to select the default Account
Information - Shares tab. |
| History Description Type Default |
Select
the History Description Type Default
down arrow to select the default description level for the History
tab. |
| New Member Services Sequence
Override |
Select
the New Member Services Sequence Override checkbox to modify the sequence of products and services. |
| Show All Member Accounts |
Select
the Show All Member Accounts
checkbox to show all closed share accounts, surrendered certificates,
and paid off loans on the Account Listing grid. |
| Contact Manager Origination Source |
Select
the Origination Source down
arrow to select the default source that will appear in the Origination Source field on the contact records. |
| Cash Disbursed: Max Bill for User |
Select the Max Bill for User
down arrow to select the maximum bill the user can dispense. |
| Cash Disbursed: User Bill Mix or Branch Bill Mix |
Select the User Bill Mix option
or Branch Bill Mix option
to select whether the bill mix will be calculated from the branch
level file set up in Administration
or the user level file. |
| New Loan Default |
Select the Calculators Tab option to display the
Calculators tab first when
you select in the
Lending menu on the Portico Explorer Bar. Select the
New Loan Tab option to display
the New Loan tab first when
you select in the
Lending menu on the Portico Explorer Bar. |
| Verification Option Defaults |
Select the OFAC checkbox, ID Verification checkbox, Qualifile checkbox, or
BizChex checkbox to automatically
select these checkboxes on the Verification
Processing dialog box. These selections override the credit
union-level defaults. |
| Financial Activity Suppress Partial Payment Warning |
The Suppress Partial Payment Warning checkbox will default to unchecked and will result in a warning message when a partial payment is processed on the Transactions – Deposits, Withdrawals, Payments, Transfers tab, Transactions – Money Orders tab, and the Transactions – Bond Redemption tab. To remove the warning message, select the Suppress Partial Payment Warning checkbox. |
| Operations Allow Default Return Code
Processing |
Select the Allow Default Return Code Processing checkbox to automatically select the Use Default Return Code Processing checkbox on the ACH
Exception Items window and Share
Draft Exception Items window. |
| Collections: Allow Activity/Notes Review |
In the Collections group box, select the Allow Activity/Notes Review checkbox to alert collection officers if a note has not been added within a specified number of days. Enter the number of days up to 999 in the Grace Period field. The number of days specified in the Grace Period field is a ‘less than or equal to’ value. For example, if the Grace Period field is 30 and the last note was entered on July 1, the red X will appear on the Tickler File tab on July 31 if the activity listed below occurs and a note is not added. If the Review Activity/Notes checkbox is selected on the Tickler File tab and the Grace Period field is 000 or if a note has not been added within the days specified and any of the following activities occur on the Collection Detail tabs, a red X will appear next to the account on the Tickler File tab: - A comment is added in the Officer Comments field, but a note was not added.
- The date was changed in the Officer Tickler Date field, but a note was not added.
- The Rank field was changed, but a note was not added.
- A promise was added, but a note was not added.
If you do not select the Allow Activity/Notes Review checkbox on the User Profile – Preferences tab, the Review Activity/Notes checkbox will not display on the Tickler File tab and the indicators (red X or green check mark) will only appear on the day the activity occurs and only on the share or loan in which a note was added.
|
| Collections: Notes Default |
Indicate whether the Collection Detail – Notes tab appears with the Account-Level Notes option selected or the Member-Level Notes option selected. The default option selected at the user level will override the option defined at the credit union level. |
On the Security tab, you can set up the default teller settings for Portico. You can specify your default branch and teller number and select the auto logon option. You can also view your parameters. If you have the Portico - Profile - User Profile – Maintain security permission, you can enter a user-level parameter on the User Profile – Security tab.
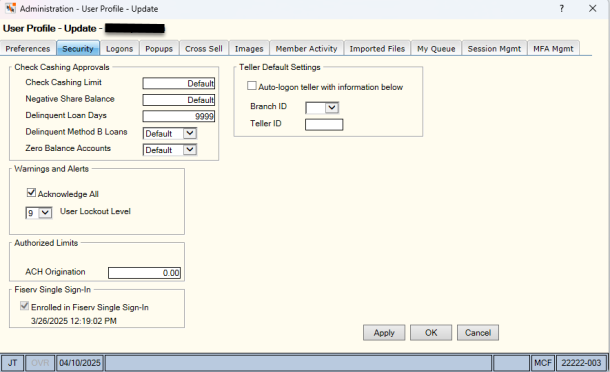
| Check Cashing Approvals: Check Cashing Limit |
In the Check Cashing Limit field, enter the maximum check cashing amount that the user can approve. A value of 0.00 indicates all check cashing transactions require an approval. A value of 999,999,999.99 indicates no check cashing transaction requires an approval. For example, a limit of 499.99 indicates that the user can cash checks through $499.99. A check-cashing transaction of $500.00 will require an approval. If a user-level value is not specified, the word Default appears. |
| Check Cashing Approvals: Negative Share Balance |
In the Negative Share Balance field, enter the maximum negative balance amount that the user can approve. Transactions with a larger negative balance will require an approval. A value of -999,999,999.99 indicates the user can process and approve check cashing transactions for members with any negative balance. A value of 0.00 indicates the user cannot process or approve a check-cashing transaction for a member with a negative share balance. If a user-level value is not specified, the word Default appears. |
| Check Cashing Approvals: Delinquent Portico Loan Days |
In the Delinquent Portico Loan Days field, enter the number of grace days allowed before a check cashing transaction for a member with a delinquent loan requires an approval. When the number of delinquent days is greater than the number of grace days specified, the check-cashing transaction requires an approval. If the Days field is 0, an approval is needed anytime a delinquent loan is encountered. A value of 999 indicates that the user can process and approve any check-cashing transaction regardless of how delinquent a member’s loan may be. If a user-level value is not specified, the word Default appears. |
| Check Cashing Approvals: Delinquent Method B |
From the Delinquent Method B Loan dropdown list, select Yes to allow the user to approve check cashing transactions for members with delinquent method B loans. A value of No indicates that the user cannot approve check cashing transactions for members with delinquent method B loans. If a user-level value is not specified, the word Default appears. |
| Check Cashing Approvals: Zero Balance Accounts |
From the Zero Balance Accounts dropdown list, select Yes to allow the user to approve check cashing transactions for members with zero balance accounts. A value of No indicates that the user cannot approve check-cashing transactions for members with zero balance accounts. If a user-level value is not specified, the word Default appears. |
| Warnings
and Alerts: Acknowledge
All |
Select the Acknowledge All checkbox to display an Ack
checkbox appears on the grid header of the Note,
Warnings, and Alerts grid. Selecting the Ack
checkbox selects all the warnings and alerts. If this checkbox
is not selected, the user must select each warning and alert individually.
You must belong to a security group with the Portico
- Profile - User Profile - Warnings and Alerts Acknowledge All
security permission to select this checkbox. |
| Warnings
and Alerts: User Lockout Level |
Select
the User Lockout Level down
arrow to select which alert-lockouts the user can override. The system
default is 0. If you set the level to 9, the user can override all
alert lockouts. For example, if the >User Lockout Level field is 5 and the member has an alert-lockout
on their account, the user would not be able to override any alert
lockout with a level of 6 or higher. You must belong to a security
group with the Portico - Profile
- User Profile - Warnings and Alerts Lockout Level security
permission to change this field. |
| Authorized Limits ACH Origination |
In the ACH Origination field, specify the authorized origination limit up to 99,999,999.99. Your branch tellers can create ACH origination items up to the specified dollar amount. Any dollar amount over the designated limit can be approved using your credit union’s override process. If a user does not have an authorization limit specified on their User Profile – Security tab, Portico compares the origination item amount to the credit union authorization limit specified on the Credit Union Profile – ACH/Payroll tab. If the item amount exceeds the limit, a teller override will be required.
Length: 11 numeric including decimal
|
| Fiserv Single Sign-In |
After you enroll in Fiserv Single Sign-In, Portico displays a selected checkbox and your enrollment date and time. The Enrolled in Fiserv Single Sign-In checkbox is not selected if your credit union has not enabled Fiserv Single Sign-In or you have not enrolled in Fiserv Single Sign-In.
|
| Auto-logon teller with information below |
Select the Auto-logon teller with information below checkbox to automatically sign in Portico using the teller information specified.
- Select the Branch ID down arrow to select the default branch to use when logging into Portico.
- In the Teller ID field, enter the default teller number to use when signing in Portico. If the Teller ID field is blank, receipts generated in Offline Processing display the teller ID of the teller who completed the transaction. Length: 2 alphanumeric.
- If you select the Enforce Branch/Teller ID Combination checkbox on the Branch/Teller ID Assignments window for a specific user, a users default branch and teller options will be limited to the assigned branch and teller ID combinations. Select the Auto-logon teller with information below checkbox to automatically sign in Portico using the teller information specified. Then, enter your branch ID and teller number or select the Default checkbox in the Assigned Branch/Teller ID grid.
|
The Logons tab contains the sign-in options for Collections and other vendor applications.
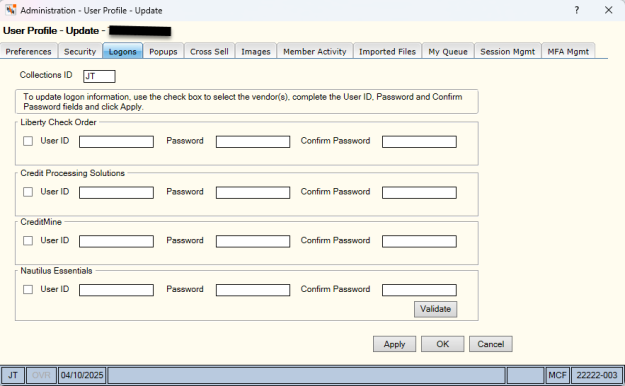
For vendor applications, an informational message will indicate if a password is stored on Portico for your user ID. To update your user ID and password for a vendor interface, select the checkbox next to the vendor to make available the User ID, Password, and Confirm Password fields. If you are only updating the User ID field for a vendor, and the stored password is not being changed, you will still need to reenter the corresponding password in the Password and Confirm Password fields. An error message will occur if the password fields are left blank when updating the User ID field.
The Logons tab on the User Profile – Update window (accessed from the Users – List or User – Update window within Administration – Security – User Maintenance) does not require you to enter the password when adding a vendor user ID for an employee. Your credit union security administrator can leave the password fields blank for the employee to complete using the User Profile – Logons tab. The informational message will indicate that a password has not been added for the user ID. Please be aware that there is the potential to inadvertently delete a stored password when updating vendor logons on the User Profile – Update window (accessed from the Administration – Security menu). If you select the checkbox next to a vendor and do not reenter the corresponding password, the existing password will be deleted. When you select Apply or OK, you will submit a blank password value, and the stored password will be deleted. An error message will not appear if the password fields are left blank. The informational message will change to indicate that a password that was previously stored is no longer stored.
The Portico - Profile - User Profile - Logons - Maintain security permission allows a user to update the vendor user IDs and passwords. You can use this permission to give your users access to change passwords and IDs, and still prevent users from making other changes to the User Profile dialog box. This security permission is included in the following security groups: Portico – Administrator, Portico - Security – Administrator, and Portico – User. To update the vendor user IDs and passwords, users must be assigned to a security group listed or you can add the permission to a credit union-defined security group using the Security Group Permissions – Update window.
| Collections ID |
If you will be using Collections, enter your collections officer ID in the Collections ID field.
Length: 2 alphanumeric
|
| Liberty Check Order |
If Liberty Enterprises has been set up as an active check vendor, enter your Liberty Enterprises user ID in the User ID field. In the Password and Confirm Password fields, enter the corresponding password. This is the same user ID and password used to access the Liberty Enterprises system.
Length: 48 alphanumeric
|
| Credit Processing Solutions |
If Credit Processing Solutions (CPS) is your credit card processor and you have set up CPS integration, the Logons tab will display a Credit Processing Solutions group box. In the User ID field, enter your CPS user ID. In the Password and Confirm Password fields, enter the corresponding password.
Length: 48 alphanumeric
|
| CreditMine |
No longer available.
|
| Nautilus Essentials
|
If you use Nautilus Essentials, the Logons tab will display an Nautilus Essentials group box. You can enter and validate their individually assigned Nautilus Essentials user IDs and passwords, allowing you to take advantage of enhanced security options when accessing Nautilus Essentials from within Portico. In the User ID field, enter your Nautilus Essentials user ID. In the Password and Confirm Password fields, enter the corresponding password.
Length: 48 alphanumeric.
Select Validate to test your access.
If you have an individual Nautilus Essentials user account and one or more of the following Nautilus Essentials security privileges, the enhanced security option allows you to take advantage of these same functions when accessing Nautilus Essentials via Portico: Report Export, Save As, Re-index, Re-sequence, Annotate, Delete, and PC File Upload. To update the Nautilus Essentials user ID and password, you must belong to the Imaging - Individual Authentication security group or belong to a security group containing the Imaging - User Can Access Individual Authentication permission.
To remove the Imaging - User Can Access Individual Authentication permission from a user, you must first clear the Nautilus Essentials User ID and Password fields on the User Profile - Logons tab. Then, you can remove the security permission. The permission must be removed in this order to prevent 'individual authentication' errors in Portico. Log off and log back in for the change to take effect.
If no Nautilus Essentials user ID and password are entered on the User Profile – Logons tab, Portico will use the credit union generic user ID and password to access Nautilus Essentials.
|
On the Popups tab, you can set up which system alerts will appear, such as new member status, negative share accounts, and delinquent loans, on the Member Notifications and Alerts dialog box and Member Information dialog box.
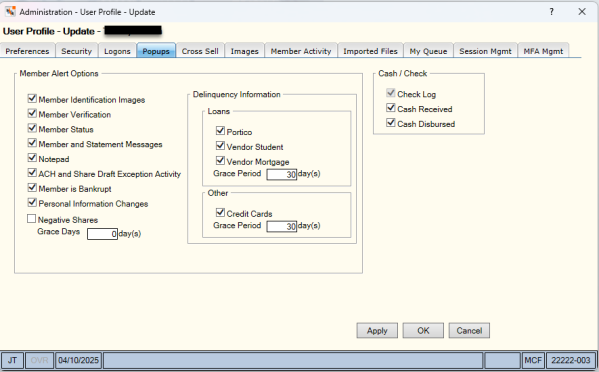
| Member Identification Images |
Select
the Member Identification Images
checkbox to display the member's photograph and signature on the Member
Information dialog box that appears when you look up a member. When the Member Identification Images checkbox is selected, and the Retrieval option on the Images tab is Automatic, the member’s photo and signature images will appear on the Member Information dialog box. When the Retrieval option on the Images tab is Manual, the Retrieve Images button appears on the Member Information dialog box to manually display photo and signature images. The Member Notifications and Alerts dialog box accessed from the Portico toolbar will include the Retrieve Images button to manually display photo and signature images, even if the Member Identification Images checkbox is not selected. |
| Member Verification |
Select
the Member Verification checkbox to display member verification information including name, address, contact information, birth date, date joined and verification hint and password on the Member Information dialog box when looking up a member. The Member Notifications and Alerts dialog box accessed from the Portico toolbar will include the member verification information, even if the Member Verification checkbox is not selected. |
| Member Status |
Select
the Member Status checkbox
to display member status notifications on the Member
Information dialog box that appears when you look up a member. Member status notifications include new member, birthday, credit union employee, report only, family member, restricted, dormant, and deceased. The Member Notifications and Alerts dialog box accessed from the Portico toolbar will include the member status notifications, even if the Member Status checkbox is not selected. |
| Member and Statement Messages |
Select
the Member and Statement Messages
checkbox to display member and statement messages on the Member
Information dialog box that appears when you look up a member. The Member Notifications and Alerts dialog box accessed from the Portico toolbar will include the member and statement messages, even if the Member and Statement Messages checkbox is not selected. |
| Notepad |
Select
the Notepad checkbox to display
member notes on the Member
Information dialog box that appears when you look up a member. The Member Notifications and Alerts dialog box accessed from the Portico toolbar will include the member notes, even if the Notepad checkbox is not selected. |
| ACH and Share Draft Exception Activity |
Select
the ACH and Share Draft Exception Activity checkbox
to display ACH or share draft exception activity alerts for the member on the Member
Information dialog box that appears when you look up a member. The Member Notifications and Alerts dialog box accessed from the Portico toolbar will include the alerts for ACH or share draft exception activity, even if the ACH and Share Draft Exception Activity checkbox is not selected. |
| Member is Bankrupt |
Select
the Member is Bankrupt checkbox to display a bankruptcy notification for bankrupt members on the Member
Information dialog box that appears when you look up a member. The Member Notifications and Alerts dialog box accessed from the Portico toolbar will include a bankruptcy notification for bankrupt members, even if the Member is Bankrupt checkbox is not selected. |
| Personal Information Changes |
Select the Personal Information Changes checkbox to display fraud prevention alert messages on the Member Information dialog box that appears when you look up a member. The complete list of monitored contact information includes:
- Statement Name
- Primary Address (line 1, line 2, city, state, or ZIP)
- Alternate Address (line 1, line 2, city, state, or ZIP)
- Phone Number (home, work, or cell)
- Email Address (email 1, email 2, or email 3)
When a change is made to the monitored contact information, Portico will display the applicable alert message on the Member Information dialog box for the number of days defined in the System Alerts Period field on the Credit Union Profile – Member tab. The possible alert messages are:
- Primary Address was changed today
- Alternate Address was changed today (this alert will only display if the Alternate Address is currently in use and has been changed)
- Name was changed today
- Phone number was changed today
- E-Mail was changed today
- Primary Address changed in last NN days
- Alternate Address changed in last NN days (this alert will only display if the Alternate Address is currently in use and has been changed)
- Name changed in last NN days
- Phone number changed in last NN days
- E-Mail changed in last NN days
- Fraud Prevention notice sent MM/DD/YYYY
These alert messages will appear on the Member Notifications and Alerts dialog box, accessed using the icon on the Portico toolbar, for the number of days defined in the System Alerts Period field on the Credit Union Profile – Member tab, regardless of the Personal Information Changes checkbox.
The Fraud Prevention notice message appears if your credit union has the Fraud Management Member Notices Report 052 scheduled for notice production. The notice date is updated in the back-office cycle the day after the notice is produced, and the Fraud Prevention notice message will appear on the second day after the notice is produced.
|
|
Negative Shares
|
Select the Negative Shares checkbox to display a negative share notification on the Member Notifications and Alerts dialog box and Member Information dialog box. Enter the number of days a share account can be negative, before a negative share notification appears oncheckboxthe Member Notifications and Alerts dialog box and Member Information dialog box. Portico uses the date in the Went Negative field on the Shares - General tab to determine the number of days the share account has been negative. If the number of days meets the criteria specified on the User Profile - Popups tab, the days negative appears on the Member Verification dialog box.
To display the promise status on the Member Information dialog box, at least one of the following checkboxes must be selected on the User Profile – Popups tab: Negative Shares checkbox, Portico checkbox, Vendor Mortgage checkbox or Credit Cards checkbox.
|
|
Loans: Portico
|
Select the Portico checkbox to display a delinquency notification for delinquent Portico loanscheckboxon the Member Notifications and Alerts dialog box and Member Information dialog box.
To display the promise status on the Member Information dialog box, at least one of the following checkboxes must be selected on the User Profile – Popups tab: Negative Shares checkbox, Portico checkbox, Vendor Mortgage checkbox or Credit Cards checkbox.
|
|
Loans: Vendor Student
|
Select the Vendor Student checkbox to display a delinquency notification for delinquent student loans on the Member Notifications and Alerts dialog box and Member Information dialog box.
|
|
Loans: Vendor Mortgage
|
Select the Vendor Mortgage checkbox to display a delinquency notification for delinquent vendor mortgage loans on the Member Notifications and Alerts dialog box and Member Information dialog box.
To display the promise status on the Member Information dialog box, at least one of the following checkboxes must be selected on the User Profile – Popups tab: Negative Shares checkbox, Portico checkbox, Vendor Mortgage checkbox or Credit Cards checkbox.
|
|
Loans: Grace Period
|
Enter the number of days a payment can be late on a Portico loan, vendor student loan, or vendor mortgage loan before a delinquency notification checkbox will appear on the Member Notifications and Alerts dialog box and Member Information dialog box.
|
|
Credit Cards
|
Select the Credit Cards checkbox to display a delinquency notification for delinquent credit cards. Then, enter the number of days a payment can be late on a credit card before a delinquency notification appears on the Member Notifications and Alerts dialog box and Member Information dialog box.
To display the promise status on the Member Information dialog box, at least one of the following checkboxes must be selected on the User Profile – Popups tab: Negative Shares checkbox, Portico checkbox, Vendor Mortgage checkbox, or Credit Cards checkbox.
|
|
Check Log
|
Select the Check Log checkbox to automatically display the Check Log dialog box when your cursor is in the CR Checks Received field. You can also access the Check Log dialog box by clicking the CL button in the transaction area grid. The Check Log checkbox must be selected to use Teller Item Capture.
|
|
Cash Received
|
Select the Cash Received checkbox to automatically display the Cash Received dialog box when your cursor is in the CR Cash Received field. You can also access the Cash Received dialog box by clicking the CR button in the transaction area grid.
|
|
Cash Disbursed
|
Select the Cash Disbursed checkbox to automatically display the Cash Disbursed dialog box when a cash-disbursal transaction is completed. You can also access the Cash Disbursed dialog box by selecting the Dispense Cash option from the Activity menu or by pressing Ctrl+Shift+D on your keyboard.
|
|
Audio Preferences
|
If your credit union uses ConvergeIT: VoIP in conjunction with MaxAgent software, in the Audio Preferences group box, you can display a Portico Audio Notification popup when a member or non-member calls the credit union. Select the default window that appears when you select the Retrieve Member button.
|
On the Cross Sell tab, you can activate and place your Cross Sell Opportunities pop up and specify your default origin of sale.
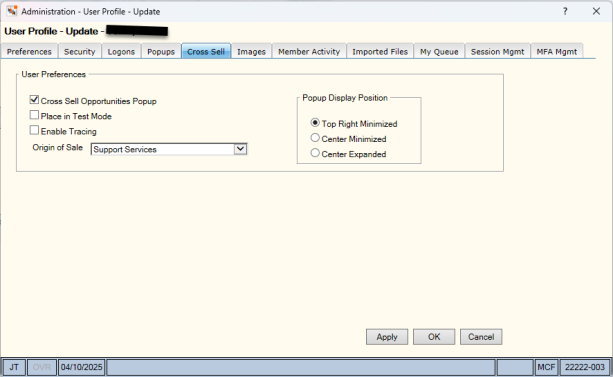
| Cross Sell Opportunities Popup |
Select
the Cross Sell Opportunities Popup
checkbox to activate the Cross Sell
Opportunities pop up. |
| Place in Test Mode |
Select
the Place in Test Mode checkbox to use Cross Sell and Tracking in test mode. |
| Enable Tracing |
Select
the Enable Tracing checkbox
to allow testing of Cross Sell and Tracking. |
| Origin of Sale |
Select
the Origin of Sale down arrow
to select your default Origin of Sale. If you do not define an origin of sale, Portico will use ‘Added by Sale Process’ as the origin of sale. |
| Popup Display Position |
In the Popup Display Position group box: - Select the Top Right Minimized option to place the Opportunities pop up in the top-right corner, minimized.
- Select the Center Minimized option to place the Opportunities pop up in the center, minimized.
- Select the Center Expanded option to place the Opportunities pop up in the center, maximized.
|
On the Images tab, you can customize your signature and image options.
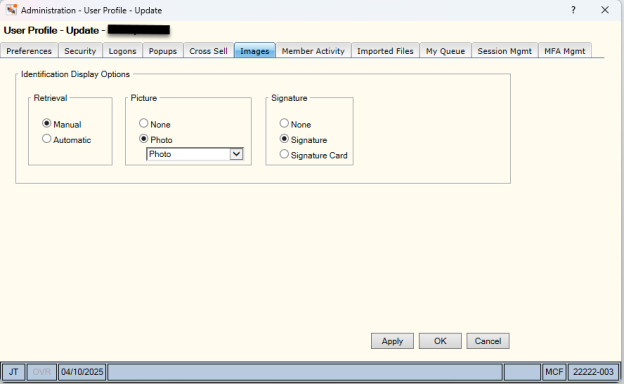
| Retrieval |
Select the Manual option to display the Retrieve Images button on the Member Information dialog box. You must select the Retrieve Images button to display the images.
Select the Automatic option to automatically display the images on the Member Information dialog box. Portico will display the Member Information dialog box, and then retrieve the identification and signature images from Nautilus Essentials. The message Retrieving identification images... will appear on the Member Information dialog box to inform you that the system is retrieving the identification images.
|
| Picture |
Select the Photo
option, and then select the down arrow to select the type of picture identification
that you would like to view on the Member
Information dialog box. If the None option or Driver's License option is selected and the member has multiple photo ID images on file, the most recent driver's license captured will appear on the
Member Information dialog
box. |
| Signature |
Select the Signature
option or Signature Card option
to select the type of signature that you would like to view on the
Member Information dialog
box. If the None option or Signature option is selected and the member has multiple signature images on file, the most recent signature captured will appear on the
Member Information dialog
box. If the Signature Card option is selected and the member has multiple signature images on file, Portico displays the most recent signature card captured. |
If you have Member Activity Tracking, you can use the Member Activity tab to set up your subtabs on the Overview tab at the user-level.
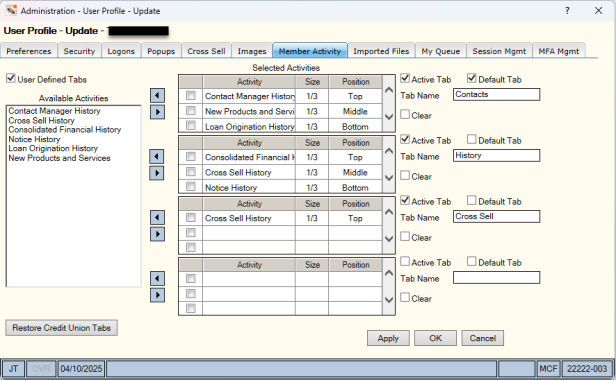
To customize your member activity tracking tabs, complete the following steps:
- Select the User Defined Tabs checkbox.
- Select up to three controls in the box on the left side and select the right arrow to add the controls to the grid.
- Select the Size down arrow to select the size of the control.
- Then, select the Position down arrow to select where the control should appear on the sub tab.
- Select the Active Tab checkbox to display the subtab on the Overview tab.
- Select the Default Tab checkbox to make this subtab appear on top on the Overview tab.
- Then, enter a name for the tab in the Tab Name field.
- Select Apply.
Select a control checkbox and select the left arrow to remove it from the custom tab.
Select the Clear checkbox to clear the subtab settings.
Select Restore Credit Union Defaults to restore the subtab settings at the credit union-level. The credit union-level default settings are found on the Member Activity Tracking window.
The Imported Files tab lets you define the extract file location and icons that will appear on the Command Line Multiple tab. The Optional Files group box lets you set up any type of custom or third-party reoccurring file that you need to process using the new formatted batch transaction process.
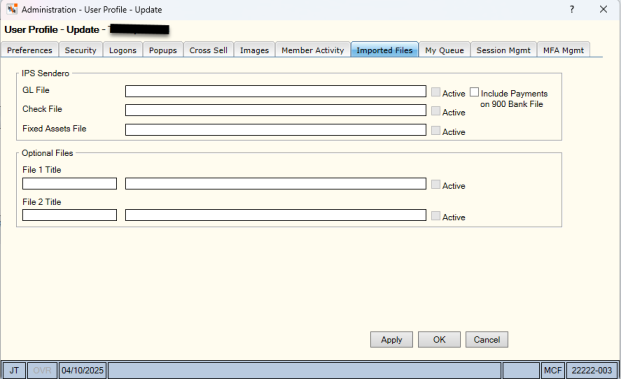
| IPS Sendero: GL File |
In the GL File field, enter the file used to upload Accounts Payable transactions from IPS Sendero.
Select the Active checkbox to display the IPS Accounts Payable Upload icon on the Multiple tab.
Select the Include Payments on 900 Bank File checkbox to specify if the keyword BF needs to be added to the file to include check disbursals on the 900 Report bank transmission file.
|
| IPS Sendero: Check File |
In the Check File field, enter the file used to upload voided check transactions (Check Register window).
Select the Active checkbox to display the IPS Check Extract Upload icon on the Multiple tab.
|
| IPS Sendero: Fixed Assets File |
In the Fixed Assets File field, enter the file used to upload Fixed Assets transactions from IPS Sendero.
Select the Active checkbox to display the IPS Fixed Assets Upload icon on the Multiple tab.
|
| Optional Files: File 1 |
In the File 1 Title field, enter the description of the optional file path that will appear as the tool tip for the Miscellaneous File Upload 1 icon on the Multiple tab. Then, enter the file used to upload the optional batch transactions.
Select the Active checkbox to display the Miscellaneous File Upload 1 icon on the Multiple tab.
|
| Optional Files: File 2 |
In the File 2 Title field, enter the description of the optional file path that will appear as the tool tip for the Miscellaneous File Upload 2 icon on the Multiple tab. Then, enter the file used to upload the optional batch transactions.
Select the Active checkbox to display the Miscellaneous File Upload 2 icon on the Multiple tab.
|
Files must have a .txt or .fil extension.
The My Queue tab lets you define your default options for the Selection Criteria group box on the My Queue window. You can also select how often your My Queue will be checked for new items and the type of notification you will receive.
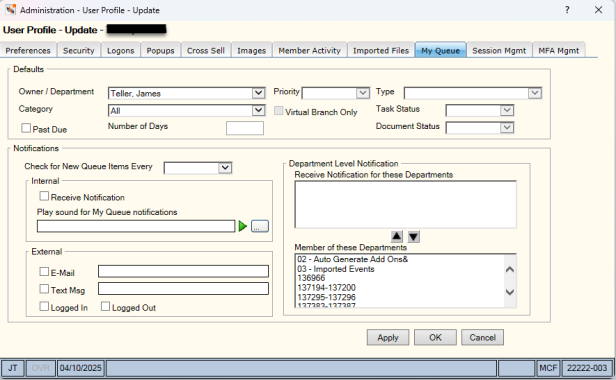
| Owner/Department |
Select the Owner/Department
down arrow to select the default owner or department. |
| Category |
Select
the Category down arrow to
select All, Contact/Event,
Cross Sell, New
Members & Services, Demographic
Maintenance, Currency Transaction Reports, or Ad hoc Documents as the default category. |
| Past Due |
To
view past due items, select the Past Due checkbox, and then enter the number of days past due in the
Number of Days field. |
| Priority |
If
the Category field is Contact/Event, select the Priority
down arrow to select the default priority. |
| Virtual Branch Only |
To
retrieve all Cross Sell referrals that originated from Virtual Branch, select Cross Sell from
the Category dropdown list
and select the Virtual Branch Only
checkbox. |
| Type |
If
the Category field is Contact/Event or New
Members & Services, select the Type
down arrow to select the default type. |
| Task Status |
If
the Category field is Contact/Event or New
Members & Services, select the Task Status
down arrow to select the default status. |
| Document Status |
If the Category field is Ad hoc documents, select the Document Status down arrow to select the default document status. |
You can receive notification when an item is assigned to you or when an item is assigned to a department only [without an owner]. The Notifications group box lets you select how often your queue will be checked for new items and the type of notification you will receive. Once you establish your notification criteria, you must log off and log back on Portico for these settings to take effect.
| Check for New Queue Items Every |
Select the Check for New Queue Items Every down arrow to select how often your queue will be checked for new items.
If the Receive Notification for these Departments box is blank and you add departments from the Member of these Departments box, you must select a time from the Check for New Queue Items Every dropdown list in order to save your changes to the Receive Notification for these Departments box.
|
| Internal: Receive Notification |
Select
the Receive Notification checkbox to receive notifications in Portico. |
| Internal: Play sound... |
Select the ellipsis ... button next to the Play sound for My Queue notifications
field to browse for a sound file that will play when a new item is
added to your queue. Select the green arrow to play the sound notification. |
| External: Email |
Select the E-mail
checkbox to receive notifications via email. Then, enter your email
address in the field. |
| External: Txt Msg |
Select the Txt Msg checkbox to receive notifications via cell phone text messages. Then, enter the provider address in the field. For example:
T-Mobile: phonenumber@tmomail.net
Virgin Mobile: phonenumber@vmobl.com
Sprint: phonenumber@messaging.sprintpcs.com
Cingular: phonenumber@cingularme.com
Verizon: phonenumber@vtext.com
Nextel: phonenumber@messaging.nextel.com
AT&T: phonenumber@txt.att.net
|
| External: Logged In |
Select
the Logged In checkbox to
receive notifications when you are logged into Portico. |
| External: Logged Out |
Select
the Logged Out checkbox to
receive notifications when you are logged out of Portico. |
| Department Level Notification |
In the Department Level Notification group box, select a department in the Member of these Departments box. Then, select the up arrow to receive notification of items added to that department's queue.
If the Receive Notification for these Departments box is blank and you add departments from the Member of these Departments box, you must select a time from the Check for New Queue Items Every dropdown list in order to save your changes to the Receive Notification for these Departments box.
|
The Session Mgmt tab lets you choose how long to display the timeout warning message (5-40 seconds) and select a sound to play for the warning notification. You can also set up switchover notifications if your credit union uses Portico's automatic connection switchover option.
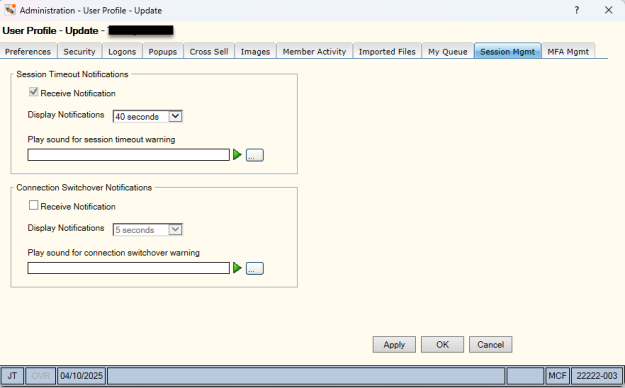
| Session Timeout Notifications: Receive Notification |
The Receive Notification checkbox is automatically selected. |
| Session Timeout Notifications: Display Notifications |
Select the Display Notifications down arrow
to choose how long to display the timeout warning message (5-40 seconds) . The system default is 40 seconds. |
| Session Timeout Notifications: Play sound... |
Select the ellipsis
... button next to the Play sound for session timeout warning field to browse for a sound file
that will play when your warning notification appears. Select the green
arrow to play the sound notification. |
| Connection Switchover Notifications: Receive Notification |
Select the Receive Notification checkbox to
receive switchover timeout notifications. |
| Connection Switchover Notifications: Display Notifications |
Select the
Display Notifications down
arrow to choose how long to display the switchover message (5-40 seconds). |
| Connection Switchover Notifications: Play sound... |
Select the ellipsis
... button next to the Play sound for connection switchover warning field to browse for a sound
file that will play when your switchover notification appears. Select
the green arrow to play the sound notification. |
Select Apply to apply your changes to the User Profile dialog box. Select OK to save your user preferences and close the User Profile dialog box. Select Cancel to reject your changes and close the User Profile dialog box.
The MFA Mgmt tab lets you add, delete, or define a default device for Multi-Factor Authentication (MFA) Time-Based One-Time Passwords (TOTP).
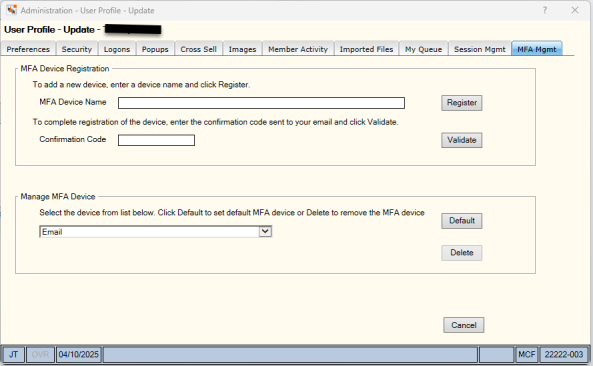
| MFA Device Registration: MFA Device Name |
Enter a name for the device that you a registering for MFA TOTP.
The device name cannot exceed 30 characters. It cannot include any special characters besides an apostrophe (') or a dash (-).
|
| MFA Device Registration: Confirmation Code |
Enter the code sent to your email to confirm device registration. |
| Manage MFA Device: dropdown |
Dropdown list of registered MFA TOTP devices. |
Use the following steps to add a new device.
-
Enter a name in the MFA Device Name field and select Register.
-
Open your authenticator (for example, Google Authenticator or Microsoft Authenticator) and follow the instructions.
-
Enter the code sent to your email in the Confirmation Code field and select Validate.
Use the following steps to delete a device.
-
In the Manage MFA Device section, select the device from the dropdown list.
-
Select Delete.
-
The following warning displays: "Are you sure you want to delete this MFA device?" Select OK.
Use the following steps to set up a default device.
-
In the Manage MFA Device section, select the device from the dropdown list.
-
Select Default.
-
The following message displays: "MFA default device was successfully updated." Select OK.
Once you set the default, the device name in dropdown indicates this with (Default).