Defining the Check Order Options
|
|
|
|
|
The Check Order - Update window lets you identify the check vendor and enter the correct login information to order checks from Portico. To access the Check Order - Update window, in the Administration menu on the Portico Explorer Bar, click Products/Services. On the Product/Services top menu bar, click Integrated Services, then click Check Order to display the Check Order - Update window.
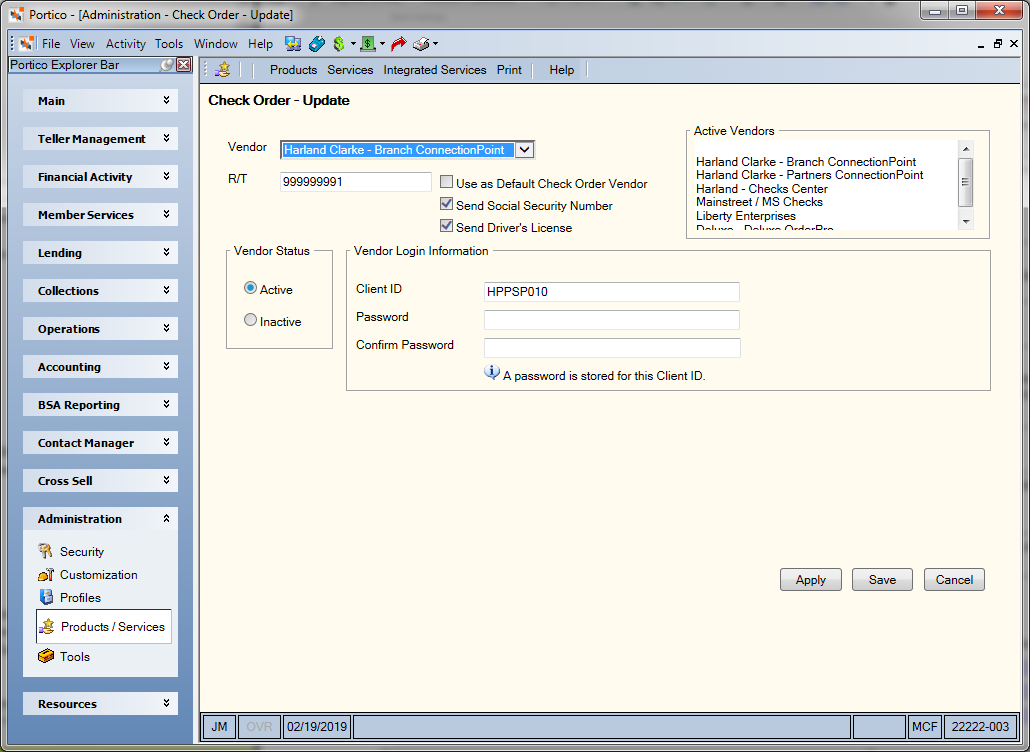
Harland Clarke - Branch ConnectionPoint
How do I?
To set up the Check Order options for Harland Clarke - Branch ConnectionPoint, complete the following steps:
- In the R/T field, enter the default route and transit number that will be used for the majority of the check orders.
- If you are setting up more than one check vendor for active use, select the Use as Default Check Order Vendor check box to select Harland Clarke – Branch ConnectionPoint as the default check vendor. Users may select from any of the active check vendors when placing the check order.
- Select the Send Social Security Number check box to send the member's Social Security Number with the check order.
- Select the Send Driver's License check box to send the member's driver's license number with the check order.
- Click the Active option in the Vendor Status group box to use Harland Clarke – Branch ConnectionPoint for Check Orders. Click the Inactive option to inactivate Harland Clarke – Branch ConnectionPoint, but store the login information for future use.
- In the Client ID field, enter the user ID used to access the Harland Clarke – Branch ConnectionPoint system.
- In the Password field, enter the password associated with the user ID. This should have been assigned by or setup on the Harland Clarke – Branch ConnectionPoint system in conjunction with the user ID. The vendor password will not be displayed on the Check Order - Update window for Harland Clarke – Branch ConnectionPoint or Harland Clarke – Partners ConnectionPoint. An informational message will indicate if a password has been stored on Portico for the client ID.
- In the Confirm Password field, enter the password again.
- In the Account Number Length field, enter the length of the account numbers Harland Clarke uses to identify your members. This must coincide with the length set up with Clarke American. The valid range is 1-20.
- Click Save.
- On the Products/Services top menu bar, click Integrated Services, then click Processor Specifications to display the Integrated Services - Processor Specifications window.
- In the Share Draft Processor Specs group box, enter the processor prefix and length. When the user orders checks, Portico applies the specs to the draft ID. For example, if the draft ID is 567, the length is 10, and the prefix is 123, the draft ID sent to the processor is 1230000567.
- Click Save.
- Log off Portico and log back in.

Harland Clarke – Partners ConnectionPoint
To set up the Check Order options for Harland Clarke – Partners ConnectionPoint, complete the following steps:
- On the Check Order - Update window, click the Vendor down arrow and select Harland Clarke – Partners ConnectionPoint.
- In the R/T field, enter the default route and transit number that will be used for the majority of the check orders.
- If you are setting up more than one check vendor for active use, select the Use as Default Check Order Vendor check box to select Harland Clarke – Partners ConnectionPoint as the default check vendor. Users may select from any of the active check vendors when placing the check order.
- Select the Send Social Security Number check box to send the member's Social Security Number with the check order.
- Select the Send Driver's License check box to send the member's driver's license number with the check order.
- Click the Active option in the Vendor Status group box to use Harland Clarke – Partners ConnectionPoint for Check Orders. Click the Inactive option to inactivate Harland Clarke – Partners ConnectionPoint, but store the login information for future use.
- In the Client ID field, enter the user ID used to access the Harland Clarke – Partners ConnectionPoint system.
- In the Password field, enter the password associated with the user ID. This should have been assigned by or setup on the Harland Clarke – Partners ConnectionPoint system in conjunction with the user ID. The vendor password will not be displayed on the Check Order - Update window for Harland Clarke – Partners ConnectionPoint. An informational message will indicate if a password has been stored on Portico for the client ID.
- In the Confirm Password field, enter the password again.
- In the Account Number Length field, enter the length of the account numbers Clarke American uses to identify your members. This must coincide with the length set up with Harland Clarke – Branch ConnectionPoint. The valid range is 1-20.
- Click Save.
- On the Product/Services top menu bar, click Integrated Services, then click Processor Specifications to display the Integrated Services - Processor Specifications window.
- In the Share Draft Processor Specs group box, enter the processor prefix and length. When the user orders checks, Portico applies the specs to the draft ID. For example, if the draft ID is 567, the length is 10, and the prefix is 123, the draft ID sent to the processor is 1230000567.
- Click Save.
- Log off Portico and log back in.

Liberty Enterprises
To set up the Check Order options for Liberty Enterprises, complete the following steps:
- On the Check Order - Update window, click the Vendor down arrow and select Liberty Enterprises.
- In the R/T field, enter the default route and transit number that will be used for the majority of the check orders.
- If you are setting up more than one check vendor for active use, select the Use as Default Check Order Vendor check box to select Liberty Enterprises as the default check vendor. Users may select from any of the active check vendors when placing the check order.
- Select the Send Social Security Number check box to send the member's Social Security Number with the check order.
- Select the Send Driver's License check box to send the member's driver's license number with the check order.
- Click the Active option in the Vendor Status group box to use Liberty Enterprises for Check Orders. Click the Inactive option to inactivate Liberty Enterprises, but store the login information for future use.
- In the Client ID field, enter the client ID assigned by Liberty Enterprises.
- Click Save.
- On the Product/Services top menu bar, click Integrated Services, then click Processor Specifications to display the Integrated Services - Processor Specifications window.
- In the Share Draft Processor Specs group box, enter the processor prefix and length. When the user orders checks, Portico applies the specs to the draft ID. For example, if the draft ID is 567, the length is 10, and the prefix is 123, the draft ID sent to the processor is 1230000567.
- Click Save.
- Liberty Enterprises maintains user IDs and passwords for all of the credit union’s tellers; therefore, each teller that will perform check orders must set up the user login information for Liberty Enterprises on the User Profile window. To access the User Profile window, click Tools on the menu bar, then click User Profile.
- On the User Profile window, click the Logons tab. In the User ID, enter your Liberty Enterprises user ID. In the Pswd and Confirm Pswd fields, enter the corresponding password. This is the same user ID and password used to access the Liberty Enterprises system.
- Then, log off Portico and log back in.
To set up the Check Order options for Deluxe OrderPro, complete the following steps:
Before you can set up the check order options for Deluxe OrderPro, you must download the Deluxe certificate. Complete the following steps to download the certificate.
- Open Internet Explorer and go to https://cert.deluxe.com/OneStep/.
- Click Enroll Now. Follow the directions provided. When prompted, enter the credential information in the e-mail sent from Deluxe.
- Once the certificate has been downloaded and installed to Internet Explorer, on the Internet Explorer menu bar, click Tools, then click Internet Options.
- On the Internet Options dialog box, click the Content tab.
- Click Certificates in the center of the tab. The Certificates dialog box appears.
- On the Personal tab, select the Deluxe Certificate and click Export.
- On the Certificate Export Wizard dialog box, click Next.
- In the Export Private Key section, click the Yes, export the private key option. Then, click Next.
- In the Export File Format section, click the Personal Information Exchange option and select the Enable strong protection check box. Then, click Next.
- In the Password section, enter the password for the certificate and re-enter the password for confirmation. Portico recommends using the certificate number issued by Deluxe or your credit union name, but this can be any password you prefer. Then, click Next.
- Browse to find an appropriate location to save the exported certificate. Portico suggests placing the certificate on the desktop and naming it DeluxeCertXXXX, where XXXX is the number that Deluxe used to name the certificate. Note: Do not include a file extension. The system will automatically give the file a .pfx extension.

Deluxe OrderPro
Complete the following steps to set up the check order options for Deluxe OrderPro.
- On the Check Order - Update window, click the Vendor down arrow and select Deluxe - Deluxe - OrderPro.
- In the R/T field, enter the default route and transit number that will be used for the majority of the check orders.
- If you are setting up more than one check vendor for active use, select the Use as Default Check Order Vendor check box to select Deluxe as the default check vendor. Users may select from any of the active check vendors when placing the check order.
- Click the Active option in the Vendor Status group box to use Deluxe for Check Orders. Click the Inactive option to inactivate Deluxe, but store the login information for future use.
- Select the Send Social Security Number check box to send the member's Social Security Number with the check order.
- Select the Send Driver's License check box to send the member's driver's license number with the check order.
- In the Certificate Path field, enter the folder location of the certificate provided by Deluxe. Click Browse to search for the location.
- In the Password field, enter the password associated with the certificate. This is the same password you entered to protect the private key when exporting the certificate from Internet Explorer.
- In the Confirm Password field, enter the password again.
- Click Save.
- On the Product/Services top menu bar, click Integrated Services, then click Processor Specifications to display the Integrated Services - Processor Specifications window.
- In the Share Draft Processor Specs group box, enter the processor prefix and length. When the user orders checks, Portico applies the specs to the draft ID. For example, if the draft ID is 567, the length is 10, and the prefix is 123, the draft ID sent to the processor is 1230000567.
- Click Save.
- Log off Portico and log back in.

Harland – Checks Center
To set up the Check Order options for Harland, complete the following steps:
- On the Check Order - Update window, click the Vendor down arrow and select Harland – Checks Center.
- In the R/T field, enter the default route and transit number that will be used for the majority of the check orders.
- If you are setting up more than one check vendor for active use, select the Use as Default Check Order Vendor check box to select Harland as the default check vendor. Users may select from any of the active check vendors when placing the check order.
- Select the Send Social Security Number check box to send the member's Social Security Number with the check order.
- Select the Send Driver's License check box to send the member's driver's license number with the check order.
- Click the Active option in the Vendor Status group box to use Harland for Check Orders. Click the Inactive option to inactivate Harland, but store the login information for future use.
- In the Client ID field, enter the user ID used to access the Harland system.
- In the Account Number Length field, enter the length of the account numbers Harland uses to identify your members. This must coincide with the length set up with Harland. The valid range is 1-20.
- In the Key File Path field, enter the folder location of the key file provided by Harland. Click Browse to search for the location.
- Click Save.
- On the Product/Services top menu bar, click Integrated Services, then click Processor Specifications to display the Integrated Services - Processor Specifications window.
- In the Share Draft Processor Specs group box, enter the processor prefix and length. When the user orders checks, Portico applies the specs to the draft ID. For example, if the draft ID is 567, the length is 10, and the prefix is 123, the draft ID sent to the processor is 1230000567.
- Click Save.
- Log off Portico and log back in.

Mainstreet/MS Checks
To set up the Check Order options for Mainstreet/MS Checks, complete the following steps:
- On the Check Order - Update window, click the Vendor down arrow and select Mainstreet/MS Checks.
- In the R/T field, enter the default route and transit number that will be used for the majority of the check orders.
- If you are setting up more than one check vendor for active use, select the Use as Default Check Order Vendor check box to select Mainstreet/MS Checks as the default check vendor. Users may select from any of the active check vendors when placing the check order.
- Click the Active option in the Vendor Status group box to use Mainstreet/MS Checks for check orders.
- Select the Send Social Security Number check box to send the member's Social Security Number with the check order.
- Select the Send Driver's License check box to send the member's driver's license number with the check order.
- In the Client ID field, enter the user ID used to access the Mainstreet/MS Checks system.
- In the Password field, enter the password associated with the user ID. This should have been assigned by or setup on the Mainstreet/MS Checks system in conjunction with the user ID.
- In the Confirm Password field, enter the password again.
- Click Save.
- On the Product/Services top menu bar, click Integrated Services, then click Processor Specifications to display the Integrated Services - Processor Specifications window.
- In the Share Draft Processor Specs group box, enter the processor prefix and length. When the user orders checks, Portico applies the specs to the draft ID. For example, if the draft ID is 567, the length is 10, and the prefix is 123, the draft ID sent to the processor is 1230000567.
- Click Save.
- Log off Portico and log back in.

Bank-A-Count Checks For Less
To set up the Check Order options for Bank-A-Count Checks For Less, complete the following steps:
- On the Check Order - Update window, click the Vendor down arrow and select Bank-A-Count Checks For Less.
- In the R/T field, enter the default route and transit number that will be used for the majority of the check orders.
- If you are setting up more than one check vendor for active use, select the Use as Default Check Order Vendor check box to select Mainstreet/MS Checks as the default check vendor. Users may select from any of the active check vendors when placing the check order.
- Click the Active option in the Vendor Status group box to use Bank-A-Count Checks For Less for check orders.
- In the Client ID field, enter the user ID used to access the Bank-A-Count Checks For Less system.
- In the Password field, enter the password associated with the user ID. This should have been assigned by or setup on the Bank-A-Count Checks For Less system in conjunction with the user ID.
- In the Confirm Password field, enter the password again.
- Click Save.
- On the Product/Services top menu bar, click Integrated Services, then click Processor Specifications to display the Integrated Services - Processor Specifications window.
- In the Share Draft Processor Specs group box, enter the processor prefix and length. When the user orders checks, Portico applies the specs to the draft ID. For example, if the draft ID is 567, the length is 10, and the prefix is 123, the draft ID sent to the processor is 1230000567.
- Click Save.
- Log off Portico and log back in.
Field Help
| Field | Description |
|---|---|
|
Click the down arrow to select the check vendor: Harland Clarke - Branch ConnectionPoint, Harland Clarke - Partners ConnectionPoint, Deluxe - Deluxe OrderPro, Harland – Checks Center, Mainstreet/MS Checks, Bank-A-Count Checks For Less, or Liberty Enterprises. |
|
|
The default route and transit number that will be used for the majority of the check orders. Length: 10 numeric |
|
|
Select this check box to use this vendor as the default check vendor. Users may select from any of the active check vendors when placing the check order. |
|
|
Select this check box to send the member's Social Security Number with the check order. Not available for Bank-A-Count Checks For Less. |
|
|
Select this check box to send the member's driver's license number with the check order. Not available for Bank-A-Count Checks For Less. |
|
|
The list of active vendors available for check orders. |
|
|
Click the Active option to allow check orders from the check vendor. Click the Inactive option to prevent check orders from the check vendor, but store the login information for future use. |
|
|
The client ID to log into the check vendor website. Length: Contact your check vendor for requirements. |
|
|
The password required to log into the vendor website. The vendor password will not be displayed on the Check Order - Update window for Harland Clarke – Partners ConnectionPoint or Harland Clarke - Branch ConnectionPoint. An informational message will indicate if a password has been stored on Portico for the client ID. Length: Contact your check vendor for requirements. |
|
|
The password required to log into the vendor website. Length: Contact your check vendor for requirements. |
|
|
The length of the account numbers Harland Clarke uses to identify your members. This must coincide with the length set up with Harland Clarke. The valid range is 1-20. Length: 2 numeric |
|
|
The folder location of the certificate provided by Deluxe OrderPro or the folder location of the key file provided by Harland – Checks Center. Click Browse to search for the location. |
Click Apply to apply your changes.
Click Save to save your settings and close the Check Order - Update window.
Click Cancel to reject your changes and close the Check Order - Update window.