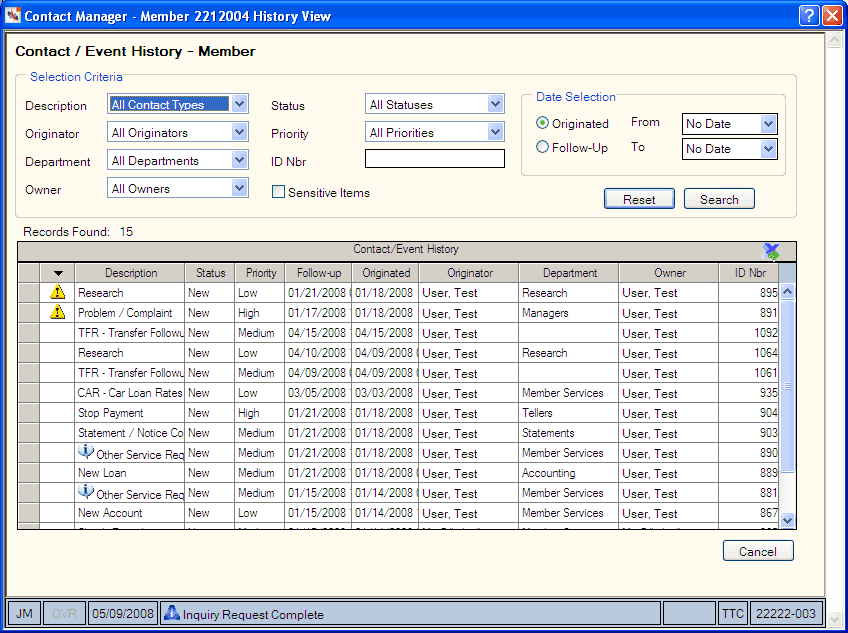
Contact/Event History - Member
If your credit union has Contact Manager, you can display a member’s entire history of contact requests and events.
To review Contact/Event History, locate the member using the search tool on the top menu bar. Select the down arrow to select the search method, then enter the search criteria. Select the green arrow or press ENTER to locate the member.
Then, do one of the following...
- Under Member Services on the Portico Explorer Bar, select History/Reversals. The History tab appears on top. On the History tab, select the Type of History down arrow and select Contact/Event History. The member's contact/event history automatically appears.
- On the tool bar, select the down arrow next to the Contact Manager icon and select Contact History.

How do I? and Field Help
To refine your search, complete any of the following fields in the Selection Criteria group box and select Search.
- Select the Description down arrow to select the type of contact record or event.
- Select the Originator down arrow to select the individual who created the contact record or event.
- Select the Department down arrow to select the department associated with the contact record or event.
- Select the Owner down arrow to select the owner of the contact record or event.
- Select the Status down arrow to select the contact or event status.
- Select the Priority down arrow to select the priority of the contact record or event.
- In the ID Nbr field, enter the unique computer-assigned number identifying the contact record or event (Length: 9 numeric).
- Select the Sensitive Items checkbox to view contact records or events marked as Sensitive.
- In the Date Selection group box:
- Select the Originated option to enter a date range based on the origination date. Then, select the From down arrow to select a beginning date from the calendar or enter the date in MM/DD/YYYY format. Select the To down arrow to select an ending date from the calendar or enter the date in MM/DD/YYYY format.
- Select the Follow-up option to enter a date range based on the follow-up date. Then, select the From down arrow to select a beginning date from the calendar or enter the date in MM/DD/YYYY format. Select the To down arrow to select an ending date from the calendar or enter the date in MM/DD/YYYY format.
Select Search to search for the results. Select Reset to clear the Selection Criteria fields.
The Search Results grid displays the contact or event description, status, priority, follow-up date, originated date, originator, department, owner, and ID number. Select any of the column headings with an arrow to sort the grid in ascending or descending order by the column heading. The column heading with the bold arrow indicates the column the grid is currently sorted by. Select the export icon to export items in the grid to Microsoft Excel.
| Column Heading | Description |
|---|---|
|
Unlabeled |
Indicates if you marked the contact record or event Sensitive. |
|
Description |
The type of contact record or event. For an Other Service Request contact record, move your point to the information icon to view the tool-tip describing the credit union-defined request. |
|
Status |
The contact or event status. |
|
Priority |
The priority of the contact record or event. |
|
Follow-up |
The follow-up date for the contact record or event. |
|
Originated |
The date that you created the contact record or event. |
|
Originator |
The department that created the contact record or event. |
|
Department |
The department associated with the contact record or event. |
|
Owner |
The owner of the contact record or event. |
|
ID Number |
The unique computer-assigned number identifying the contact record or event. Length: 9 numeric |