Printing Member History
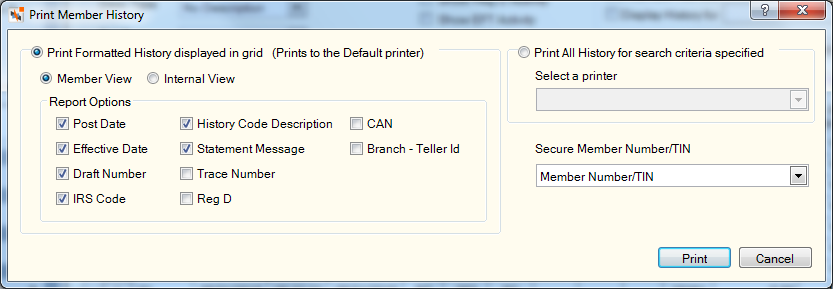
The Print Member History dialog box lets your print the member’s past financial transactions in an easy-to-read format. To access the Print Member History dialog box, , under Member Services on the Portico Explorer Bar, select History/Reversals. The History tab appears on top. Locate the member using the search tool on the top menu bar. Select the down arrow to select the search method, then enter the search criteria. Select the green arrow or press ENTER to locate the member. On the History tab, select the Type of History down arrow and select Financial Transaction History. In the Selection Criteria group box, click the Account Type down arrow to select the account type. Click Search. The results appear in the grid. Click the print icon button to display the Print Member History dialog box.

How do I? and Field Help
The Print Formatted History displayed in grid option will print the history information currently displayed in the grid. If additional history information is available, you must click the More button to retrieve the records before they will appear on the history report.
The Print All History for search criteria specified option will print the history based on the selection criteria entered on the History tab. You can select a printer from the drop-down list.
From the Secure Member Number drop-down list, select the secure member number option to use when printing the member history/status. The valid values are: No Member Number, Member Number, Secure Member Number - Suffix, and Secure Member Number - Prefix. The system default is selected on the Print Profile - Preferences - Other tab.
If you select the Print Formatted History displayed in grid option, two versions of the formatted report are available.
- Click the Member View option to automatically select all the report options except Trace Number, CAN, Teller ID and Branch.
- Click the Internal View option to automatically selects all the report options available.
You may select any of the fields in the Report Options group box to print on the history report; however, at least one option must be selected in order to print the report. The report will be formatted based on the fields selected. When you click Print, the history report will print to the Windows default printer.
- Select the Post Date check box to print the date the transaction was posted on the report.
- Select the Effective Date check box to print the effective date of the transaction on the report.
- Select the Draft Number check box to print the share draft or loan draft number associated with the transaction on the report.
- Select the IRS Code check box to print the IRS withdrawal or deposit code associated with the transaction on the report.
- Select the History Code Description check box to print the history code description associated with the transaction on the report.
- Select the Statement Message check box to print the statement description added by the credit union or by the ACH originator on the report. The Statement Description field will display the company name, effective date, and batch description for fees assessed for paid or returned ACH items when posting the fees online.
- Select the Trace Number check box to print the 17-digit draft trace number for a share draft or loan draft on the report.
- Select the Reg D check box to print the Reg D transaction indicator on the report.
- Select the CAN check box to print the CAN assigned to the transaction on the report.
- Select the Branch - Teller ID check box to print the two-digit teller ID followed by the three-digit branch number associated with the transaction on the report.
Click Print to print the report. Click Cancel to close the dialog box without printing the report.
Member View - System default selects all fields except Trace Number, Reg D, CAN, Teller ID and Branch.

Internal View - Selects all fields available.

On the printed history, an E indicates that the history item is an EFT item, while an R indicates that the item is a reversal.