Issue Card
|
|
|
|
|
For Remote Card Management (RCM), Integrated Desktop, MasterCard Visa Debit File Exchange (MVFE), and FIS Authorization Processor (FIS AP) only.
The Issue Card dialog box allows the issuing and reordering of ATM cards, debit cards and PIN mailers through Portico using Remote Card Management (RCM), Integrated Desktop, MasterCard Visa Debit File Exchange (MVFE), and FIS Authorization Processor (FIS AP).
When the Remote Card Mgmt field, Web Services field, or MVFE field, is A, B or D on the Credit Union Profile - Self Service tab, you must use the Issue Card dialog box for ATM and/or debit card orders.
To use the Issue Card dialog box, the Issue Cards check box must be selected in EFT Options section on Credit Union Profile – Self Service tab. If you elect to use MVFE for ATM cards, you can no longer use the auto-reissue option to reorder cards.
Complete the following steps to access the Issue Card dialog box.
- Under Member Services on the Portico Explorer Bar, click Account Information. The Overview tab appears on top.
- Locate the member using the search tool on the top menu bar. Select the down arrow to select the search method, then enter the search criteria. Select the green arrow or press ENTER to locate the member.
- An ATM and/or Debit Card button will appear if the member has an ATM and/or Debit ID set up. Click the ATM or Debit Card button to display the ATM Card Maintenance dialog box or Debit Card Maintenance dialog box.
- Click the Account ID down arrow to select the ATM or debit ID.
Click Issue Card to open the Issue Card dialog box. The card ID, card prefix and PAN appear in the title of the dialog box.
The account ID, card prefix, and PAN number on the title bar are partially masked.

How do I? and Field Help
| Field | Description |
|---|---|
|
Select the design to be used for a card order from the Card Class drop-down list. This is a Fiserv Card Services assigned value designating the plastic design to be used for a card order. Instead of manually entering a 2 digit code, you can define the values that should appear in the Card Class drop-down list using the Customized Field – Update window. Examples include: RC - Regular Customer Keyword: CC Reporting Analytics: ATM Order Card Class (ATM Additional Information query subject in Self Service folder and ME ATM Additional Information query subject in Month-end Information\ Self Service Month-end folder) and Debit Order Card Class (Debit Additional Information query subject in All Self Service folder and ME Debit Additional Information query subject in Month-end Information\ All Self Service Month-end folder) |
|
|
For First Data, enter the card stock used by the credit union. Length: 5 alphanumeric For FIS Authorization Processor (FIS AP), the default card media type from the Card Management window will automatically appear in the Media Type field. You can change the member's media type as needed. The valid options are: MS - Mag Stripe Only Reporting Analytics: ATM RCM Card Class (Self Service subject in the ATM Additional Information folder and ME ATM Additional Information subject in the Month-end Information\Self Service Month-end folder) and Debit RCM Card Class (Self Service subject in the All Debit Additional Information folder and All ME Debit Additional Information subject in the Month-end Information\Self Service Month-end\All Self-Service Month-end folder) |
|
|
Click the down arrow to select the card order type. The valid options are: A - ATM card |
|
|
Click the down arrow to select the status of the card being ordered. This field should not be confused with the Status field on the ATM/Debit Card Maintenance dialog box. When the card is ordered, the card status will be sent to Fiserv Card Services to update the DAF record. Once the member has activated the card, the status on the DAF record will be updated to 1 for active, but the value displaying in this field will remain unchanged. 0 – Inactive Card (the cardholder must activate the card using the voice activation system) 2 – Lost Card 3 – Stolen Card 4 – Restricted Card 5 – Insufficient Funds 6 – Pre-activated (the cardholder must insert the card into an ATM or swipe the card at a POS device and enter the PIN to activate the card) 7 - Reserved 8 – Expired Card 9 – Closed Card Keyword: CS |
|
|
For Remote Card Management (RCM) or FIS Authorization Processor (FIS AP) users, select the activation type from the Card Activation drop-down list. The valid values are: Blank - Not Used. System default. 1 - Last 4 digits of the cardholder's SSN 2 - First 6 characters of the cardholder's mother's maiden name 3 - Birth date of the cardholder (YYMMDD format) 4 - Alphanumeric code up to 6 characters long Length: 1 alphanumeric Keyword: AT |
|
|
For Remote Card Management (RCM) or FIS Authorization Processor (FIS AP) users, enter the card activation data needed when the cardholder attempts to activate their card. Length: 6 alphanumeric Keyword: AD |
|
|
For Integrated Desktop, Remote Card Management (RCM), or FIS Authorization Processor (FIS AP) users, enter the stock ID for the selected card design. This field overrides the default stock ID defined for the card class at Fiserv Card Services or CO-OP. A customized drop-down list can be created for this field using the Customized Field – Update window. The Card Design field appears on the Issue Card dialog box and ATM/Debit Card Options dialog box. Updates to this field on either dialog box will be saved to both dialog boxes. Length: 5 alphanumeric Keyword: CD |
|
|
The expiration date specified on the Card Information tab on the ATM/Debit Card Maintenance dialog box will automatically appear. The expiration date of the ATM or debit card. The card expires on the last day of the specified month. The default date 204912 indicates an unexpiring card. Select the down arrow to choose a date from the pop-up calendar or enter a date in MM/DD/YYYY format. Use the default date for debit cards. Keyword: XD |
|
|
Enter the number of months to use when calculating the expiration date. The valid values are 1-4. For First Data. Length: 1 numeric Reporting Analytics: ATM Expiry Reissue Months (Self Service subject in the ATM Additional Information folder and ME ATM Additional Information subject in the Month-end Information\Self Service Month-end folder) and Debit Expiry Reissue Months (Self Service subject in the All Debit Additional Information folder and All ME Debit Additional Information subject in the Month-end Information\Self Service Month-end\All Self-Service Month-end folder) |
The Address Information group box will display the member’s primary address. If the card should to be sent to an alternate address, you can enter a different address. Address changes on the Issue Card dialog box will not update the member’s primary address.
|
Line 1 of the member's primary address. This field cannot contain all blanks. Length: 35 alphanumeric Keyword: PA |
|
|
Line 2 of the member's primary address. If the Foreign check box is selected, the foreign city's name must reside in this field. Length: 35 alphanumeric Keyword: AD |
|
|
The city where the individual resides. If the Foreign check box is selected, the foreign country's name MUST reside in this field. In the State field, enter the foreign country code. For Canada, enter the province code in the State field. Length: 21 alphanumeric Keyword: PC |
|
|
Click the down arrow to select the correct state abbreviation from the drop-down list. If the Foreign check box is checked, enter the foreign country code in the State field. For Canada, enter the province code in the State field. Keyword: PS |
|
|
The postal ZIP Code for the address listed. For domestic addresses, the ZIP code must be either 5 or 9 digits. For foreign addresses, the ZIP code can be up to 10 characters. If the Address is Foreign check box is not selected:
If the Address is Foreign check box is selected:
Length: 9 numeric (10 alphanumeric if the Address is Foreign check box is selected.) Keyword: PZ |
|
|
Select this check box if the address is foreign. If the Address is Foreign check box is selected, the Country drop-down list and State/Province field will appear. Enter the foreign city's name in the Address 2 field and the foreign country's name in the City field. For countries other than Canada or Mexico, enter the two character country code in the State field for mailing label purposes. Then, choose the country from the Country drop-down list and enter the appropriate 2-character state or province code or select the state or province from the State/Province drop-down list to provide this information for the Self Service Interface. For Canadian addresses, enter Canada in the City field and enter the two character province code in the State field for mailing label purposes. Then, choose Canada from the Country drop-down list and select the appropriate Canadian province from the State/Province drop-down list to provide this information for the Self Service Interface. For Mexican addresses, enter Mexico in the City field and enter the two character state code in the State field for mailing label purposes. Then, choose Mexico from the Country drop-down list and select the appropriate Mexican state from the State/Province drop-down list to provide this information for the Self Service Interface. If your credit union has foreign address support with Corillian Online Banking, member updates to foreign addresses via online banking will display a three-character abbreviation in the City field. For example, if a member updates their Canadian address using online banking, CAN will appear in the City field and Canada will appear in the Country field. When 3rd party vendors update Portico with foreign address changes, the foreign city's name will appear in the Address 2 field (e.g. Guadalajara), the foreign country code will appear in the State field (e.g. MX), and the Country field and State/Province field will be cleared. The Country and State/Province fields allow you to capture the foreign address information to be used by the Self Service Interfaces (SSI) for online banking online enrollment, online banking verification, and online banking demographic updates. The Country and State/Province fields do not impact address formats for labels, statements, or notices. Fiserv recommends reviewing the Self Service Member Request Report 941 to identify members that updated a foreign address. Then, use the member's non-financial history to verify that the address information was entered correctly. Keyword: FF |
|
|
Line 1 of the member's alternate address. This field cannot contain all blanks. Length: 35 alphanumeric Keyword: AA |
|
|
Line 2 of the member's alternate address. If the Foreign check box is selected, the foreign city's name must reside in this field. Length: 35 alphanumeric Keyword: 2A |
|
|
The city where the individual resides. If the Foreign check box is selected, the foreign country's name MUST reside in this field. In the State field, enter the foreign country code. For Canada, enter the province code in the State field. Length: 21 alphanumeric Keyword: AC |
|
|
Click the down arrow to select the correct state abbreviation from the drop-down list. If the Foreign check box is checked, enter the foreign country code in the State field. For Canada, enter the province code in the State field. Keyword: AS |
|
|
The postal ZIP Code for the address listed. For domestic addresses, the ZIP code must be either 5 or 9 digits. For foreign addresses, the ZIP code can be up to 10 characters. If the Address is Foreign check box is not selected:
If the Address is Foreign check box is selected:
Length: 9 numeric (10 alphanumeric if the Address is Foreign check box is selected.) Keyword: AZ |
|
|
Select this check box if the alternate address is foreign. If the Foreign check box is selected, the foreign city's name must reside in the Address 2 field and the foreign country's name must reside in the City field. In the State field, enter the foreign country code. For Canada, enter the province code in the State field. Keyword: FA |
In the Embossing Information grid, you can add a DAF record, debit card order and/or PIN mailer request. Click Add Primary to add a row to the Embossing Information grid containing the primary member information. Click Add Joint to display the Relationships dialog box listing all the relationships and co-owners associated with the member. On the Relationships dialog box, select the check box next to the name and click Save. Portico will automatically complete the name fields in the Embossing Information grid with the selected name.
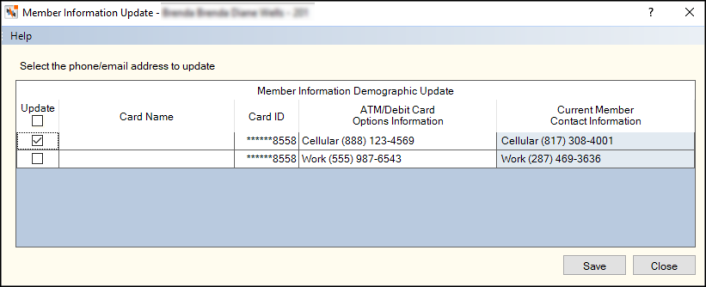
Digital Issuance Contact Information dialog box

If you modify any of the fields on the Digital Issuance Contact Information dialog box and the fields do not match the primary member or joint owner information on the Contact Information page, a message displays prompting you to choose which information to keep. The information you select on the Member Information Demographic Update dialog box, updates the primary or joint owner's Contact Information page.
Click Save to save the card order. If you are using Digital Card Issuance, the member receives a temporary card with the same card number, but with a different expiration date and CVS security number than the member's new card.
When you select Save, we send the updated phone number and type on the DAF record to Card Services, in addition to updating the Card Options page for the primary member or joint owner. If you update the email address, we send it in the Remote Card Management (RCM) batch file. If you select Close, a warning message appears telling you that Phone/Email may be out of sync and to perform a manual maintenance to correct.
The Card Order History grid lists actions that affected the member's ATM and debit card. For example, if you order a card or update a member's phone number, Portico records the action in the Card Order History grid. These history records are purged when the date in the Txn Date field is one year or more in the past. If an original order for a card and PIN mailer listed two different addresses, two records will appear in the Card Order History grid: one with an Action field of C and one with an Action field of P.
The Instant Card Issue application can be used to order debit cards for small businesses that do not have an EIN. Portico uses the Business Type field on the Contact Information tab to let you order a plastic card for a business using the Instant Card Issue application. If the business has an EIN or if the Business Type field contains a valid value, Portico will send the business name and primary name on the card to the Instant Card Issue application.
none
Card and PIN orders will appear on the:
- Card Order History dialog box
- Non-Financial Transaction Register Reports 030/036
- Card Management Activity Register Report 039
Portico Host: 10C