Verifying a Member
The Member Notifications and Alerts dialog box and Member Information dialog box contain important information about the member, such as member notes, messages, delinquent loans, etc.

How do I? and Field Help
To verify a member...
- Locate the member using the search tool on the top menu bar. Select the down arrow to select the search method, then enter the search criteria. Select the green arrow or press ENTER to locate the member. The Member Information dialog box will automatically appear.
- To verify a member using the Member Notifications and Alerts dialog box, click the Member Notifications and Alerts icon on the toolbar.
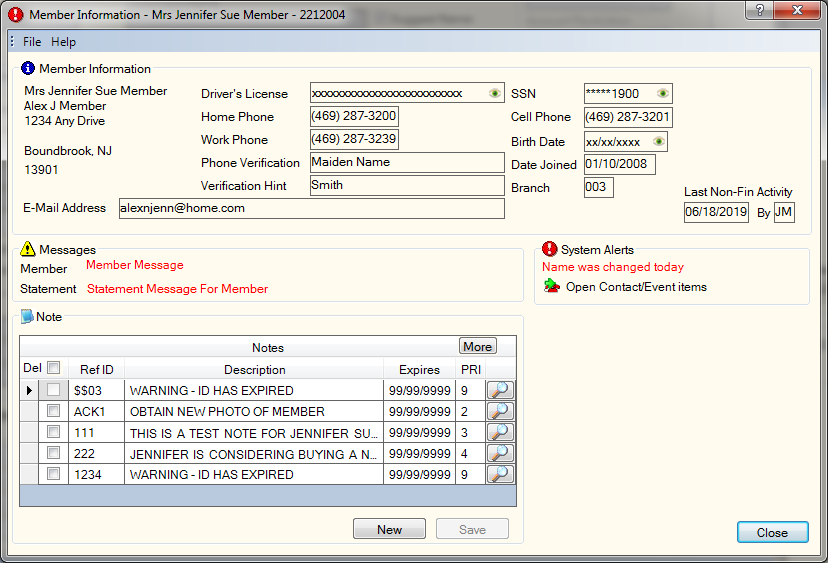
The Member Information group box displays basic information about the member.
| Field | Description |
|---|---|
|
The name that will appear on the member's statement. |
|
|
The joint owner or secondary member for this account. |
|
|
Line 1 of the member's primary address. |
|
|
Line 2 of the member's primary address. |
|
|
The city and state where the primary address is located. |
|
|
The ZIP code of the member's primary address. |
|
|
The state that issued the member's driver's license and the driver's license number. Portico masks driver license numbers. You can click inside the field to show the driver license number. When you tab out of the field, the driver license number will be masked. The driver's license number will remain unmasked as long as the field has focus. Portico will log each time a user clicks inside a field to view a driver license number in the View Sensitive Data Audit report. |
|
|
Home Phone |
The complete home phone number including area code for the member. |
|
Work Phone |
The complete work phone number including area code for the member. |
|
The credit-union defined name or code use for verification of account access. This field can be customized using the Customized Fields window. |
|
|
Phone Hint |
The credit-union defined name or code used as a hint for the verification of account access. This field can be customized using the Customized Fields window. |
|
E-Mail Address |
The member's primary default e-mail address. |
|
The SSN field displays the member's Social Security Number (SSN). On business accounts, the Employer Identification Number (EIN) appears in the EIN field. For members with an Individual Taxpayer Identification Number (ITIN), the ID number appears in the ITIN field. Portico partially masks taxpayer ID numbers. If you are assigned to the Portico – User Can View/Maintain TIN security group or a credit union-defined security group with the Portico – User Can View TIN permission or the Portico – User Can Maintain TIN permission, an eye indicator will appear within the field to indicate that you have permission to view the taxpayer ID number. You can click inside the field to show the taxpayer ID. When you tab out of the field, the taxpayer ID will be masked. The taxpayer ID will remain unmasked as long as the field has focus. |
|
|
Cell Phone |
The complete cell phone number including area code for the member. |
|
Birth Date |
The member's birth date. Portico masks birthdates. You can click inside the field to show the birthdate. When you tab out of the field, the birthdate is masked. The birthdate will remain unmasked as long as the field has focus. Portico logs each time a user clicks inside a field to view a birthdate in the View Sensitive Data Audit report. |
|
Date Joined |
The date the member joined the credit union. |
|
The branch where the member set up the original accounts. |
|
|
Last Non-Fin Activity |
The last date non-financial activity occurred on the member's account and the teller ID of the user that performed the non-financial activity. You can click the Last Non-Financial Activity date button to display the member’s non-financial history and research changes to the member’s contact information. Changes to a member’s contact information will appear in non-financial history the day after the change was made. |
A Closed Account indicator will appear above the member information if the member account is closed.
The palm icon will appear on the Member Information and Member Notifications and Alerts dialog boxes if the member is enrolled in Palm Authentication.
A member’s identification and signature can be retrieved manually or automatically on the Member Information dialog box.
If the Member Identification Images check box is selected on the User Profile – Popups tab, the Member Information dialog box displayed when a member number is entered on the top toolbar will display the images automatically or display a Retrieve Images button. The Retrieval group box on the User Profile – Images tab indicates if the images will be retrieved automatically or manually. If the Automatic option is selected, Portico displays the Member Information dialog box, then retrieves the identification and signature images from Nautilus Essentials. The message Retrieving identification images... will appear on the Member Information dialog box to inform you that the system is retrieving the identification images. You can wait for the images to appear or close the Member Information dialog box before the images appear. Click Retrieve Images to retrieve the member signature and photo images.
The date that the images were captured will appear to the right of the image name in the ID Types and Signatures drop-down lists. If there is more than one photo or signature image for a member, left and right arrows will appear above the image. Portico will determine which photo and signature image to display based on the user’s selection on the User Profile – Images tab. Click the arrows to scroll through the member photos and signatures.
For credit unions new to Portico, all photos and signatures will be loaded into the system and assigned your conversion date as the capture date.
If the Member Identification Images check box is not selected on the User Profile – Popups tab, the Member Information dialog box displayed when a member number is entered on the top toolbar will not display the images automatically nor display a Retrieve Images button. However, the Member Notifications and Alerts dialog box accessed from the Member Notifications and Alerts icon on the Portico toolbar will display the Retrieve Images button.
In the Messages group box, the Member field displays the credit union-defined internal message regarding this member. The Statement field displays the customized message to print on the member's statement.
The System Alerts group box displays various alerts about the member, such as a past due safe deposit box payment, delinquent loan, negative share, or a promise to pay exists on an account. You can set up which system alerts will appear on the User Profile - Popups tab.
The Notes, Warnings and Alerts grid on the Member Information dialog box and Member Notifications and Alerts dialog box displays the reference ID, type, description or first 35 characters of the member note, expiration date, and priority. Up to five notes will appear in the Notes, Warnings and Alerts grid. A More button will appear if there are additional notes. Click More to view additional notifications and alerts.
To view a complete note, you can:
- Hover over the row in the grid to display a tool tip containing the entire note.
- Click the magnifying glass icon to display the Notes, Warnings and Alerts dialog box.
| Column | Description |
|---|---|
|
Select the Del check box next to the member note and click Delete to delete an existing member note. Select the Del check box in the column heading to select all the member notes. |
|
|
Ref ID |
The credit union-defined identification associated with this specific member note. |
|
Type |
The type of member note: Note, Warning, Alert-Lockout or Alert-Freeze. |
|
Description |
The first 50 characters of the member note. |
| Expires |
The expiration date for the specific member note. |
|
PRI |
The priority of the specific member note. |
|
Detail |
Click the magnifying glass icon to view or maintain an existing note. |
|
When a warning or alert has been added to a member account, you must acknowledge it on the Member Information dialog box that appears when you look up a member. To acknowledge a message, select the Ack check box for each warning and alert, then click the Acknowledge button. If you manually display the Member Notifications and Alerts dialog box, notes, warnings lockouts and freezes will display, but you are not required to acknowledge or override the message. Users cannot prevent warnings and alerts from appearing on the Member Information dialog box, regardless of the settings on the User Profile – Popups tab. If only notes exist on a member’s account, the Ack check box and Acknowledge button will be disabled and the Cancel button will change to a Close button. When you acknowledge a warning or alert-freeze, the Member Information dialog box will close and the user name and the warning or alert-freeze information will be sent to the Warnings and Alerts Acknowledge/Override report. When you acknowledge an alert-lockout, the User Override dialog box will appear. If the user has a lockout level equal to or greater than the required level to override the Alert-Lockout, they will enter their override password and click OK. If the user’s lockout level is lower than the alert-lockout placed on the member’s account, the user will be unable to override the lockout. If your credit union uses the enhanced override option, another user in the override group (one with a high enough user lockout level) can override the lockout or the user can request a remote override. A user will only appear in the Override User drop-down list if they are a member of the override group and their user lockout level is high enough to override the Alert-Lockout. |
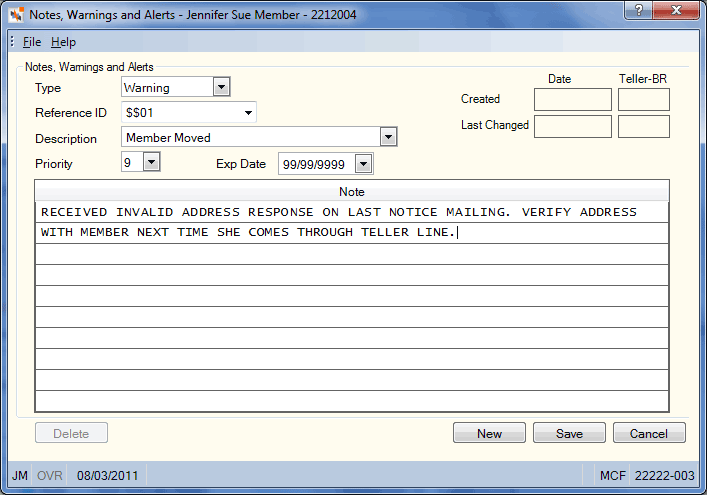
To add a new note, click New. The Notes, Warning and Alerts dialog box appears. To maintain an existing note, click the magnifying glass icon to display the Notes, Warnings and Alerts dialog box. The Notes, Warning and Alerts dialog box will appear with the complete note. You can maintain the Priority field, Exp Date field and the text in the Note box. Click Save to save your changes to the note.

- From the Type drop-down list, select Note, Warning, Alert-Lockout or Alert-Freeze. System default is Note.
- Enter a reference ID in the Reference ID field. This field can be customized using the Customized Fields window.
- If you selected Alert-Lockout from the Type drop-down list, enter the lockout level 0-9 in the Level field. A user must have a user level equal to or greater than this level to override the lockout.
- From the Description drop-down list, select the pre-defined description or enter a description. You can enter a description if the List with Data Input option is selected on the Warnings and Alerts – Admin window.
- In the Priority field, accept the system default of 9 or enter a new priority.
- In the Exp Date field, accept the system default of 99/99/9999 or click the down arrow to select a date from the pop-up calendar.
- If desired, enter the note in the Note box. You can enter up to 10 rows of 75 characters each - there is no word-wrapping.
- Click Save. The note will appear in all capital letters in the Notes, Warnings and Alerts grid.