Setting Up Electronic and Laser Notices
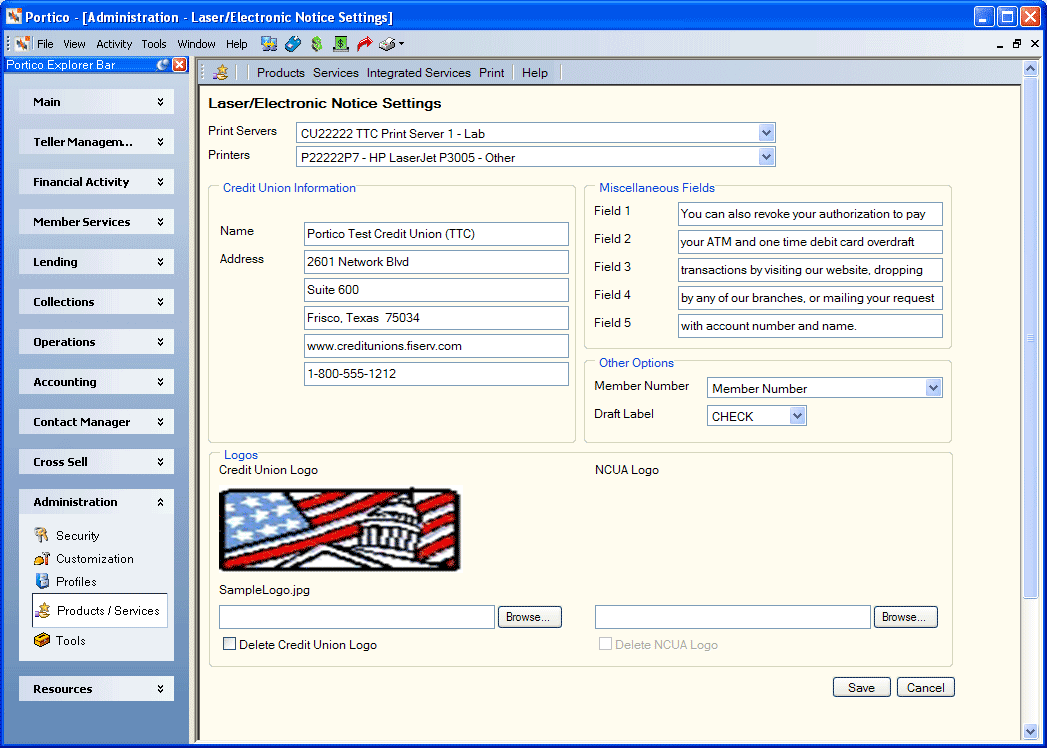
The Laser/Electronic Notice Settings window lets you define the credit union information, customized message and logo that should appear on the notices. To access the Laser/Electronic Notice Settings window, select Products/Services within the Administration menu on the Portico Explorer Bar. On the Products/Services menu bar, select Print, then select Laser/Electronic Notices.

How do I? and Field Help
Complete the following steps to define the laser/electronic notice settings:
- From the Print Servers dropdown list, select the print server.
- Select the printer where the notices print from the Printers dropdown list.
- In the Credit Union Information Name field, enter the name of the credit union that should appear on the notice. (Length: 50 alphanumeric)
- In the Credit Union Information Address fields, enter the credit union address that should appear on the notice. (Length: 50 alphanumeric per line)
- In the Miscellaneous Fields group box, enter additional messages that should appear on the notice. (Length: 50 alphanumeric per line)
- From the Member Number dropdown list, select how the member number should appear on the notice. The valid values are: No Member Number, Member Number, Secure Member Number - Suffix, or Secure Member Number - Prefix.
- From the Draft Label dropdown list, select how a share draft/check should appear on the notice. The valid values are: CHECK, DRAFT, or SERIAL.
- In the Logos group box, select Browse to select the credit union logo and/or NCUA logo that should appear on the notice.
- Select Save to save your changes.
Select the Delete Credit Union Logo checkbox to remove the credit union logo from the notice.
Select the Delete NCUA Logo checkbox to remove the NCUA logo from the notice.
Select Cancel to disregard your changes.
The Notice Delivery Method group box on the Stmts/Reporting/Notices tab reflects the member’s notice options. For each notice group, the member can choose if the notices deliver through:
H – Hardcopy. System default.
E – Electronic
B – Both
For Laser Notices, once you determine which notices print on a credit union laser printer, update the Automated Short Report Print Schedule window. Add the report number and branch where you scheduled the report to the Automated Short Report Print Schedule window before you can set up notices to print on a credit union laser notice printer. To access the Automated Short Report Print Schedule window, on the Portico Explorer Bar, select Products/Services within the Administration menu. On the Products/Service menu bar, select Print, then select Automated Short Report Print Schedule. You need to add the following for each back-office notice that prints on a credit union laser notice printer:
- Report number
- Report branch
- Number of copies that either print automatically or become the default on the Laser Notices window.
- Indicate if the report prints automatically by selecting the Print PM checkbox
- The printer ID set up to print the laser notices.
Select the Laser/Electronic Notices icon button on the Automated Short Report Print Schedule window to access the Laser/Electronic Notices window.
The Laser Print field on the report rules for the notices indicates if Personix prints the notice or the credit union laser printer does. Portico Customer Service must change the field after updating the Automated Short Report Print Schedule window. The E Delivery and E Group fields on the report rules of the reports support Electronic Notices. The E Delivery field indicates if the notice is available for Electronic Notices and should send to Virtual Branch or Corillian for the member to view. The E Group field indicates the electronic notice group code for the notice. The valid options are:
00 – System default.
01 – Certificates
02 – NSF/Overdraft
03 – Tax Forms (future)
04 – Lending
05 – Member
The following permissions and security groups support access to the Laser/Electronic Notices window.
| Permissions | Security Groups |
|---|---|
|
Print - Print - Laser/Electronic Notices - Menu Option |
Portico - Customization - Administrator Portico - Customization - View Only Print - Administrator |
|
Print - Print - Laser/Electronic Notices - View Only |
Portico - Customization - Administrator Portico - Customization - View Only Print - Administrator |
|
Print - Print - Laser/Electronic Notices - Maintain |
Portico - Customization - Administrator Print - Administrator |