Creating Documents
The Document Preparation dialog box lets you prepare documents with member and joint owner information.
How do I? and Field Help
The Member Data Selection tab lets you narrow down the list of available documents and limit the data retrieved for document preparation. To view the full list of documents on the Available Documents tab, select the Other Documents check box and click Get Data. To narrow down the list of documents that appears on the Available Documents tab and limit the data retrieved; select the information check boxes and specific accounts from the drop-down lists. Then, click Get Data.
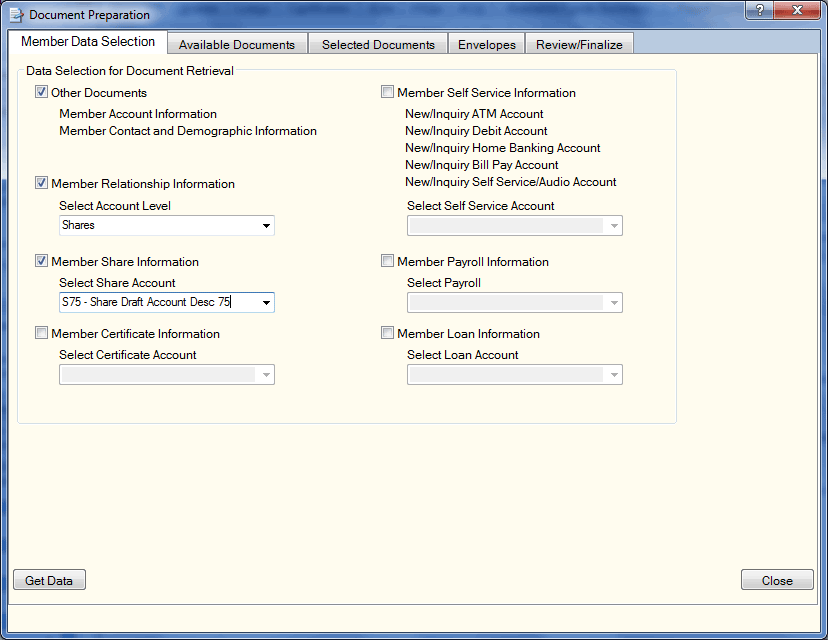
Before you can begin using the check boxes on the Member Data Selection tab to select the data retrieved, the data must be mapped to the appropriate document. In addition, the documents must be associated with a Portico Process on the Document Preparation - Process Associations - Update window in order for the document to appear on the Available Documents tab. The Portico Processes related to each check box are:
On the Available Documents tab, select the check box next to the desired documents, then click Get Forms to display the Selected Documents tab. The selected documents appear on the Selected Documents tab.
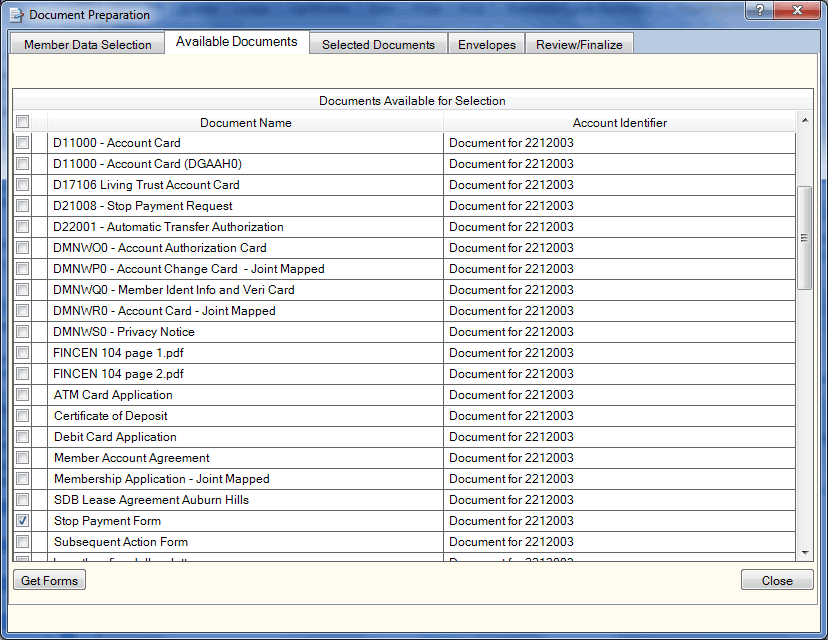
The Documents Available for Selection grid displays the following information:
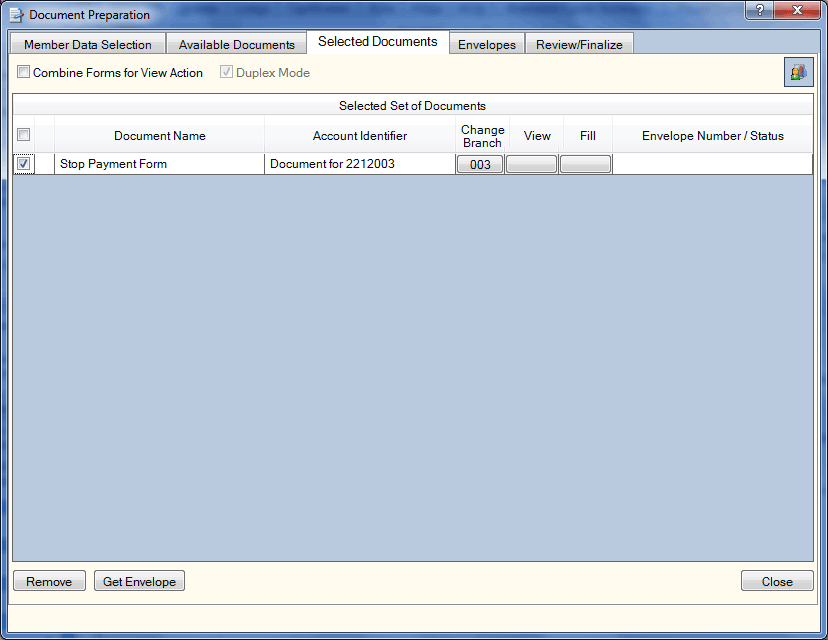
On the Selected Documents tab, you can change the branch, view the document and fill in the document.
Web Signatures for Credit Unions: Web Signatures for Credit Unions offers a secure way to obtain signatures on forms and allows members to securely upload required documentation, such as payroll stubs and insurance information. For credit unions using Web Signatures, on the Selected Documents tab, select the documents that should be combined in an envelope to be presented to the member for review and signing, and then click Get Envelope.
Web Signatures
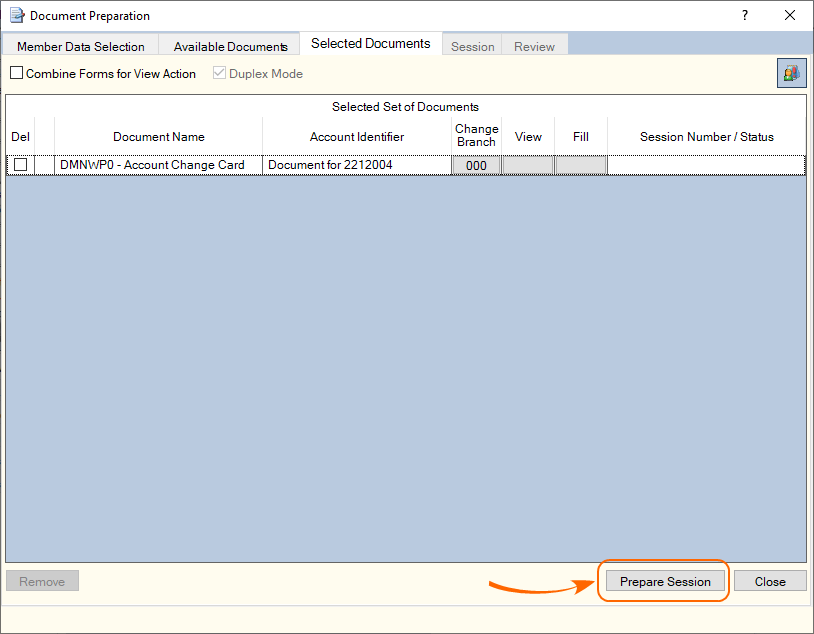
IMMeSign: IMMeSign provides in-person and remote signing options of documents and forms generated in Portico. For credit unions using IMMeSign, on the Selected Documents tab, select Prepare Session to prepare the signing session.
IMMeSign
Select the Combine Forms for View Action check box to view multiple forms. If the Combine Forms for View Action check box is selected, click View to view multiple forms.
Select the Duplex Mode check box to duplex print the forms.
Click the Member Notifications and Alerts icon on the Envelopes tab to display the Member Notifications and Alerts dialog box
The Selected Set of Documents grid displays the following information:
| Column Heading | Description |
|---|---|
|
Select the check box, then click Remove to remove the selected documents from the Selected Documents tab. |
|
|
An R in this column indicates that the document is required |
|
|
The name of the document. |
|
|
The member number that the document will be generated for. |
|
|
Click the branch button in the Change Branch column to display the Change Documents dialog box. |
|
|
Click the button in the View column to view the document. |
|
|
Click the button in the Fill column to complete the document. If an error occurs, the Fill button appears in red and the tooltip indicates that a possible fill error has occurred. Errors can occur if a user closes the document or if the connection is lost before the Send and Save is complete. If you press the Complete button or Sign button when a Fill error exists, an error message appears. You can continue with the process or click Cancel to return to the Selected Documents tab. |
|
|
Click Sign to add an electronic signature to the document. If an error occurs, the Sign button appears in red and the tooltip indicates that a possible signing error has occurred. Errors can occur if a user closes the document or if the connection is lost before the Send and Save is complete. Credit unions using Web Signatures for Credit Unions will not receive Sign errors, since the signature process occurs outside of the Portico document preparation process. If you press the Complete button when a Sign error exists, an error message appears. You can continue with the process or click Cancel to return to the Selected Documents tab. This column does not appear for IMMeSign. |
|
|
Click Complete to finish the document. This column does not appear if your credit union uses IMMeSign. |
|
|
If using CIC Sign IT, select the check box to store an image of the document in Nautilus Essentials. This column does not appear if your credit union uses Web Signatures or IMMeSign. |
|
|
If using Web Signatures, this column will display the system-assigned envelope number and the status of the envelope. The valid statuses are: Draft, Voided, Created, Deleted, Sent, Delivered, Signed, Review, and Completed. For Ad Hoc documents and Safe Deposit Box documents, anything older than 5 days with a document envelope status of Completed, Deleted, Draft, or Voided will be purged. This column does not appear if your credit union uses IMMeSign. |
|
|
Session Number/Status |
If using IMMeSign, this column displays the system-assigned session number and the status of the session. This column does not appear if your credit union uses Web Signatures. |
To remove the selected documents from the Selected Documents tab, select the check boxes on the document and click Remove.
IMMeSign: For credit unions using IMMeSign, the Session tab appears with the list of selected documents. Use the drop-down list on the Organize tab to designate a signer for a specific field on a document. Select Remove Draft Session to remove a draft eSign session.
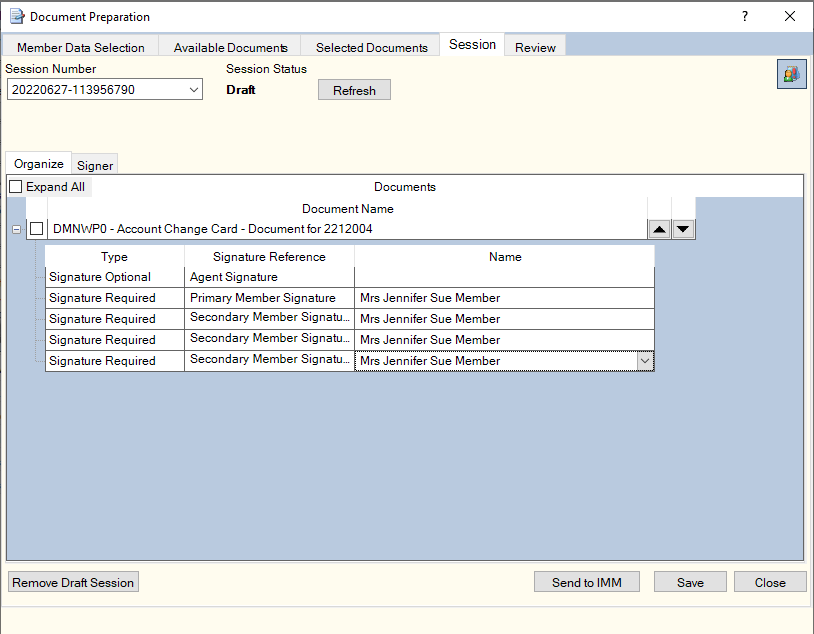
IMMeSign
Web Signatures for Credit Unions: For credit unions using Web Signatures, the Envelopes tab appears with the list of selected documents. The envelope number is automatically assigned. The status of the envelope can be: Draft, Created, Sent, and Completed.
- Select an action from the Envelope Action drop-down list and click Submit. The valid options are:
- Select Create Envelope from the drop-down list and click Submit to submit the envelope for processing. The system generates the emails to the members allowing them to sign via the web. The Envelope Status will change from Draft to Created. Create Envelope is only available for documents without an envelope number or a Fiserv WebSign RequestID.
- Select Remove Envelope from the drop-down list and click Submit to remove the envelope from the Envelopes tab. The process is stepped back to before the Get Envelope button was clicked on the Selected Documents tab. The filled and mapped fields are retained, but no envelope is created and no signatures are obtained. Remove Envelope is only available for envelopes in a Draft status and documents without an envelope number. If the only envelope on the Envelopes tab is removed, the Envelopes tab becomes disabled.
- If the credit union has DocuSign Manager, select Manage Envelope and click Submit to launch DocuSign Manager for the envelope number. Manage Envelope is only available for documents with an envelope number. Manage Envelope is not available for envelope statuses of Voided, Deleted, Review, Completed, Declined, or Timedout.
- Select Void Envelope and click Submit to enable the Void Reason cell for the envelope and void the signing process. Void Envelope is only available for documents with an envelope number. Void Envelope is not available for envelope statuses of Voided, Deleted, Review, Completed, Declined, or Timedout.
- Click the Envelope History icon on the Envelopes tab to view the current history of the envelope.
- Click the Member Notifications and Alerts icon on the Envelopes tab to display the Member Notifications and Alerts dialog box.
- In the Email Subject field, enter the email subject that will appear in the email to the recipient (Length: 70 alphanumeric). You can create a default email subject on the Credit Union Profile - Web Signatures tab.
- In the Email Blurb field, enter the email body that will appear in the email to the recipient (Length: 70 alphanumeric. You can create a default email blurb on the Credit Union Profile - Web Signatures tab.
- You must submit the envelope before collecting in-branch signatures using signature pads.
- For in-branch signing, you can use a credit union workstation to sign and upload documents. On the Envelopes – Address tab, select Request Signer from the Actions drop-down list, then click the green arrow. The green arrow next to the Branch Signer will be disabled on the Envelopes – Address tab once the envelope has been delivered and signed by that recipient. Remote recipient emails are automatically sent based on the order defined in the Order column.
- Click Refresh Envelope to obtain the most current envelope status. Once an envelope has been submitted, the third-party signature processor begins processing the envelope. While you are viewing the envelope within Portico, there may be status changes occurring behind the scenes. For example, the envelope status in Portico may be Created, but as processing occurs, the status may change to Delivered.
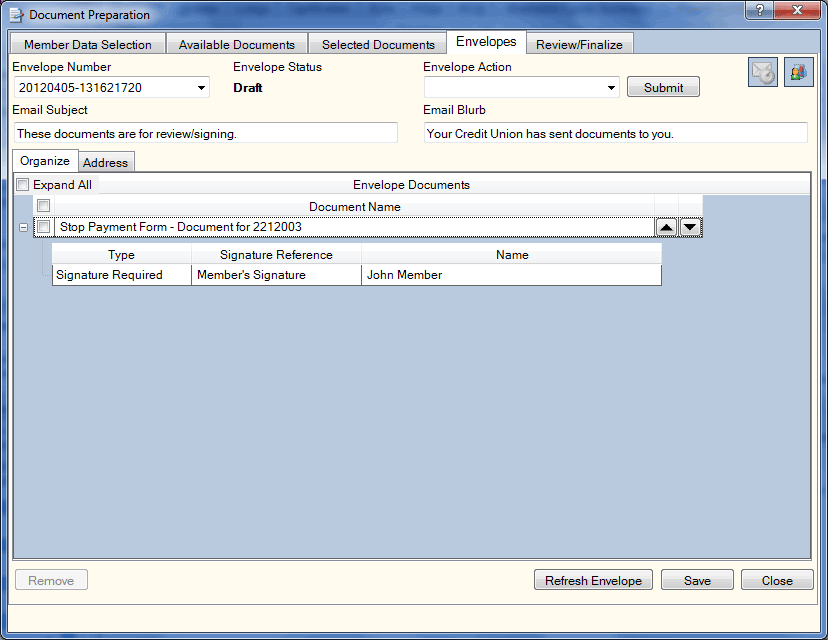
Web Signatures
The Organize tab lets you remove a document from an envelope, change the order of the documents, designate a signature or initial field on a document as required or optional, designate a signer and more.
IMMeSign: For credit unions using IMMeSign, the email address of the recipient from the Contact Information tab appears in the Signer/Recipient Information grid on the Session tab. You can use this email address or you can enter a different email address. Select Add Viewer to include a recipient as a view-only receiver of the selected documents. Select Send to IMM to transmit the document(s) to the IMM interface for in-branch or remote signing.
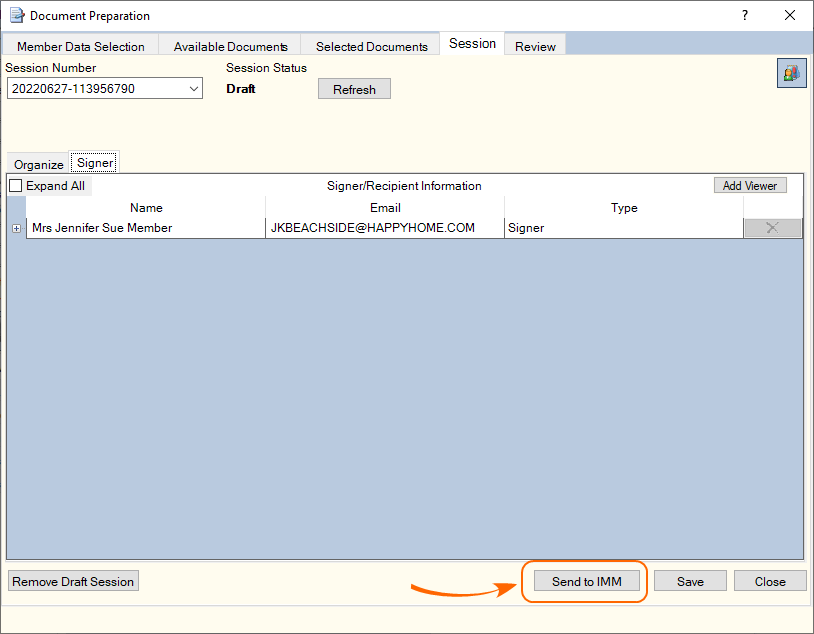
IMMeSign
Web Signatures for Credit Unions: For credit unions using Web Signatures, most of the information within the Signer/Recipient Information grid is completed based on the Credit Union Profile - Web Signatures tab.

Web Signatures
The Signer/Recipient Information grid displays the member name, email address and type of signer.
| Column Heading | Description |
|---|---|
| Add | To add an envelope recipient to the Address tab, click Add. The Add Recipient dialog box lets you select the recipient, the recipient’s email address and type of signer (Branch Signer, Carbon Copy, Certified Delivery, Hosted Signer, or Web Signer) and the documents that the recipient should receive. This column does not appear if your credit union uses IMMeSign. |
| Expand/Expand All | Select the Expand All check box to view the member name, email address and type of signer. |
| Actions |
Select a valid action from the drop-down list and click Save. Actions are only available for envelopes with an envelope number.
This column does not appear if your credit union uses IMMeSign. |
| Name | The name of the recipient. |
| The email address of the recipient from the Contact Information tab. You may enter a different email address. | |
| Type |
The type of recipient. The options available for Web Signatures are:
|
| Order | The order in which the recipients interact with the envelope. Consecutive numbering indicates that the recipients interact with the envelope, one at a time. Concurrent numbering indicates the recipients may be in the envelope at the same time. This column does not appear if your credit union uses IMMeSign. |
| Authentication |
For remote recipients, choose the Authentication method for securing the access to the envelope. The options available for the Authentication drop-down list are:
This column does not appear if your credit union uses IMMeSign. |
| Code |
The access code provided by the credit union when using Access Code authentication. Length: 25 alpha characters This column does not appear if your credit union uses IMMeSign. |
| Green Arrow |
For in-branch signing, you can use a credit union workstation to sign and upload documents. On the Envelopes – Address tab, select Request Signer from the Actions drop-down list, then click the green arrow. The green arrow next to the Branch Signer will be disabled on the Envelopes – Address tab once the envelope has been delivered and signed by that recipient. Remote recipient emails are automatically sent based on the order defined in the Order column. You must submit the envelope before collecting in-branch signatures using signature pads. This column does not appear if your credit union uses IMMeSign. |
| Credit Union Employee Signing Host Name |
If the Type field is Hosted Signer, the Credit Union Employee Signing Host Name drop-down list allows you to select the name of the credit union employee who will serve as the host for the member to sign via Web Signatures using the credit union employee’s workstation. The Credit Union Employee Signing Host Name drop-down list will contain the names of employees who have Portico user IDs and the appropriate security permissions. This column does not appear if your credit union uses IMMeSign. |
| Credit Union Employee Signing Host E-mail Address |
If the Type field is Hosted Signer, the Credit Union Employee Signing Host E-mail Address displays the email address of the credit union employee who will serve as the host for the member to sign via Web Signatures using the credit union employee’s workstation. This column does not appear if your credit union uses IMMeSign. |
Click Save to save the envelope information.
IMMeSign:For IMMeSign, the Review tab displays a document status and session number. Select View IMM Session to display the IMM eSign Session Details page.
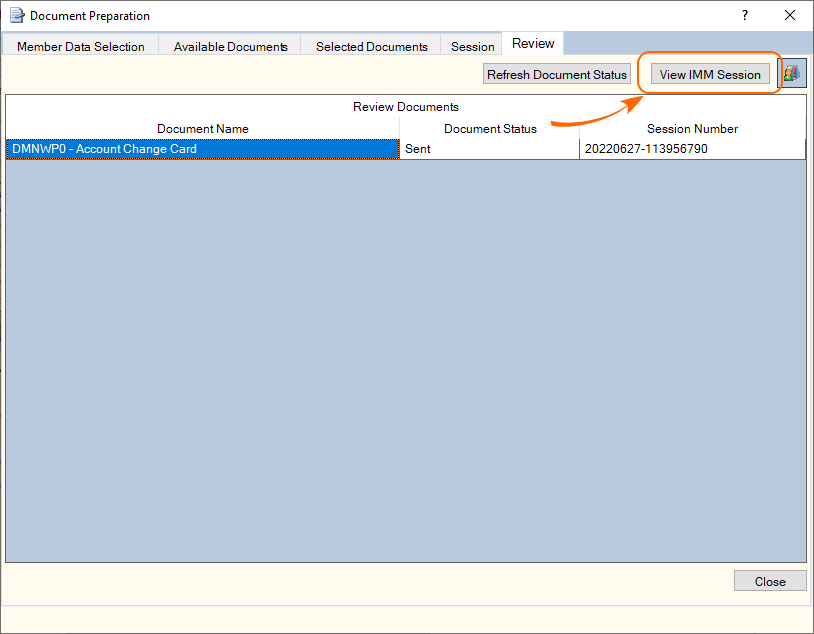
IMM eSign
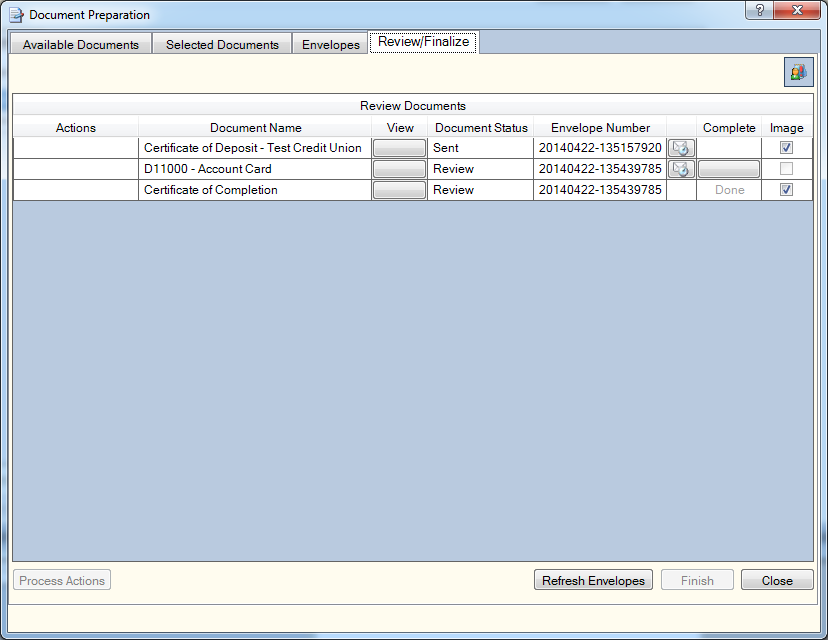
Web Signatures for Credit Unions: For credit unions using Web Signatures, the Review/Finalize tab lists the status of the document and the envelope number.
Web Signature
The Review Documents grid lists the status of the document.
| Column Heading | Description |
|---|---|
| Actions |
To clear the signatures on a document, but retain the filled and mapped data on the document, select Clear Signatures from the Actions drop-down list and click Process Actions. The document is removed from the envelope and is available on the Selected Documents tab to be placed into another envelope for signing. To remove a document, select Remove Document from the Actions drop-down list and click Process Actions. This column does not appear if your credit union uses IMMeSign. |
| Document Name |
The name of the document. |
| View |
Click the button in the View column on the Review/Finalize tab to view signatures on completed documents. Each completed envelope has a Certificate of Completion document to prove validation of signatures. Click the button in the View column on the Review/Finalize tab to view the certificate. This column does not appear if your credit union uses IMMeSign. |
| Document Status |
The status of the document. |
| Envelope Number |
The system-assigned envelope number. This column does not appear if your credit union uses IMMeSign. |
|
Session Number |
If using IMMeSign, this column displays the system-assigned session number. This column does not appear if your credit union uses Web Signatures. |
| History icon |
Click the Envelope History icon to view the current history of the envelope. This column does not appear if your credit union uses IMMeSign. |
| Complete |
As you review the completed documents, click the button in the Complete column to lock the documents and mark them DONE. Then, click Finish to send the documents to Nautilus Essentials, and the document status will change to Completed. In some cases, there may be documents that do not need to be sent to Nautilus Essentials. For example, a carbon copy. In this situation, the document status is Review. You should review the document, then click the button in the Complete column to lock the document and mark it Done. The document status will change to Completed. The Finish button remains disabled as no imaging is necessary. This column does not appear if your credit union uses IMMeSign. |
| Image |
Select the check box to store an image of the document in Nautilus Essentials. Each night, any document set older than 5 days with a document envelope status of Completed, Deleted, Draft, or Voided will be purged. Document sets with a status other than Completed, Deleted, Draft, or Voided will remain in Portico for 45 days before being purged. This column does not appear if your credit union uses IMMeSign. |
Click the Member Notifications and Alerts icon to display the Member Notifications and Alerts dialog box
Click Close to close the dialog box.
To prepare and image documents, users must be assigned to one of the following security groups or you can create your own security group. You can add the following permissions to a credit union-defined security group using the Security Group Permissions – Update window.
| Permissions | Security Groups |
|---|---|
|
DocPrep - User Can Prepare Documents |
DocPrep – Administrator DocPrep – User |
|
ImagingID - User Can Access Image Capture |
ImagingID – User |
|
ImagingDocuments – User Can Access Safe Deposit Box Repository |
ImagingDocuments – Safe Deposit Box Repository |