Step 1: Starting a New Member Application
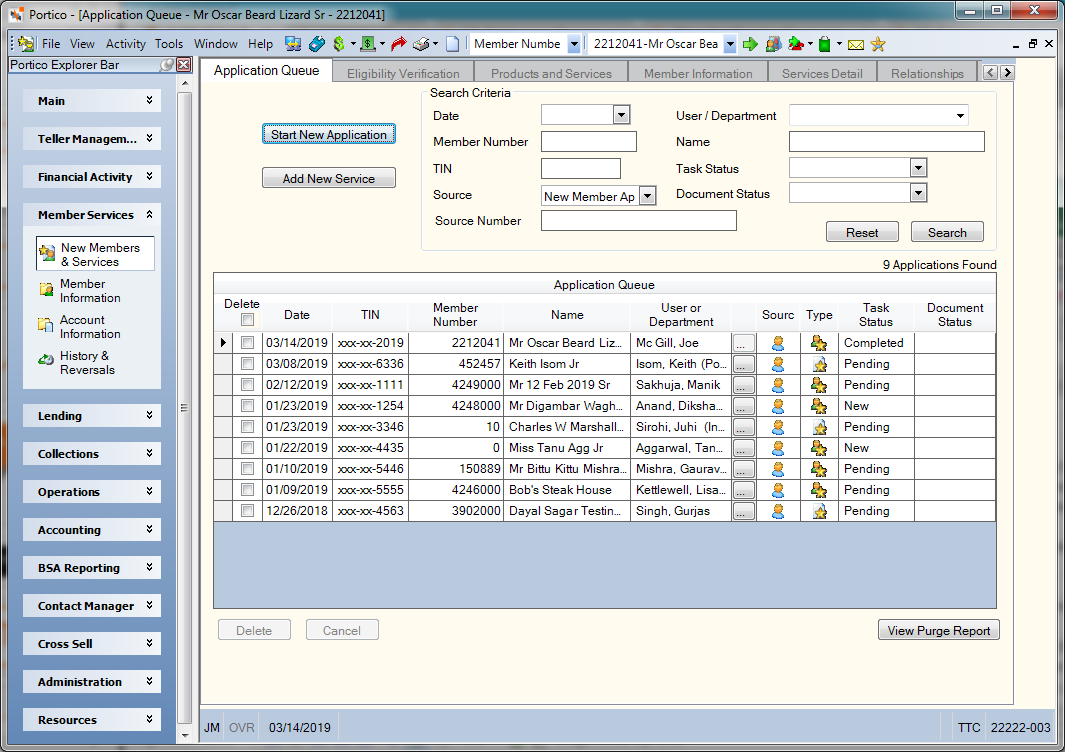
From the Application Queue tab, you can add a new member to the credit union, add a new service for an existing member, or search for an application in progress. To access the Application Queue tab, under Member Services on the Portico Explorer Bar, select New Members & Services. The Application Queue tab appears.

How do I? and Field Help
The Application Queue automatically displays the applications assigned to the user logged into Portico.
Select Start New Application to add a new member to the credit union.
Select Add New Service to add a new product or service to an existing credit union member.
To search for a specific application, enter the search criteria in the Search Criteria group box, then select Search.
- Select the Date down arrow to select the date the application was originally created from the pop-up calendar or enter a date in MM/DD/YYYY format.
- Select the User/Department down arrow to select the credit union user and department that originated the application.
- In the Member Number field, enter the member number associated with the application. Length: 12 numeric
- In the Name field, enter the full member name associated with the account. Length: 23 alphanumeric
- In the TIN field, enter the taxpayer ID number of the new or existing member. Length: 9 numeric
- Select the Task Status down arrow to select the application status.
- For credit unions using Web Signatures for Credit Unions, select the status of the document envelope from the Document Status dropdown list to display queue items by a specific status. The valid statuses are: Draft, Created, Sent, Review and Completed.
- Select the Source down arrow to select source of the application: New Member Applicant, Internet New Member Applicant, or Loancierge.
- If the application source is Internet or Loancierge, enter the confirmation number used to identify the application in the Source Number field (Length: 12 alphanumeric). If this request was generated by using the Internet, this is the number received by the member, and the first 3 digits are the Julian date. If this request was manually created, this number will be auto generated and the first 3 digits are the Julian date + 500. For new member applications, this number will be displayed on the Self-Service Member Request Report 941.
Select Reset to reset the search criteria.
Double-click an application to open an existing application.
| Column Heading | Description |
|---|---|
|
Select this checkbox to select all the applications in the queue. |
|
|
Select the checkbox next to an application and select Cancel to change the application Status to Canceled. You can reactivate a canceled application by double-clicking the application and selecting Yes when prompted to reactivate the application. Select the checkbox next to an application and select Delete to delete the application from the queue. The application will only appear on the Purge Report. |
|
|
The date the application was originally created. |
|
|
The taxpayer ID number. Portico partially masks taxpayer ID numbers. |
|
|
The member number associated with the application. |
|
|
The member name associated with the application. |
|
|
The credit union user and department that originally created the application. |
|
|
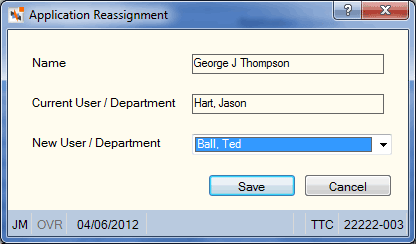
Select the ellipse button (...) to open the Application Reassignment dialog box and reassign an application to a different user and department. |
|
|
The source of the application (New Member Applicant, Internet New Member Applicant, or Loancierge). For applications received by using the Internet or Loancierge, place your point to the source icon to view the confirmation number. |
|
|
The type of application (new member application or new service for an existing member). |
|
|
The status of the application. |
|
|
Move your point to the Document Status icon to display the created and completed dates and the envelope number. |
Select the ellipse button (...) to open the Application Reassignment dialog box and reassign an application to a different user and department. On the Application Reassignment dialog box, select the New User/Department down arrow to select the new user or department and select Save.

Select the checkbox next to an application and select Cancel to change the application Status to Canceled. You can reactivate a canceled application by double-clicking the application and selecting Yes when prompted to reactivate the application.
Select the checkbox next to an application and select Delete to delete the application from the queue. The application will only appear on the Purge Report.
Select View Purge Report to access the Application Queue Purge Summary Report window.
During the process of adding a new member or service, messages may appear to assist you in setting up the products and services.
none
- New Share Accounts Report 070 - Displays I for new account applications by using Internet
- Self-Service Activity Report 940- Displays MA0000 new member processing code
- Self-Service Member Request Report 941- Displays memo for teller intervention on SSI requests, memo line for new member applications
- Self-Service Audit Report 946- Displays activity on requests
- Self-Service Purge Report 947- Displays purged and completed request transaction