Assigning and Maintaining a Safe Deposit Box
Overview
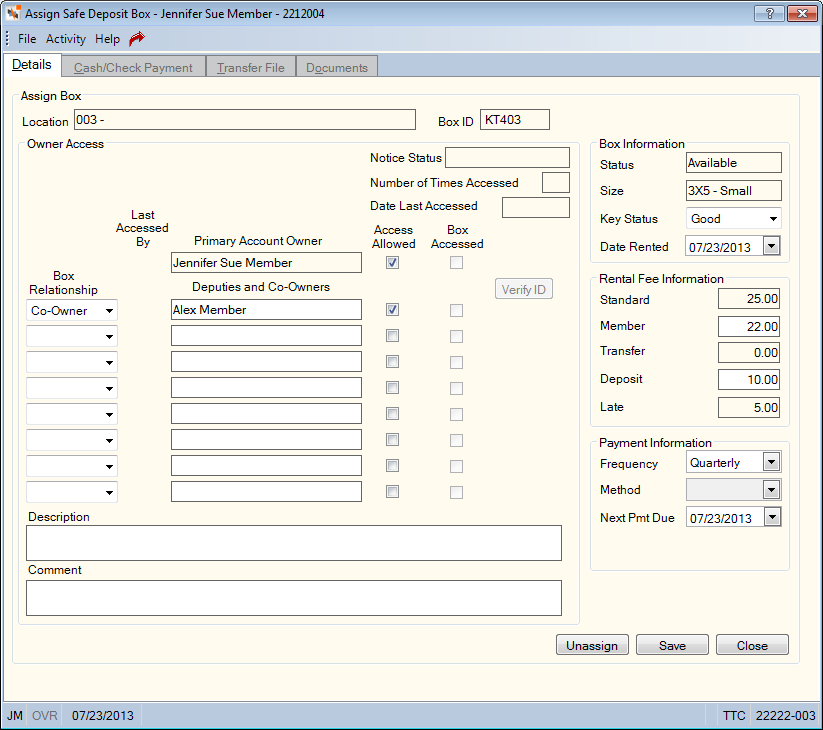
The Assign Safe Deposit Box dialog box lets you assign a safe deposit box to a member. The Maintain Safe Deposit Box dialog box lets you change the information for the safe deposit box or unassign the safe deposit box.
Access
To access the Assign Safe Deposit Box dialog box, complete the following steps:
- Under Member Services on the Portico Explorer Bar, click Account Information. The Overview tab appears on top.
- Locate the member using the search tool on the top menu bar. Select the down arrow to select the search method, then enter the search criteria. Select the green arrow or press ENTER to locate the member.
- On the New Services sub-tab, click the Safe Deposit Box button.
- On the Safe Deposit Box List dialog box, click the button in the Details column to assign an available safe deposit box to a member.

Procedure
The ID of the safe deposit box and the branch where the safe deposit box is located appear at the top of the tab.
Complete the following steps to assign a safe deposit box.
- Use the credit-union customizable Box Relationship field to identify the relationship of the Deputies/Co-Owners. Reporting Analytics: Co-Owner Relation 1-8 (Member Info subject in the Safe Deposit Box folder)
- In the Deputies and Co-Owners fields, enter the name of the co-owners of the safe deposit box(Length: 26 alphanumeric). The primary owner of the account is listed in the Primary Account Owner field.
- Select the Access Allowed check box to choose each person that has access to the box. If the Access Allowed check box is not selected, the co-owners will not have access to the box. Reporting Analytics: Owner Allowed and Co-Owner Allowed 1-8 (Member Info subject in the Safe Deposit Box folder)
- In the Description field, enter a note about the safe deposit box (Length: 120 alphanumeric). Reporting Analytics: Internal Note 1 (Member Info subject in the Safe Deposit Box folder)
- In the Comments field, enter a credit union-defined comment about the safe deposit box (Length: 120 alphanumeric). Comments about the box that will be stored in the safe deposit box event history as a Box Comment event. Reporting Analytics: Internal Note 2 (Member Info subject in the Safe Deposit Box folder)
- The Key Status field will default to the value from the Safe Deposit Box List dialog box . Click the down arrow to change the status of the key associated with the safe deposit box.
- The Date Rented field will default to the current date. Click the Date Rented down arrow to select the rental date from the pop-up calendar or enter the date in MM/DD/YYYY format.
- When a box is assigned to a member, the member fee amount will default to the standard fee amount. You can enter a new member fee amount in the Memberfield (Length: 8 numeric including decimal). Any change to the standard box fee on the Safe Deposit Boxes - Change Fees window will not update the member-specific fee amount. If the member fee amount is changed and the box is paid by Transfer File, the Transfer File record must be changed to match the member fee. The renewal notice will generate with the member fee amount regardless of the standard fee amount. If the member fee was changed less than 45 days prior to production of the renewal notices, the old member fee will print on the notice. To make sure that the correct member fee amount is printed on the renewal notices, be sure to change the member fee no less than 60 days prior to production of the renewal notices.
- In the Deposit field, enter the deposit fee amount paid by the member for the safe deposit box (Length: 6 numeric including decimal). For example, a refundable key deposit paid by the member.
- In the Payment group box, click the Frequency down arrow to select the payment frequency. The valid values are:
- A - Annually. System default.
- M - Monthly
- Q - Quarterly
- S - Semi-annually
- N - No rent
The Next Pmt Due date field will increment by the value entered in the Frequency field when a payment is made using the Cash/Check Payment tab or Transfer File. Portico will automatically update the Next Pmt Due date field when a payment is made using the Cash/Check Payment tab for a safe deposit box that has a Method field of Transfer File. Payments made using any other transaction will not update the Next Pmt Due date field.
- Click Save to save the safe deposit box assignment.
To assign a safe deposit box, users must be assigned to the Teller - Advanced or Member Services - User security group or you can add the MbrInfo - Safe Deposit Box Detail – Maintain permission and MbrInfo – Safe Deposit Box Detail – Maintain Access Allowed permission to a credit union-defined security group using the Security Group Permissions – Update window.
Click the Transfer File tab to set up an automatic transfer to pay for the safe deposit box. The Transfer File amount should match the member fee amount.
Click the Cash/Check Payment tab to process a safe deposit box payment from a share account, cash or check to the safe deposit box general ledger account.
Click the Documents tab to generate any forms or agreements required by your credit union for the safe deposit box.
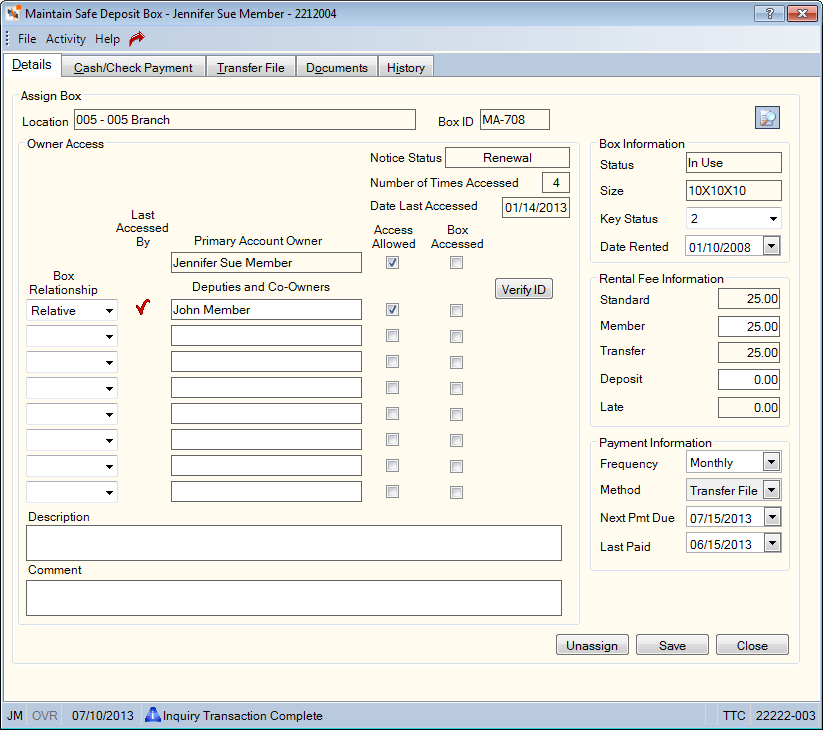
After you add a safe deposit box to a member, a safe deposit box icon button appears on the Account Information – Overview tab. Click the safe deposit box icon button to open the Safe Deposit Box dialog box and review the safe deposit boxes rented by the member. Click the button in the Details column to display the Details tab on the Maintain Safe Deposit Box dialog box and review the owner, rental and payment information.

Field Descriptions
After a box has been assigned, you can click the History tab on the Maintain Safe Deposit Box dialog box to review the date and time the safe deposit box was accessed and by whom.
A Delinquency Indicator indicates if the member is delinquent on the safe deposit box payments.
Click the View Docs icon to retrieve the signature access log for the safe deposit box.
To record safe deposit box access by the owner or co-owners of the box, select the Box Accessed check box. The click Save. Portico will update the Last Accessed By column, update the date the box was accessed in the Date Last Accessed field and increment the count in the Number of Times Accessed field by one. Portico will then reset the Box Accessed check box to unchecked.
Click the Verify ID button to open the Safe Deposit Box Documents Presented dialog box and verify the identity of owner or co-owners of the box. If your credit union uses Signature Capture, the Image Capture and Index dialog box appears for you to capture the signature using a signature pad and store the signature in Nautilus Essentials.
Click Unassign to make the safe deposit available for use by another member. Portico will change the box status to E - Rekey. When the safe deposit box is rekeyed by the credit union, you must change the box status on the Safe Deposit Boxes - Maintenance window to A - Available to allow it to be assigned to another member. If the safe deposit box rental fee is paid by Transfer File, the Transfer File record must be deleted first, then the box can be unassigned.
The Notice Status field indicates the type of notices generated for the safe deposit box. As each notice is produced, the Notice Status field will change.
- When a renewal notice is created, Renewal will appear in the Notice Status field.
- When the first late notice is produced, First Late Notice will appear in the Notice Status field. If a second or third late notice is created, the Second Late Notice or Third Late Notice will appear in the Notice Status field.
- Once a payment is made on the box using the Cash/Check Payment tab or Transfer File, and the Next Pmt Due date field is advanced, the Notice Status field will be reset to blank. The Notice Status field must be blank in order for Portico to produce a renewal notice.
The Number of Times Accessed field indicates the number of times the safe deposit box has been accessed. When the box changes ownership, this counter returns to zero.
The Date Last Accessed field indicates the date that the safe deposit was last accessed. A red check mark in the Last Accessed By column indicates the owner or co-owner who last accessed the safe deposit box. Reporting Analytics: Last Access Owner and Last Access Co-Owner 1-8 (Member Info subject in the Safe Deposit Box folder)
The Status field in the Box Information window indicates the status of the safe deposit box. The valid options are: Available, ReKey, In-use, Restricted, and Unusable. The status of In-use, Restricted and Unusable are only valid when a box is assigned to a member. The status of Available, Re-key and Unusable are valid when a box is not assigned to a member. The system will change the box status to ReKey when you click Unassign. Once the safe deposit box is rekeyed by the credit union, you must change the box status to Available on the Safe Deposit Boxes - Maintenance window before assigning the box to another member.
The Box Size field indicates the credit union-defined size of the safe deposit box (Length: 10 alphanumeric).
The fees associated with safe deposit box are listed in the Rental Fee Information group box. The Standard field indicates the standard fee associated with the safe deposit box. When a box is assigned to a member, the member fee amount will default to the standard fee amount. The member fee amount can be manually changed to a specific amount. Any change to the standard box fee on the Safe Deposit Boxes - Change Fees window will not update the member fee amount. If the member fee amount is changed and the box is paid by Transfer File, the Transfer File record must be changed to match the member fee. The renewal notice will generate with the member fee amount regardless of the standard fee amount. If the member fee was changed less than 45 days prior to production of the renewal notices, the old member fee will print on the notice. To make sure that the correct member fee amount is printed on the renewal notices, be sure to change the member fee no less than 60 days prior to production of the renewal notices.
If a Transfer File payment is set up for the safe deposit box, the transfer amount will appear in the Transfer field. If you manually change the member fee on the Details tab and click Save and the payment method is Transfer File, the Transfer File tab will appear so you can manually update the Transfer File amount.
The Late field indicates the late fee that can be manually assessed for late rental payments for the safe deposit box (Length: 8 numeric including decimal)
The Payment Information group box indicates the payment method used to pay the rental fee for the safe deposit box. The Method field defaults to Cash. If an automatic transfer is set up via Transfer File, the Method field changes to Transfer. The Last Paid date field will display the last transaction date a payment is made.
Click Close to close the dialog box.
Portico Host: ASM