Closing a Member Account
|
|
|
|
|
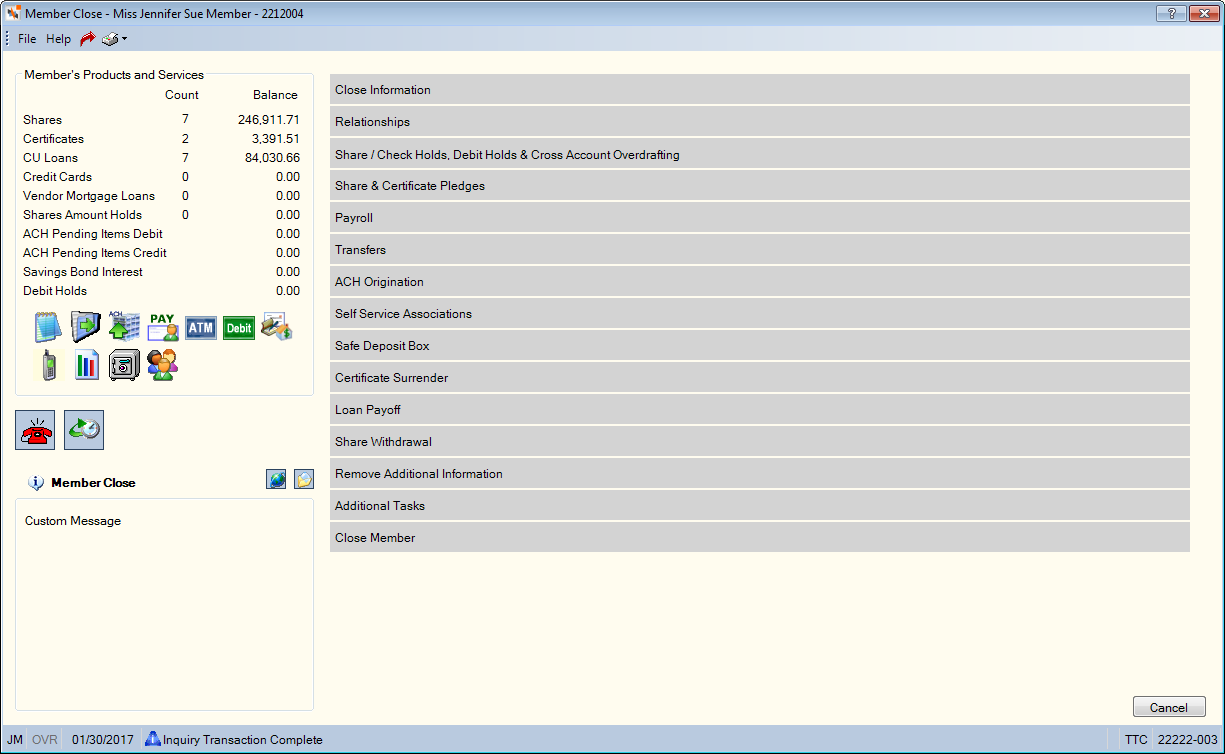
To access the Member Close dialog box, under Member Services on the Portico Explorer Bar, click Account Information. The Overview tab appears on top. Locate the member using the search tool on the top menu bar. Click the down arrow to select the search method, then enter the search criteria. Click the green arrow or press ENTER to locate the member. Click the Member Close icon button to display the Member Close dialog box.
A user may not close their own employee account or a member account that is listed on the user's Associated Accounts to window. The buttons will be disabled preventing the user from maintaining the information. To close another employee's account, the user closing the account must be included in the Employee Security - Administrator security group.
How do I? and Field Help
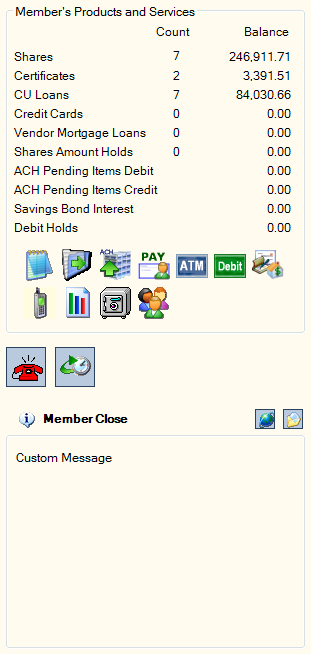
The left side of the Member Close dialog box displays a summary of the products and services the member owns and provides access to additional options.
|
The Member's Products & Services group box displays the type of accounts, holds and pending items. For Shares, Certificates, CU Loans, Credit Cards, and Vendor Mortgage Loans, the Count column includes the number of open accounts regardless of balance. The Balance column contains the aggregate balance of all the accounts. For Shares Amount Holds, the Count column includes the number of shares that have an amount hold. For Shares Amount Holds, ACH Pending Items, ACH Pending Items Credit, Savings Bond Interest, and Debit Holds, the Balance column contains the aggregate balance of all the holds, pending items, and bond interest.
Below the member financial information, icons represent the services used by the member. These are the same icons found on the Overview tab, Transactions tab and Adjustments tab for the member. As funds are withdrawn, loans are paid off, and services are removed, the Member's Products & Services group box will display the updated financial information and the remaining service icons. If your credit union uses Contact Manager with Event Tracking, you can click the Add New Contact/Event icon button to display the Member Event – New dialog box to add an event. A customization option lets you tie a specific event to the member close process so the correct member event is automatically selected. To access the member's financial transaction history, click the History icon. The bottom group box can be used to display credit union-defined instructions. You can also add links to websites or files. The Member Close Messaging - List window lets you define instructional messages and links to websites or files that can appear for each panel on the Member Close dialog box. |
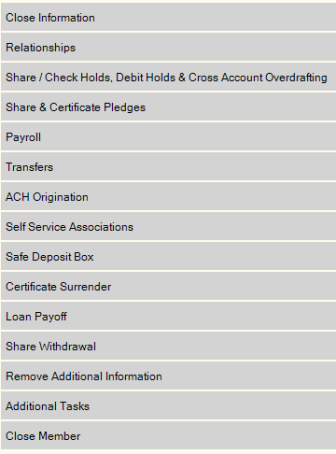
The right side of the Member Close dialog box features an accordion style workflow that moves you through the member close process.
|
|
Close Information: Displays general information about the member, such as member open date and dormant or deceased member indicators. Relationships: Lists co-owner relationships including co-borrower relationships. Share/Check Holds, Debit Holds & Cross Account Overdrafting: Includes share/check holds and debit hold information and cross-account overdraft protection information. Share & Certificate Pledges: Lists all the loan pledges held against the member's shares and certificates. Payroll: Displays the member’s payrolls and any incoming cross-account payroll distributions. Transfers: Lists all incoming and outgoing recurring transfers. ACH Origination: Displays all incoming and outgoing ACH origination items for the member. Self Service Associations: Lists all the self service associations (online banking, bill pay, and audio response) defined for the member. Safe Deposit Box: Lists all the safe deposit boxes owned by the member. Certificate Surrender: Displays the certificate surrender transaction. Loan Payoff: Displays the loan payoff transaction. Share Withdrawal: Displays the share close transaction. Remove Additional Information: Lists items that may and may not need to be deleted in order for the account to purge. Additional Tasks: Allows you to add an event, add the member to the Closed Account File, create documents, and add a note. Close Member: Allows you to specify a close reason and date. |
Close Information
The Close Information panel displays general information about the member, such as member open date and dormant or deceased member indicators. In some cases, you may wish to discontinue the member close process to maintain the member record or until pending items are settled.
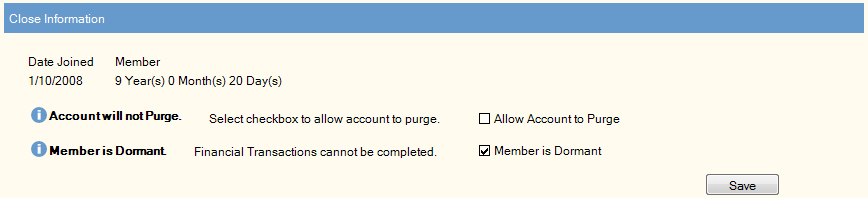
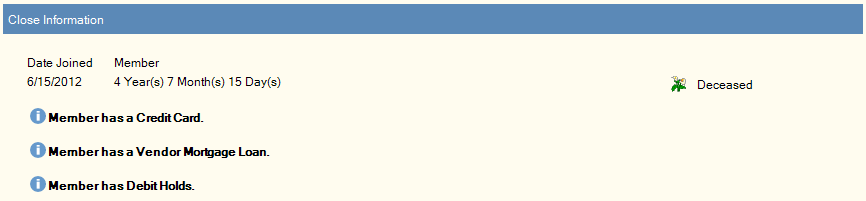
The Account will not purge message will appear if the Allow Account to Purge check box is NOT selected on the Stmts/Reporting/Notices tab. You can still close the account, but the account will not purge until the check box is selected. Select the check box on the Close Information panel and click Save to allow the account to purge.
The Member is Dormant message will appear if the Dormant check box is selected on the Contact Information tab. You can continue with the close process, but you will not be able to complete any financial transactions until this check box is cleared. Clear the check box on the Close Information panel and click Save to complete the financial transactions required to close the member.
The Member is Bankrupt message will appear if the member has a bankruptcy record. You can click the link on the Close Information panel to view the bankruptcy information.
The Member is a Co-Borrower on a delinquent loan in collections message will appear if the member is a co-borrower on a delinquent loan in collections. You can click the link on the Close Information panel to view the Borrowers dialog box. You may also wish to see if any of the funds belonging to the member being closed can go toward a payment on the delinquent loan.
The Member has a Vendor Mortgage Loan message will appear if the member has a vendor mortgage loan.
The Member has a Credit Card message will appear if the member has a credit card.
The Member has ACH Pending Items message will appear if the member has ACH debits or credits pending that will affect the member's accounts. You can click the link on the Close Information panel to view the ACH pending items.
The Member has Debit Holds message will appear if the member has debit holds indicating that debit card transactions are still pending on the member's accounts. You can view the debit holds on the Share/Check Holds, Debit Holds & Cross Account Overdrafting panel.
Relationships
The Relationships panel displays the members, non-members and beneficial owners associated with the member's share account.
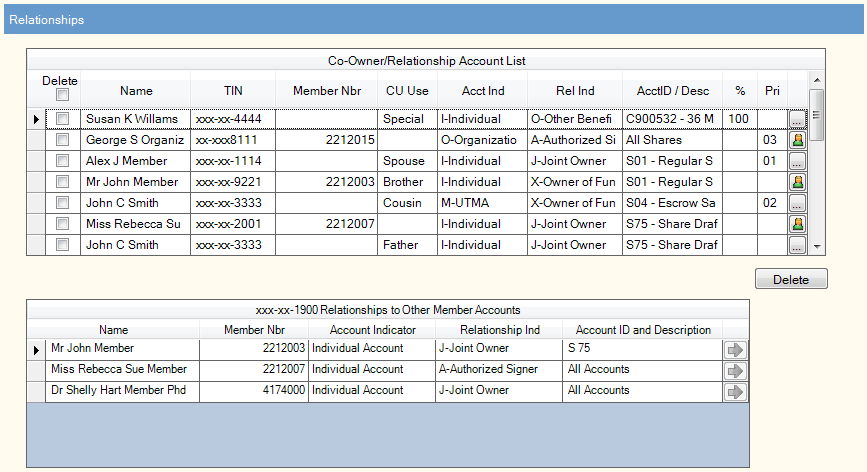

To remove the relationships from the member's share or certificate accounts, select the Delete check box in the column heading and click Delete. Since non-members can be co-borrowers on loans, co-borrower relationships on loans will not be removed using the Delete check box. You must access the Borrowers dialog box to remove the co-borrower relationship.
| Column Heading | Description |
|---|---|
Delete | To delete a relationship, select the Delete check box next to the relationship you wish to remove, then click Save. Select the check box in the column heading to select all the relationships. To remove the relationships from the member's share or certificate accounts on the Member Close dialog box, select the Delete check box in the column heading and click Delete. Since non-members can be co-borrowers on loans, co-borrower relationships on loans will not be removed using the Delete check box. You must access the Borrowers dialog box to remove the co-borrower relationship. On the Member Relationships dialog box, the Delete check box in the Co-Owner/Relationship Account List grid is disabled. |
Name | The name of the member, non-member or beneficial owner. Purged-Deleted will appear for broken account relationships in which the taxpayer ID number (TIN) associated with a relationship is changed, but the TIN is not updated throughout Portico resulting in issues for other members with the same relationship. |
TIN | The taxpayer ID number of the member, non-member or beneficial owner. Portico partially masks taxpayer ID numbers. |
Member Nbr | The member number, if the individual or beneficial owner is a member of the credit union. |
CU Use | A credit union-defined customized field. This field can be customized using the Customized Fields window. Keyword: CP |
Account Indicator/Acct Ind | The ownership type on the associated account. The valid values are:
If the Business Account has Beneficial Owners check box is selected on the Contact Information tab or Member Verification tab in New Members & Services, Portico will limit the valid options available. For the Account Indicator field, the valid options are: Agency (A), Business (B), Corporate (C), and Individual (I). Keyword: AI |
Relationship Indicator/Rel Ind | The individual's relationship to the member account. The valid values are:
If the Business Account has Beneficial Owners check box is selected on the Contact Information tab or Member Verification tab in New Members & Services, Portico will limit the valid options available. For the Relationship Indicator field, the valid options are:
If the business account has authorized signers, add the authorized signers first. Then, select the Business Account has Beneficial Owners check box, and add the beneficial owners. To view the valid values based on account type, refer to the Account Relationships Table. Keyword: RI |
Acct ID and Description | The share, loan or certificate type and corresponding description of the associated account. This column does not appear when viewing the Co-Owner Account List for a specific share, loan or certificate, or viewing a business account with beneficial owners. |
Prong | The type of relationship associated with the business account. For the ownership relationship, select Ownership from the Prong drop-down list. For the control relationship, select Control from the Prong drop-down list. This field appears if the Business Account has Beneficial Owners check box is selected on the Contact Information tab or Member Verification tab in New Members & Services. If the same individual is both the control prong and ownership prong, you must add two account relationships for the individual. The Account Indicator field can be the same, but the Relationship Indicator field must be different. For example, John Member is both the control prong and ownership prong for a business. The Account Indicator field can be Individual for both the control prong record and ownership prong record. If the Relationship Indicator field for the control prong record is Ultimate Beneficial Owner, the Relationship Indicator field for the ownership prong record must be different. Multiple individuals can be set up with a control prong relationship. Multiple individuals can be set up with an owner prong relationship using the % field to indicate the percentage of ownership (25%, 50%, etc.). Reporting Analytics: Owner Prong Type (Joint Cross Reference subject in the Member Information folder) |
Title | The title for the beneficial owner. The default list of valid values are: Chief Executive Officer, Chief Financial Officer, Chief Operating Officer, General Partner, Managing Partner, President, Treasurer, or Vice President. You can customize this field and make it a required field in New Members & Services using the Customized Fields window. A title must be selected for the beneficial owner if the Prong field is Control. This field appears if the Business Account has Beneficial Owners check box is selected on the Contact Information tab or Member Verification tab in New Members & Services. Reporting Analytics: Title (Joint Cross Reference subject in the Member Information folder) |
Start | The time period the beneficial owner has a relationship with the business account. The Start Date field will default to the current date, but can be changed to a date in the past. Click the down arrow to select the date from the pop-up calendar or enter the date in MM/DD/YYYY format. This field appears if the Business Account has Beneficial Owners check box is selected on the Contact Information tab or Member Verification tab in New Members & Services. Reporting Analytics: Relationship Start Date (Joint Cross Reference subject in the Member Information folder) |
End | The time period the beneficial owner has a relationship with the business account. The End Date field can be left blank or a date in the future when you know the relationship will end. Click the down arrow to select the date from the pop-up calendar or enter the date in MM/DD/YYYY format. This field appears if the Business Account has Beneficial Owners check box is selected on the Contact Information tab or Member Verification tab in New Members & Services. Reporting Analytics: Relationship End Date (Joint Cross Reference subject in the Member Information folder) |
% | For a beneficiary relationship, this is the percentage of the account funds that the beneficiary on the account will receive. For the ownership prong of a beneficial owner relationship, enter the percentage of ownership in the % field. The % field appears if the Business Account has Beneficial Owners check box is selected on the Contact Information tab or Member Verification tab in New Members & Services. Valid option are 000-100. Length: 3 numeric |
Pri | The priority of the account relationship. This is a credit union-defined field. Any value between 01 and 99 is valid, where 01 is the highest priority and 99 is lowest priority. When the account has multiple joint owners within the same relationship/derived group, the priority can be used to determine the joint name that appears in the account listing and in documents generated through Document Preparation. Portico determines the name using the following criteria:
When a business account has multiple beneficial owner relationships within the same relationship/derived group, the priority can be used to determine the name that appears in documents generated through Document Preparation. Portico determines the name using the following criteria:
Length: 2 numeric Reporting Analytics: Joint Owner Priority (All Joint Cross Reference subject in the Member Information folder) |
Account Relationships | In the Co-Owner Account List grid, the ellipsis icon button indicates that the co-owner is not a member of the credit union. The member icon button (green shirt) indicates that the co-owner is a member of the credit union. The beneficial owner icon button (purple shirt) indicates that the member or non-member has a beneficial owner relationship with the business account. If the associated account is a loan, click the ellipsis icon button or the member icon button to display the Borrowers dialog box. If the associated account is a share or certificate, click the ellipsis icon button or the member icon button to display the Account Relationships dialog box. |
The Relationships to Other Member Accounts grid lists the member accounts where the member being closed is listed as a relationship.
| Column Heading | Description |
|---|---|
| The name of the credit union member associated with the member. | |
The account number of the member. | |
The ownership type on the associated account. The valid values are:
If the Business Account has Beneficial Owners check box is selected on the Contact Information tab or Member Verification tab in New Members & Services, Portico will limit the valid options available. For the Account Indicator field, the valid options are: Agency (A), Business (B), Corporate (C), and Individual (I). Keyword: AI | |
The individual's relationship to the member account. The valid values are:
If the Business Account has Beneficial Owners check box is selected on the Contact Information tab or Member Verification tab in New Members & Services, Portico will limit the valid options available. For the Relationship Indicator field, the valid options are:
If the business account has authorized signers, add the authorized signers first. Then, select the Business Account has Beneficial Owners check box, and add the beneficial owners. To view the valid values based on account type, refer to the Account Relationships Table. Keyword: RI | |
The share, loan or certificate type and corresponding description of the associated account. This column does not appear when viewing the Co-Owner Account List for a specific share, loan or certificate, or viewing a business account with beneficial owners. | |
Click the green arrow button to display the Overview tab for the member selected. Not available on the Member Close dialog box. |
Share/Check Holds, Debit Holds & Cross Account Overdrafting
The Share/Check Holds, Debit Holds & Cross Account Overdrafting panel displays share/check holds, authorized debit holds and refund credits, and cross-account overdraft protection information. From the Select a Share Account drop-down list, select a share or share draft account, then click the green arrow. The share accounts listed in the Select a Share Account drop-down list will feature an additional hold indicator after the share description: Share Hold indicates a check hold, Debit Hold indicates a debit hold, and Share Level Hold indicates a share level hold.
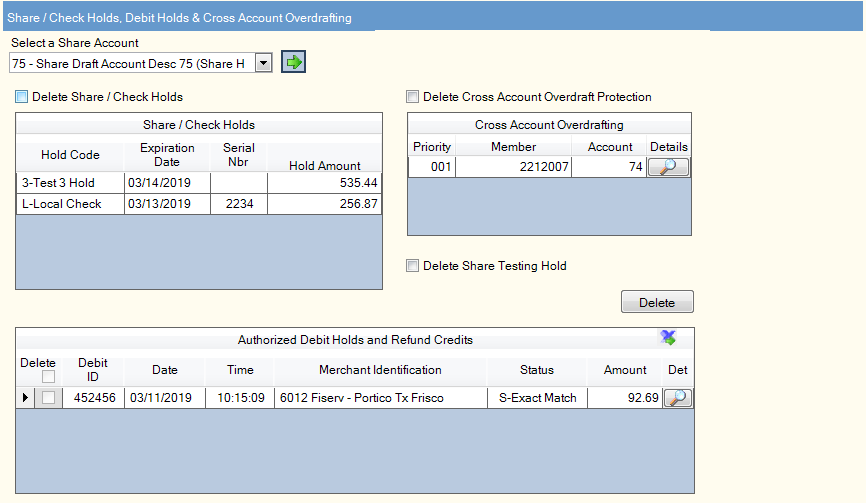
The Share Amount Hold Detail grid contains detailed information about each check hold on the share account.
| Column Heading | Description |
|---|---|
The type of hold on the share account. When adding a new hold, click the down arrow to select a hold code. You can create a customized list of valid share amount hold codes using the Share Amount Hold Code window. When a deposit with a check hold is performed online or via ATM, Portico will look at the Check Hold Release Amount field on the Credit Union Profile – Teller tab to determine the hold amount. The amount immediately available can appear in the Share Amount Hold Detail grid with an * in the Hold Code column. If you accidentally delete amount, you can manually add it to the Share Amount Hold Detail grid by typing * in the Hold Code column, entering the current date, and entering an amount. Default check hold days for existing members and new members appear on the Credit Union Profile – Teller tab. Reporting Analytics: Check Hold Ind (Check Hold subject located in the Share folder and the ME Check Hold subject in the Month-end Information\Share Month-end folder) | |
The date the hold will expire. When adding a new hold, click the down arrow to select the expiration date or enter the date in MM/DD/YYYY format. If a check hold is placed with an expiration date of 7/30, the funds will be available the morning of 7/30. The hold is removed prior to any financial processing, making the funds available for any share drafts or ACH items. Reporting Analytics: Hold Expiry Date (Check Hold subject located in the Share folder and the ME Check Hold subject in the Month-end Information\Share Month-end folder) | |
The serial number of the check. Reporting Analytics: SD Serial Number (Check Hold subject in the Share folder and ME Check Hold subject in the Month-end Information\Share Month-end folder) | |
The amount of funds restricted by the current hold. The system will automatically reduce the available balance of the share account by this dollar amount. Length: 10 numeric Reporting Analytics: Check Hold Amount (Check Hold subject located in the Share folder and the ME Check Hold subject in the Month-end Information\Share Month-end folder) |
To delete the share holds, select the Delete Share Holds check box and click Delete.
The Cross Account Overdrafting grid identifies accounts where the member you are closing is listed as an overdraft account.
| Column Heading | Description |
|---|---|
The priority of the closing member's account in the overdraft process. | |
The member number where the member you are closing is listed as an overdraft account. | |
The closing member's account that is listed as an overdraft account. | |
unlabeled | Click the detail icon button to open the Shares - Draft Info tab for the cross-member account. |
To delete the cross-account overdraft protection, select the Delete Cross Account Overdraft Protection check box and click Delete.
For a share level hold (A-Z, 0-8), the check box label will indicate the custom share level hold description. Select the Delete Share ___ Hold check box to remove the hold, so funds may be withdrawn from the account.
The Authorized Debit Holds and Refund Credits grid lists detailed information about each debit hold on the share account. To delete a debit hold, select the Delete check box and click Save. To export the information in the Authorized Debit Holds grid to an Excel spreadsheet, click the export icon.
| Column Heading | Description |
|---|---|
The 10-digit debit ID embossed and encoded on the member's debit card. The value entered in the Check Digit field on the EFT Processing Rules tab on the EFT Processing Rules window is used to calculate the check digit in the tenth position of the debit ID. | |
The date the debit hold transaction or refund authorization was initiated by the merchant. | |
The time the debit hold transaction or refund authorization was initiated by the merchant. | |
The Reg E data that was received as merchant identification on the debit authorization request. It includes the merchant type, merchant identifier and location. Length: 59 alphanumeric | |
The status code indicates a settlement or reversal of a debit hold authorization transaction was received and the system was unable to match it exactly with the hold authorization. The valid status codes are: C - Debit hold canceled by system after two hours for gas sales merchants only. The authorized amount will be subtracted from total debit holds. D - Indicates debit hold was deleted by teller. The authorized amount will be subtracted from total debit holds. E - Debit hold expired after the credit-union defined number of days. The authorized amount will be subtracted from total debit holds. I - TID (Transaction Identifier) that Visa assigns during the original authorization request message is used to match pre-authorizations to settlements to release a debit hold. The authorized amount will be subtracted from total debit holds. R - If the settlement transaction is a debit hold reversal, it will occur when the reversal transaction matches the original authorization transaction system trace number and local date and time. An authorization transaction is being reversed by Fiserv Card Services. The authorized amount will be subtracted from total debit holds. S - If a transaction exactly matches the authorization transaction on local transaction date, merchant type and approval code information, the debit hold will be settled. The authorized amount will be subtracted from total debit holds. M - If a settlement transaction matches the authorization transaction on merchant type and amount, the debit hold will be settled. The authorized amount will be subtracted from total debit holds. N - If a settlement transaction matches the authorization transaction on local date and amount, the debit hold will be settled. The authorized amount will be subtracted from total debit holds. T - If a settlement transaction matches the authorization transaction on merchant type and approval code, the debit hold will be settled. The authorized amount will be subtracted from total debit holds. F - If an authorization transaction is not an e-debit transaction and a settlement transaction matches on system trace number, retrieval reference number, and card acceptor terminal ID, the debit hold will be settled. Visa and MasterCard transactions are considered e-Debit transactions. The authorized amount will be subtracted from total debit holds. Refund Pending - Indicates a refund authorizations pending settlement. Refund authorization amounts will not affect the share available balance Blank - No matches to S, M, N, T, or F combinations were found. No debit hold will be settled and the hold will remain in place. Holds with exception codes E (expired by back-office) or C (canceled) will be reviewed for overdraft transfer, uncollected funds, and courtesy pay processing to ensure that the appropriate fee is assessed for the settlement items based on the overdraft option used during authorization. Note: All the codes listed will appear on the 247 Report. | |
The authorized amount of the debit transaction. This amount will be held against the member's share available funds until a settlement transaction is received or this authorization expires. Refund authorization amounts will not affect the share available balance Length: 9 numeric | |
Click the view details icon button to display the Self Service Transaction Information dialog box. |
Share & Certificate Pledges
The Share & Certificate Pledges panel lists all the loan pledges held against the member's shares and certificates. To remove the pledges, select the Remove Pledges check box and click Delete.
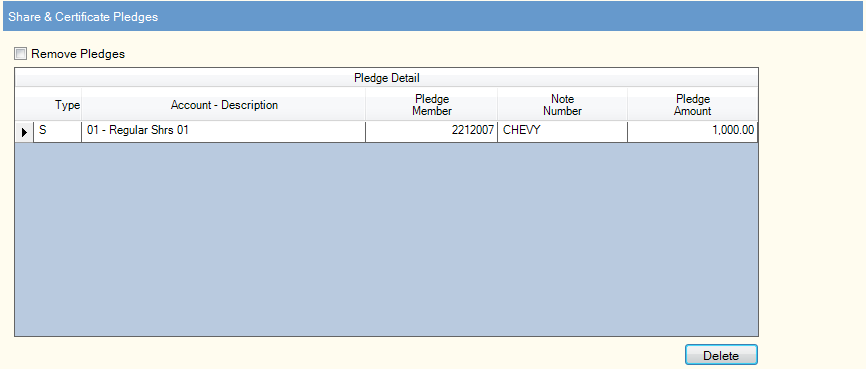
The Pledge Detail grid displays the member pledges on the account.
| Column Heading | Description |
|---|---|
The type of the account that has funds pledged against the loan. The valid values are: S - Share account C - Certificate account * - All accounts Keyword: ST | |
The share type or certificate number and the corresponding account description. | |
The member that has the pledged loan. Keyword: PM | |
The note number of the loan that the share or certificate account is pledged. Keyword: PN | |
The share or certificate amount pledged against the loan. The system will automatically reduce this amount as loan payments are made if B or T appears in the Depledge field on the Loan Profiles - Account Information tab. If N appears in the Depledge field, you must use the Pledge Information dialog box to adjust or remove the pledged amount. To remove a pledge associated with a purged loan, type 0.00 in the Pledge Amount field and click Save. Length: 12 numeric including decimal Keyword: GA |
Payroll
The Payroll panel displays the member’s payrolls and any incoming cross-account payroll distributions.
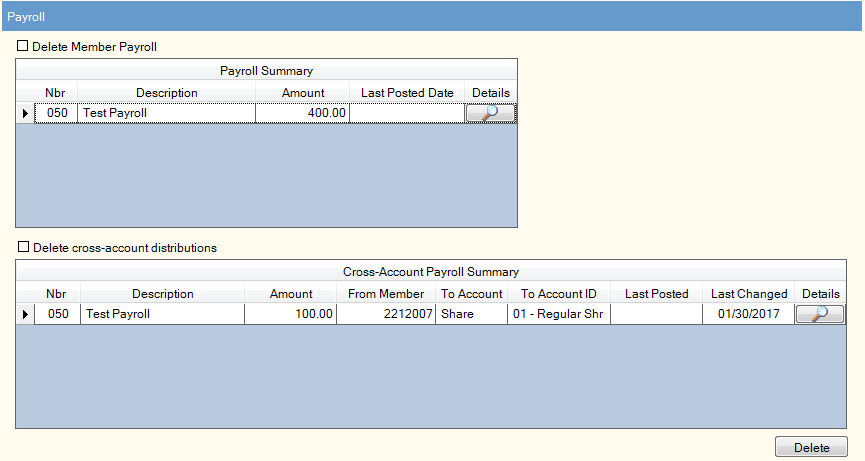
The Payroll Summary grid displays the payroll information set up for the member. To remove the member payroll, select the Delete Member Payroll check box and click Delete.
| Column Heading | Description |
|---|---|
The payroll group number. | |
The description of the payroll. | |
The member's total payroll amount received from the payroll sponsor company. | |
The last date the system posted the payroll. | |
Click the magnifying glass button in the Details column to transfer to the Member Payroll Maintenance dialog box. |
The Cross-Account Payroll Summary grid displays the cross account payroll distributions set up for the member. To remove the incoming cross-account payroll distributions, select the Delete Cross-account distributions check box and click Delete.
| Column Heading | Description |
|---|---|
The payroll group number. | |
The description of the payroll. | |
The payroll distribution amount to be applied to the specified account. Length: 10 numeric including decimal Keyword: DA | |
The member number sending the distribution. | |
The receiving account type. The valid options are: C - Certificate G - General ledger account. Cross-account distributions are not allowed for account types G and W. L - Loan account M - Mortgage loan account (resides on vendor package) S - Share account W - IRA withholding account. Cross-account distributions are not allowed for account types G and W. Keyword: ST | |
The receiving share type, certificate number, note number, or general ledger account. | |
The last date the system posted the payroll. | |
The last date a change was made to the payroll distribution. | |
Click the magnifying glass button in the Details column to transfer to the Member Payroll Maintenance dialog box. |
Transfers
The Transfers panel lists all incoming and outgoing recurring transfers. Click the Details icon button to open the Member Transfer File Information dialog box and view the transfer detail.
The Member Transfer File Summary grid displays the transfers set up for the member.
| Column Heading | Description |
|---|---|
Identifies the account information on the row as the From account or To account. | |
The selection process that will be used to determine which accounts to transfer the funds from. Transfers will not be allowed from escrow share types. The valid values are: 1 - Search all regular share accounts belonging to this member from the lowest share type to the highest. 2 - Search all share draft accounts belonging to this member from the lowest to the highest. 3 - Search all IRA share accounts belonging to this member from the lowest to the highest. 4 - Search all regular share accounts first, then all Non-IRA certificates from the lowest to the highest certificate number. 5 - Search all IRA share accounts belonging to this member first, then search all IRA certificates from the lowest to the highest certificate number. 6 - Search all IRA certificates belonging to this member from the lowest to the highest certificate number, then search all IRA share accounts. 7 - Search all IRA certificates belonging to this member from the lowest to the highest certificate number. 8 - Search all Non-IRA certificates belonging to this member from the lowest to the highest certificate number. Blank - Not used Keyword: SY | |
The type of account that the funds will be transferred from and to. The valid values are: Share Certificate Loan Check GL Safe Deposit Box Keyword: TT | |
The share type, certificate number, note number or general ledger number of the account that the funds will be transferred from or to. For share, certificate, loan, or commercial loan, click the down arrow to select the share type, certificate number, or note number. For general ledger, enter the account number. For sweep processing, enter the interest-bearing share account information in the Acct Type/Acct ID field. The interest-bearing account must be for the same member number. For a safe deposit box, the default general ledger account that will receive safe deposit box rental fees Credit Union Profile - Products & Services tab will appear in this field. Keyword: TC | |
The type of transfer scheduled for the member. The valid values are: A - All Available Funds. Transfer amount is all of the available funds in the share type specified in the Account ID field at the time of the transfer. L - Loan Amount Due. Transfer funds based on the loan amount due at the time of the transfer instead of the regular payment amount. The Transfer Type field cannot be L - Loan Amount Due for FICS loans. O - Loan Payoff. Transfer amount is the loan payoff amount at the time of the transfer. P - Scheduled Loan Payment. Transfer amount is the scheduled payment amount on the loan record at the time of the transfer. S - Sweep Excess Funds for sweep processing. Transfer amount is the difference in the available balance minus the target amount defined in the Amount/Target Balance field. Any excess available funds be moved to another specified interest bearing account. X - ACH Excess. Transfer amount is the ACH deposit amount defined in the Amount/Target Balance field. Any ACH deposit amount in excess of the amount specified will be transferred. Blank - Fixed Amount. System default. Transfer amount is the fixed amount defined in the Amount/Target Balance field. The Transfer From Selection Type or Account Type field must specify a share or share draft account. Keyword: AY | |
The fixed amount that will be transferred. The Amount field must be blank or zero if the Transfer Type field is A - Available Funds, O - Loan Payoff or P - Scheduled Loan Payment, or L - Loan Amount Due. If the Transfer Type field is X-ACH Excess, the dollar amount specified will remain in the target account. For sweep processing, enter the target minimum balance in the Amount/Target Balance field. The amount in the Amount/Target Balance field must be greater than 0.00. The system calculates if there is an amount in excess of the target balance, and a one-way sweep of funds is performed daily when the transaction account has a balance in excess of the target amount. The system will consider check hold amounts and minimum balance requirements when calculating the target balance. The excess funds will be swept to the account specified in the Acct Type/ID fields. Length: 12 numeric including decimal Keyword: TA | |
The effective date of the transfer. If the post date and effective date on the Member Transfer File Information dialog box are the same, the transfer will be performed in the PM pass of the back office cycle. If the post date is one day less than the effective date, the transfer will be performed in the AM pass of the back-office cycle. The effective date can not be more than one day greater than the post date. Click the down arrow to select the date from the pop-up calendar or enter the date in MM/DD/YYYY format. Keyword: ED | |
The order in which Portico will post the member's transfer items effective the same day. Valid transfer priority codes are 01 through 99. Transfer priorities occur in ascending order, starting with 1. The second field of XX indicates the total number of transfers that this member has set up. If the Frequency field is C-ACH Scheduled, the Priority field is system-assigned to automatically insert the ACH transfer before any non-ACH transfers. For sweep processing, set the transfer as the last priority in the Priority field. You can only specify a priority when creating the transfer. Once you click Save, you cannot maintain the Priority field. You must delete the transfer record, then re-create the transfer to change the priority. Length: 2 numeric Keyword: DP | |
The member number that the funds will be transferred to or from. Length: 12 numeric Keyword: M2 | |
Click the icon button to open the Member Transfer File Information dialog box and view the transfer detail. |
To delete all the incoming and outgoing recurring transfers, select the Delete Member Transfers check box and click Delete.
ACH Origination
The ACH Origination panel displays all incoming and outgoing ACH origination items for the member.
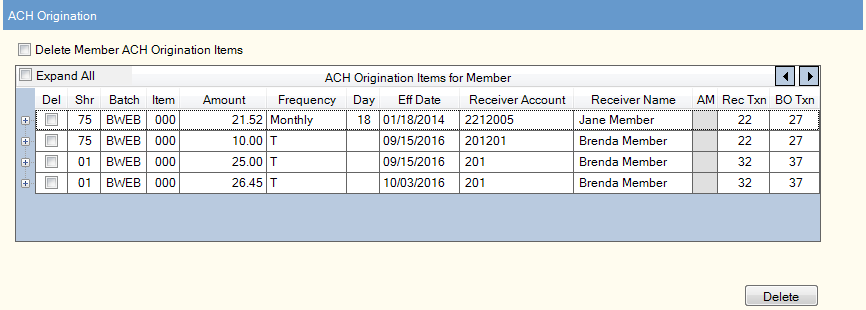
The ACH Origination Items grid displays the ACH origination items for the member. You can delete all the ACH origination items displayed by selecting the Delete Member ACH Origination Items check box and clicking Delete. Click the left and right arrows to view additional ACH origination items for the member.
Self Service Associations
The Self Service Associations panel lists all the self service associations (online banking, bill pay, and audio response) defined for the member. To remove these self service associations, click the Details icon button to open the maintenance window for the audio ID or online banking ID, and delete the ID and account access associations as needed.
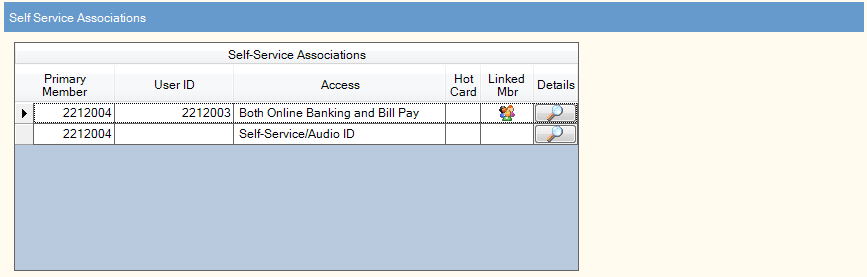
The Self-Service Associations grid displays the self service access options associated with the member. Click More to view additional transactions.
| Column Heading | Description |
|---|---|
The member who has an included or transfer to member listed on the Audio ID Maintenance dialog box or Online Banking Maintenance dialog box.Length: 12 numericKeyword: I1 | |
The logon ID, identifying the Online Banking user to the system. The credit union defines the default Virtual Branch User ID option on the Credit Union Profile - Self Service tab. These options define the parameters allowed when creating a Virtual Branch user ID.Length: 20 alphanumeric | |
The type of account access the member has. The valid values are: Both Online Banking and Bill Pay When a member number is entered in the Transfer to Accounts group box on the Audio ID Maintenance dialog box, the Transfer to Accounts number, no user ID and Transfer appears in the Access column. | |
The hot card icon indicates that the debit ID, ATM ID, audio ID, or online banking ID has been hot carded. | |
Click the view detail icon to open the Maintenance window for the debit ID, ATM ID, audio ID, or online banking ID. |
You may choose not to remove the online banking ID to allow members and non-members linked to the accounts to access account history via your online banking website.
Safe Deposit Box
The Safe Deposit Box panel lists all the safe deposit boxes owned by the member. To delete the member's safe deposit box, select the Delete Safe Deposit Box(es) check box and click Delete.
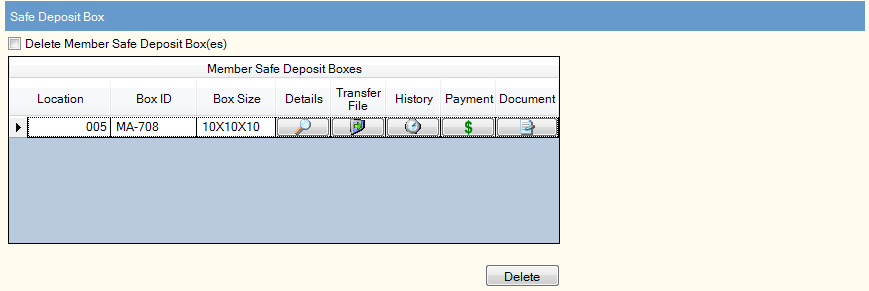
The Member Safe Deposit Boxes grid lets you track safe deposit boxes rented by the member, process payments for the boxes and set up automatic payments. If the box rental fee has not been paid (past due), the information will appear in red. Click More to view additional safe deposit boxes.
| Column Heading | Description |
|---|---|
The credit union branch number where the safe deposit box is located. Length: 3 numeric Keyword: LO | |
The credit union-defined ID associated with the safe deposit box. Length: 6 alphanumeric Keyword: SB | |
The credit union-defined size of the safe deposit box. Length: 10 alphanumeric Keyword: SZ | |
Click the button in the Details column to display the Details tab on the Maintain Safe Deposit Box dialog box and review the owner, rental and payment information. | |
Click the button in the Transfer File column to display the Transfer File tab on the Maintain Safe Deposit Box dialog box and set up a transfer to pay for the safe deposit box. | |
Click the button in the History column to display the History tab on the Maintain Safe Deposit Box dialog box and review events, such as the date and time the safe deposit box was accessed and by whom. | |
Click the button in the Payment column to display the Safe Cash/Check Payment tab on the Maintain Safe Deposit Box dialog box and process a payment for a safe deposit box. | |
Click the button in the Document column to display the Documents tab on the Maintain Safe Deposit Box dialog box and generate any forms or agreements required by your credit union for the safe deposit box. |
The Safe Deposit Box Information group box displays the type of safe deposit box (Length: 4 alphanumeric/Keyword: BT), and the identification number for the safe deposit box (Length: 14 alphanumeric/Keyword: SN). These fields are used for manually tracking a safe deposit box associated with a member. To remove the safe deposit box record, clear the fields and click Save.

Certificate Surrender
The Certificate Surrender panel allows you to surrender the member's certificates. Click the Select a Certificate down arrow to select a certificate number and description. Then, click the green arrow. (F1 will display Transactions - Certificate Surrender per Lyn Harrison)
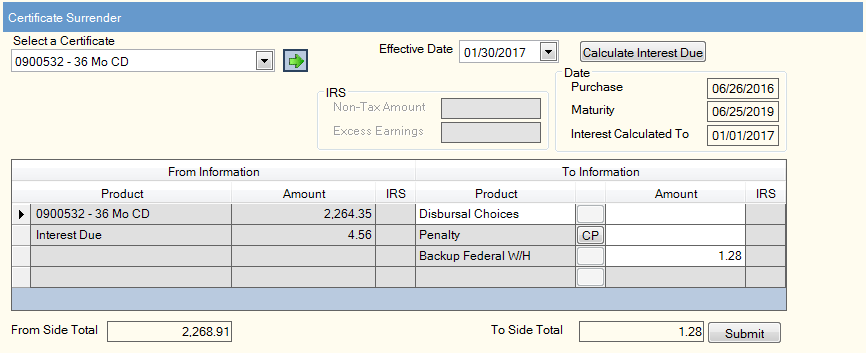
Complete the following steps to surrender a certificate.
- Click the Effective Date down arrow to select the effective date of the add-on or surrender from the pop-up calendar or enter the date in MM/DD/YYYY format.
- Click Calculate Interest Due to calculate the amount of interest due on the certificate.
- In the IRA Non-Tax Amount field, enter the amount of the transaction that is considered non-taxable if the account is an IRA (Length: 12 numeric including decimal).
- In the Excess Earnings field, enter the amount of the IRA distribution that is excess earnings. Excess earnings is the dividend amounts earned on excess contributions during a given tax year. This amount is taxable. Keyword: EA / Length: 12 numeric including decimal. Enter an amount in this field only if you are using one of the following IRA distribution codes: Removal of excess contributions for same year (Traditional - 8, 81 (with exception); Roth - 8J; Coverdell - 8M) or Removal of excess contributions for prior year (Traditional - P, P1 (With exception); Roth - PJ; Coverdell - PM).
- Use the Certificates Transaction Area to complete the surrender.
| Column Heading | Description |
|---|---|
The certificate and interest. | |
The certificate amount and interest earned. Length: 12 numeric Keyword: AP | |
Click the down arrow to select a valid IRA withdrawal code if the certificate is an IRA account. | |
Click the Disbursal Choices down arrow to select cash, check or a member share/share draft account. Keyword: CS for share transfer | |
For a certificate surrender, click the CP button to automatically calculate the surrender penalty. The Protect Original Balance check box on the Certificate Profiles - Account Information tab is not part of the overall penalty calculation. It is used to determine if the financial withdrawal can be completed. If the withdrawal would bring the certificate below the original purchase amount, the transaction will not complete. The penalty calculation is the same whether the Protect Original Balance check box is selected. Some examples: Scenario 1: Current balance = 52047.52/ Purchase amount = 54047.51/ Transaction amount = 2000.00/ If transaction amount = 2000.00 and Protect Original Balance check box is selected, the message E-PENALTY MAY NOT BE TAKEN FROM ORIGINAL CERT BALANCE will appear. Scenario 2: Current balance = 55047.51/ Purchase amount = 54047.51/ Transaction amount = 2000.00/ If transaction amount = 2000.00 and Protect Original Balance check box is selected, the penalty amount = 12.76. The partial surrender does not complete because the transaction would take the balance below the purchase amount. Scenario 3: Current balance = 55047.51/ Purchase amount = 54047.51 Any transaction amount less than 1000.40 will not calculate a penalty. A penalty is not calculated until the transaction amount is greater than or equal to 1000.40. Portico's Certificate Penalty Calculation for partial surrenders is as follows:
Keyword: CP | |
If the share account is an IRA account, click the down arrow to select a valid IRA deposit code. | |
The disbursal amount. Length: 10 numeric including decimal | |
Penalty Amount | The penalty collected when all or part of a certificate is surrendered prior to the maturity date. Length: 8 numeric including decimal Keyword: PA |
Federal Withholding | The Federal Withholding amount for this certificate. The system will look at the Federal Withholding Percent field on the IRA Profile dialog box to determine the percentage to use to calculate the IRA federal withholding. If the Federal Withholding Percent field displays 00.00, and the Federal Withholding check box is selected, the system will use the default rate of 10.00%. The system will multiply the percentage times the interest earned to calculate the IRA federal withholding amount. Length: 10 numeric including decimal Keyword: WH |
When the total amount of the From Side product codes equals the total amount of the To Side product codes, click Submit to complete the transaction.
Complete this process to surrender each certificate in the Select a Certificate drop-down list.
Loan Payoff
The Loan Payoff panel lets you payoff the member's outstanding loans before closing the member account. Click the Note Number down arrow to select a loan. Then, click the green arrow. (F1 will display Transactions - Loan Payoff per Lyn Harrison)
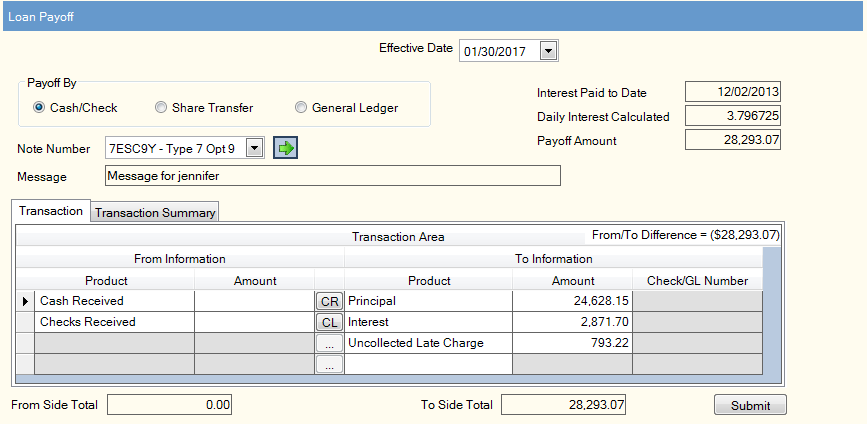
To pay off a loan, complete the following steps to first calculate the payoff amount:
- Click the Effective Date down arrow to select the effective date of the transaction from the pop-up calendar or enter the date in MM/DD/YYYY format.
- In the Payoff By group box, select the method that will be used to payoff the loan: Cash/Check, Share Transfer or General Ledger.
- Click the Note Number down arrow to select the loan. Then, click the green arrow.
When you calculate a loan payoff for loans with 360-day interest, a 360 Day Interest dialog box appears. The 360 Day Interest dialog box only appears if the Pay-off Days check box is selected in the 360-Day Interest group box on the Loan Profiles - Rate Information for the loan type.

Enter 1 through 998 to calculate the number of days interest or enter 999 to calculate all interest due. Then, click OK. Portico will calculate the interest due and the daily interest calculated and display it on the Loan Payoff dialog box. Portico will appear with the number of days. You can change the value in the 360 Day Loans Interest Calc Days field on the Loan Payoff dialog box to recalculate the interest due and the daily interest calculated.
The 360 Day Interest Calculation Days field indicates the number of days used to calculate the interest due at the time of the loan payoff for loans with a 360-day interest calculation. The interest due is determined by multiplying the value in the 360 Day Interest Calculation Days field by the daily interest amount. The daily interest amount is based on the current loan balance.
The 360 Day Interest Calculation Days field will only appear if the Pay-off Days check box is selected on the Loan Profiles - Rate Information tab for this loan type and you selected the Cash/Check option as the pay-off method. If you are using a share transfer or general ledger account to pay off a loan with the 360-Day Interest Calculation check box and Pay-off Days check box selected on the Loan Profile – Rate Information tab, Portico will assume a value of 999 and use the current date (not the effective date) to calculate all the interest due.
The Interest Paid to Date field indicates the date interest on the loan has been calculated to.
The Daily Interest Calculated field indicates the amount of interest calculated for one day on the loan.
The total amount required to pay off this loan appears in the Payoff Amount field. The payoff amount includes the loan principal, interest due, and any late charges.
A credit union-defined internal message will appear in the Message field.
To complete the loan payoff, complete the fields in the Single Loan Payoff Transaction Area:
| Column Heading | Description |
|---|---|
The From Product column will display the available payment options based on your selection in the Payoff By group box. | |
Enter the amount that will be used to payoff the loan. Length: 10 numeric including decimal. | |
If you selected cash, the Cash Received dialog box will pop up automatically when the cursor is in the From Amount column. You can also access the Cash Received dialog box by clicking the CR button in the transaction area grid. You can activate the Cash Received dialog box on the User Profile – Popups tab. If you selected check, the Check Log dialog box will pop up automatically when the cursor is in the From Amount column. You can also access the Check Log dialog box by clicking the CL button in the transaction area grid. You can activate the Check Log dialog box on the User Profile – Popups tab. | |
The column allows displays Principal and Interest. To add a refund to the transaction or assess a fee, click the To Product down arrow to select the refund method or fee type. Then, enter the amount in the To Amount column. | |
The principal and interest amount due on the loan. If desired, enter the amount of late charges, refund, or commission. Length: 10 numeric. | |
If you selected Commission as the To Product, enter a general ledger account in the Check/GL Number column. If you selected Refund to Check as the To Product, the Check/GL Number column displays the credit union check number. |
When the total amount of the From Side product codes equals the total amount of the To Side product codes, click Submit to complete the loan payoff. Complete this process to payoff each loan in the Note Number drop-down list.
The Transaction Summary tab displays the results of the loan payoff.

Cash/Check Pay Off

Share Transfer Payoff
| Column Heading | Description |
|---|---|
The response from Portico indicating that the loan has been paid off | |
The member number associated with the source of the loan payoff | |
The name of the member associated with the source of the loan payoff | |
The note number identifying the loan that was paid off | |
The share account that will receive a refund amount if a transaction amount or fee was refunded to the member | |
The amount of the loan payoff received | |
The computer assigned-number identifying the loan payoff transaction | |
If a share transfer was used to payoff the loan, the member number associated with the share account used for the loan payoff | |
If a share transfer was used to payoff the loan, the amount transferred from the share account to payoff the loan | |
If a share transfer was used to payoff the loan, the share type associated with the share account used for the loan payoff | |
If a share transfer was used to payoff the loan, the remaining balance of the share account after the funds are transferred for the loan payoff | |
If a share transfer was used to payoff the loan, the fee amount assessed for the loan payoff | |
If a share transfer was used to payoff the loan, the amount refunded to the share account if a transaction amount or fee was refunded to the member | |
IRA State Withholding Amount | If a share transfer was used to payoff the loan, the state withholding amount collected for the loan payoff transaction |
The member number associated with the loan that was paid off | |
The note number identifying the loan that was paid off | |
The remaining balance of the loan after the loan payoff | |
The total amount of the loan payoff | |
The amount of the loan payoff designated for late charges | |
The amount of the loan payoff designated for principal | |
The amount of the loan payoff designated for interest | |
If a transaction amount or fee was refunded to the member, the amount of the refund | |
The commission amount paid for the loan payoff |
Share Withdrawal
The Share Withdrawal panel lets you close a share account and calculate and pay dividends on the account. Click the Product to Close down arrow and select the share account to close. Then, click the green arrow button. The From Product and Amount columns will display the share account to close, the amount remaining in the share account and any calculated dividends for shares with dividend method DOD/DOW. For shares with dividend method ADB, select the appropriate option from the Dividends drop-down list. (F1 will pop Transaction - Close Share - per Lyn Harrison)
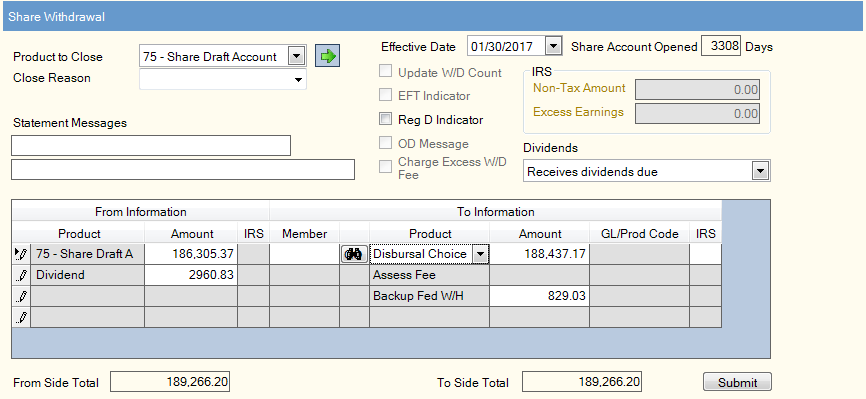
To close a share account, complete the following steps:
- Click the Effective Date down arrow to select the effective date of the transaction from the pop-up calendar or enter the date in MM/DD/YYYY format.
- Click the Product to Close down arrow and select the share account to close. Click the green arrow button. The From Product and Amount columns will display the share account to close, the amount remaining in the share account and any calculated dividends. The Share Account Opened field indicates the number of days the share account has been opened.
- Enter a close reason code in the Close Reason field (Keyword: RC/Reporting Analytics: Close Reason - Closed Shares subject in the Share folder). This is a credit union-defined field. The Close Reason field can be customized using the Close Reason - Member field name on the Customized Fields window.
- Select the Update Withdrawal Counter check box to increment the share account's withdrawal counter (Keyword: WD). The number of withdrawals is stored in the Period-to-Date Withdrawals field on the Shares - Activity tab. .
- Select the EFT Indicator check box if this is an EFT transaction (Keyword: ET). The system will automatically select the Force at Month End Because of EFT/Misc Activity check box on the Stmts/Reporting/Notices tab. If the EFT Indicator check box is selected, you must type a statement message in the Statement Messages 1 field.
- Select the Reg D Indicator check box to increment the share account's Regulation D transaction counter (Keyword: RD). The number of transactions is stored in the Period-to-Date Reg D Txns field on the Shares - Activity tab. If the share account's Period-to-Date Reg D Txns field on the Shares - Activity tab is greater than the limit defined in the Reg D Transactions field on the Share Profiles - Account Information tab, you must enter a teller override to complete the transaction.
- Select the OD Message check box to print an overdraft message on the member statement (Keyword: OD).
- Select the Charge Excess W/D Fee check box to charge the member an excess withdrawal fee (Keyword: FE). If selected, the transaction will be counted for excess withdrawals. Based on the information on the Credit Union Profile - Shares tab, a fee will be assessed when the criteria has been met.
- For share accounts with an Average Daily Balance dividend method or for share accounts with a Date of Deposit to Date of Return dividend method where you wish to zero out the dividends due at the time of closing, click the Dividends down arrow to specify how dividends should be handled at the end of the dividend period after the account has been closed. The Dividends drop-down list will only appear if you belong to a security group containing the Shares – Tab – General – Maintain security permission.
- If desired, enter a statement message in the Statement Messages fields. If the EFT Indicator check box is selected, you must type a statement message in the Statement Messages 1 field. Entering a custom message in the Statement Message 1 and 2 fields will override the default statement description that will appear on the account to which the funds were transferred. The default message that will appear on the account to which the funds were transferred is TRANSFER FROM SHARE XX. For a cross-account transfer, the message TRANSFER FROM ******XXXX SHARE XX or TRANSFER FROM SHORT NAME SHARE XX will appear, depending on the option selected in the Cross Account Transaction Description field on the Credit Union Profile - History/Reversals tab. The message ACCOUNT CLOSED TRANSFER TO SHARE XX appears on the closed account member's statement. For a cross-account transfer, the message ACCOUNT CLOSED TRANSFER TO ******XXXX SHARE XX or ACCOUNT CLOSED TRANSFER TO SHORT NAME SHARE XX will appear, depending on the option selected in the Cross Account Transaction Description field on the Credit Union Profile - History/Reversals tab. You cannot specify a credit union-defined statement message if the funds are disbursed by cash or check. (Statement Message 1 Length: 35 alphanumeric/Keyword: SM|Statement Message 2 Length: 44 alphanumeric/Keyword: M2)
- In the IRA Non-Tax Amount field, enter the amount of the transaction that is considered non-taxable if the account is an IRA (Length: 12 numeric including decimal).
- In the Excess Earnings field, enter the amount of the IRA distribution that is excess earnings. Excess earnings is the dividend amounts earned on excess contributions during a given tax year. This amount is taxable. Keyword: EA / Length: 12 numeric including decimal. Enter an amount in this field only if you are using one of the following IRA distribution codes: Removal of excess contributions for same year (Traditional - 8, 81 (with exception); Roth - 8J; Coverdell - 8M) or Removal of excess contributions for prior year (Traditional - P, P1 (With exception); Roth - PJ; Coverdell - PM).
- Complete the process to close the share account using the Close Share Account Transaction Area. The Close Share Account Transaction Area lets you close a member's share account, calculate any dividends due, and distribute the funds.
| Column Heading | Description |
|---|---|
The share account that will be closed and the dividends due. | |
The amount in the share account that will be closed. | |
From Dividend Amount | The amount of dividends due. This accumulator is the calculated value up to the dividend date. If the dividend method is Average Daily Balance (ADB), this field will contain the accumulated daily balance. In the month end cycle, the total accumulated daily balance will be divided by the number of days in the month to determine the ADB. The actual ADB is stored in the appropriate month field on the Shares - Activity tab. If the dividend method is Date of Deposit/Date of Withdrawal (DOD/DOW), this field will contain the calculated dividend amount. Length: 12 numeric including decimal Keyword: DV |
The IRA withdrawal code if the share account being closed is an IRA account. Click here to view the valid IRA withdrawal codes. Keyword: IW | |
The member number of the member that will receive the funds. Click Go to list the member's available accounts in the To Product drop-down list. Type zero in the To Member column to transfer funds to the same member. Keyword: TM | |
The disbursal options available to receive the funds. You can disburse funds by cash, check or transfer to one of the following types of accounts.
Keyword: CA (cash), Check (CK), Transfer (TR) | |
The amount to be distributed or transferred. | |
The product code if the funds will be transferred to a product code. The general ledger account number if the funds will be transferred to a general ledger account. The Product Code option must be selected on the Teller Information window to display the product code drop-down list in the GL/Prod Code column. The General Ledger option must be selected on the Teller Information window to allow entry of a general ledger account in the GL/Prod Code column. If the Branch Entry Allowed check box is selected on the Teller Information window, the fund transfer JV entry will default to the teller branch. Length: 6 numeric Keyword: GL | |
The IRS deposit code if the receiving account is an IRA, ESA, or HSA account. Keyword: TC | |
Assess Fee | The fee amount to be assessed. The fee description is defined on the Product Code Information window. For withdrawals, the product code used is tied to master code GIH. For deposits, the product code used is tied to master code GIG.Length: 10 numeric including decimalKeyword: FA |
The amount of Federal withholding that will be subtracted from the IRA transaction amount. This amount is automatically calculated if the Calculate Federal check box is selected on the tab. Length: 8 numeric including decimal Keyword: WH | |
The amount of state withholding that is subtracted from the IRA transaction amount. This amount is automatically calculated if the Calculate State field on the Credit Union Profile - Shares tab is greater than 0.00 or you may manually enter the amount Length: 8 numeric including decimal Keyword: SW |
When the total amount of the From Side product codes equals the total amount of the To Side product codes, click Submit to complete the transaction.
Complete this process to close each account in the Product to Close drop-down list. A teller override is required to close share type 01 due to the minimum balance restrictions.
Remove Additional Information
The Remove Additional Information panel lists items that may and may not need to be deleted in order for the account to purge.
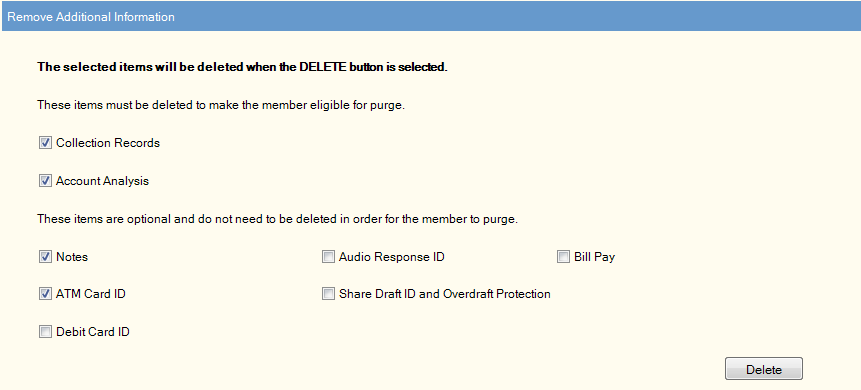
The items in the first section will appear based on the member record, and indicate if the member has:
- Collection records. If selected, Portico will purge the Collection records on the day specified on the report rules for the Purged Collection Accounts Report 735. If you close and re-open the Member Close dialog box prior to the 735 Report run date, the Collections check box will appear re-enabled.
- Uncollected late charges on one or more loans
- Account Analysis and/or accounts associated to another member's Account Analysis.
- Finance charges calculated but not collected on one or more loans
The second section lists the optional items that will appear based on whether your credit union has chosen to display the items and whether the member has the service or product listed. The optional items are:
- Notes. This option will not remove system-generated alerts. You must manually remove the condition that generated the alert, e.g. invalid address, expired driver's license, etc. After all the notes have been deleted that you have permission to delete, the Notes check box will be disabled. If you do not have permission to delete a specific note type or there are system-generated alerts on the member record, and you close and re-open the Member Close dialog box, the Notes check box will appear re-enabled.
- Audio Response ID
- Bill Pay
- ACH Stop Pays
- ATM Card ID
- Share Draft ID and Overdraft Protection
- Share Draft Stop Pays. This option will remove share draft stop pays and loan draft stop pays.
- Debit Card ID
The Member Close - Options window lets you define which information should appear on the Remove Additional Information panel. These items may or may not be selected automatically depending on your credit union-defined options. To delete the items, select the check boxes (if not already selected) and click Delete.
Additional Tasks
The Additional Tasks panel lets you add an event, add the member to the Closed Account File, create documents, and add a note.
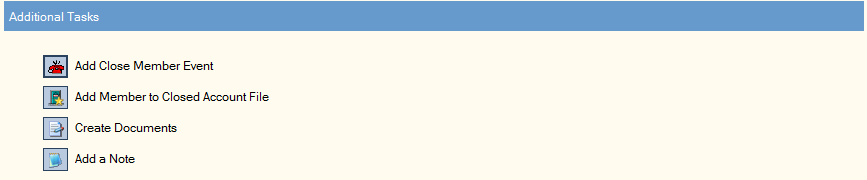
Click the Add Close Member Event icon button to open the Member Event – New dialog box to add an event.
Click the Add Member to Closed Account File icon button to display the Closed Account File dialog box and add the member to the closed account file.
Click the Create Documents icon button to display the Document Preparation dialog box and prepare documents for the member.
Click Add a Note icon button to display the Notes, Warnings and Alerts dialog box and add a note to the member account.
Close Member
The Close Member panel allows you to specify a close reason and date. The Close Reason field can be customized using the Close Reason - Member field name on the Customized Fields window. The Close Date field will default to the current date. The following permissions in the Member Services – User and Teller - Advanced security groups allow you to update the Close Reason field and Close Date field:
- MbrInfo - Field - Member Close Date - Maintain
- MbrInfo - Field - Member Close Reason - Maintain

Click Close Member to close the member account. Portico will automatically place holds on all loans and a permanent (9) hold code on all share accounts to prevent all financial activity.
After a member account is closed, the close date and reason will appear in the Close Date/Reason fields on the Contact Information tab. In addition, closed account indicators will appear on the Member Search dialog box, Portico toolbar, and the Member Information dialog box.
The Closed Account indicator will only appear on the Member Information dialog box if the Member Verification check box is selected on the User Profile - Update - Popups tab.
Be sure to clear the Receive Monthly check box on the Stmts/Reporting/Notices tab to prevent a statement from producing monthly after the member account has been closed.
Purge Exception Report 935