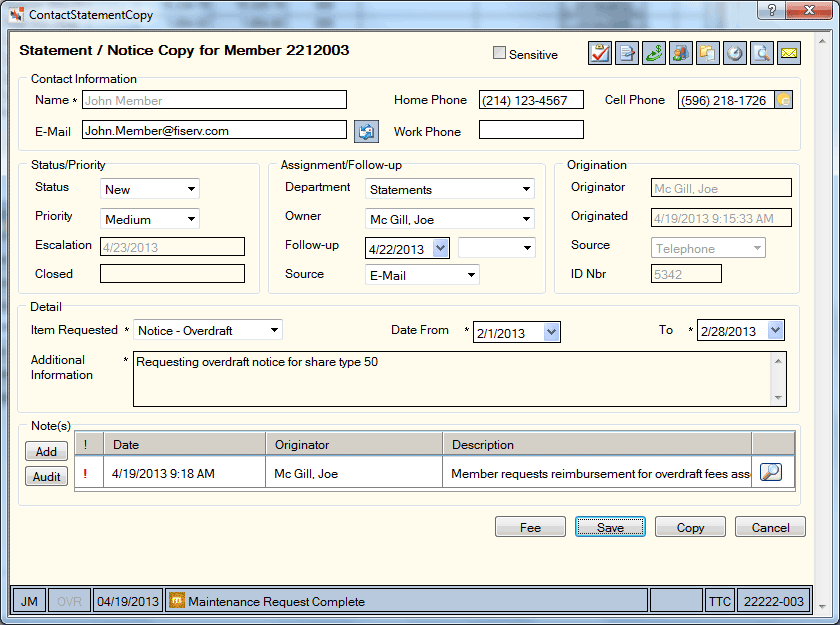
Adding a Statement/Notice Copy Request
The Statement/Notice Copy window lets you create a contact record for a member requesting a copy of their statement or notice.
You can open the Statement/Notice Copy window...
- From the Actions menu on the Contact Manager top menu bar, point to Member Contact, select Statement/Notice Copy.
- From the Activity menu, point to Add New Contact/Event, point to Member Contact, and then select Statement/Notice Copy.
- Select the Contact Manager icon on the tool bar, point to Member Contact, and then select Statement/Notice Copy.

How do I? and Field Help
The Contact Information group box displays basic information about the member.
| Field | Description |
|---|---|
|
Name |
The name of the member. Length: 25 alphanumeric |
|
|
The member's email address. Length: 50 alphanumeric |
|
Home Phone |
The complete home phone number including area code for the member. Length: 10 numeric |
|
Work Phone |
The complete work phone number including area code for the member. Length: 10 numeric |
|
Cell Phone |
The complete cell phone number including area code for the member. Length: 10 numeric |
The icon buttons in the top right corner  let you:
- create a task in Outlook for the item. passes the contact type and unique contact ID number. No member details are sent to Outlook for security purposes; however, you can add additional details to the task as you choose.
- view available documents for the member
- open the Transactions dialog box
- display the Member Notifications and Alerts dialog box
- open the Member Accounts dialog box
- display the member’s History dialog box
- display a print preview of the contact record
- print an envelope
A Past Due indicator will appear if the follow-up date has passed.
The Loancierge icons![]() let you:
let you:
- open the Loancierge Queue tab
- open the Queue Search tab
- open the New Application window
The Text Member icon ![]() appears next to the Cell Phone field lets you:
appears next to the Cell Phone field lets you:
- Send and receive text messages to members using Eltropy’s user interface. Launches the Eltropy Messenger in a standalone browser window.
The Text Member icon appears for a new Contact/Event after you save the screen.
Asterisks indicate the required fields. Your Contact Manager administrator determines which fields are required on the Contact - Update window.
Complete the following steps to add the basic contact/event record information.
- Select the Sensitive check box if the contact/event record should be handled carefully. The contact/event will appear with a caution icon on the Contact Manager - Assignments Queue grid. For a member contact/event record, the contact/event record will also appear at the top of the member's contact history in the Contact/Event History grid.
- In the Status/Priority group box, click the Status down arrow to select the status of the contact/event record.
- Then, click the Priority down arrow to select the level of importance of the contact/event record.
- In the Origination group box, click the Source down arrow to select the method that was used to submit the service request or event to the credit union.
- In the Assignment/Follow-up group box, click the Department down arrow to select the department assigned to the type of service request or event selected.
- Click the Owner down arrow to select the individual who will be assigned to process the contact/event record.
- Click the Follow-up down arrow to select the projected follow-up date from the calendar or enter the date in MM/DD/YYYY format. Then, click the down arrow in the next field to select a follow-up time.
- Click the Source down arrow to select the method that will be used to follow-up on the contact/event record.
Complete the following steps to add a Statement/Notice Copy contact record.
- Select the Item Requested down arrow to select the type of statement or notice requested.
- Select the Date From down arrow to select the beginning statement/notice date from the calendar or enter the date in MM/DD/YYYY format.
- Select the To down arrow to select the ending statement/notice date from the calendar or enter the date in MM/DD/YYYY format.
- In the Additional Information box, enter additional information about the statement or notice copy request.
In the Note(s) group box, you can add additional notes or comments pertaining to the contact/event record. Existing notes will display the date and time the note was added and the teller ID of the individual who added the note.
- Select the High Priority Note check box to flag the note as important and place it in the log in a different text color.
- Select the view details icon button
 to display the entire note in the View Note dialog box.
 - Select Add to open the New Note dialog box and add a new comment.
- Select Audit to open the Audit Log dialog box and view previous changes to the contact record.
Select Copy to open the Send Copy dialog box and send the contact record to additional users.
Select Save to save the contact record. Select Cancel to cancel the contact record and close the window.
After the contact or event record is saved, Portico will populate the following fields:
| Field | Description |
|---|---|
The date that the Status field was changed to Closed. | |
Your name for a new contact or event record or the individual who created the existing contact record. | |
The current date for a new contact or event record or the date an existing contact record was created. | |
The unique computer-assigned number identifying the contact or event record. |