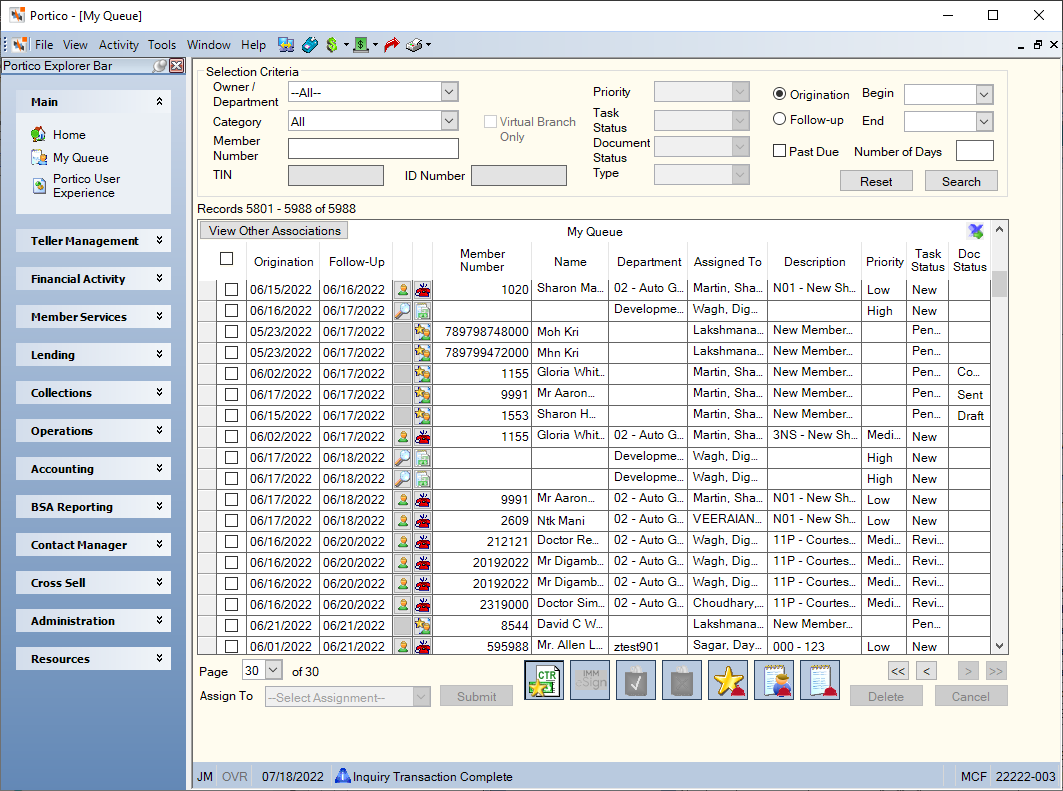
My Queue
|
|
|
|
|
Better manage member relationships and increase efficiency with My Queue. My Queue lets you merge data from existing work queues, including Contact Manager/Event Tracking, Cross Sell and Tracking, New Members and Services, and Currency Transaction Reports (CTR).
All of the data for each line item is predefined by the queue it originated from. You can use My Queue to display:
- Service and member applications with a status of Pending or New from the New Members and Services Application Queue.
- Tasks and events with a status of Blank, New, Pending or Review from the Contact Manager/Event Tracking Assignments Queue.
- Referrals that do not have a sale date and time and non-void open referrals from the Cross Sell Assignments Queue.
- Draft Currency Transaction Reports (CTR) from the CTR Queue.
- Demographic updates from Online Banking.
- Unfinished document sets from IMMeSign and Web Signatures for Credit Unions.
- Ad hoc documents from IMMeSign and Web Signatures for Credit Unions
My Queue provides an at-a-glance to-do list of items that require a user’s follow-up. The Owner/Department drop-down list defaults to the owner/department designated on the My Queue tab of the User Profile – Update dialog box for with the user logged into Portico.
How do I? and Field Help
You can search for queue items by owner/department, category, member, priority, task status, document status, type, contact ID number, origination and follow-up date using the Selection Criteria group box.
- Click the Owner/Department down arrow to select the owner or department queue. To view all assigned and unassigned items, leave the field blank. To view all assigned items, select All. To view all unassigned items, select Unassigned.
- Click the Category down arrow to select the type of queue items to display. The valid values are: All, Contact/Event, Cross Sell, New Members & Services, Currency Transaction Report, Demographic Maintenance, Ad hoc Documents, and Unfinished Document Sets. Unfinished Document Sets automatically appears if there are unfinished documents sets to displays; otherwise, the default category defined on your User Profile - My Queue tab appears.
- To search for queue items associated to a specific member number, enter the member number in the Member Number field (Length: 12 numeric).
- To view past due items, select the Past Due check box, then enter the number of days past due in the Number of Days field.
- To retrieve all Cross Sell referrals that originated from Virtual Branch, select Cross Sell from the Category drop-down list and select the Virtual Branch Only check box. You can record the sale or decline of a Cross Sell referral by selecting the referral, then clicking the Sale or Decline icon buttons. Corillian does not use Cross Sell. Corillian uses Campaign Manager and/or the Next product.
- If the Category field is Contact/Event or Currency Transaction Reports, items with a designated priority can be viewed by clicking the Priority down arrow to select the priority of the queue items to display.
- If the Category field is Contact/Event, New Members & Services, or Currency Transaction Reports, click the Task Status down arrow to select the status of the queue items to display.
- For credit unions using IMMeSign or Web Signatures for Credit Unions, select a Category of Ad hoc Documents and the status of the documents from the Document Status drop-down list to display queue items by a specific status. For credit union using Web Signatures, anything older than 5 days with a status of Completed, Deleted, Draft, or Voided will be purged. For credit unions using IMMeSign, anything older than 5 days with a status of Completed, Deleted, Expired, Remote Session Expired, Remote Session Aborted, or Sent For Imaging will be purged.
- If the Category field is Contact/Event or New Members & Services, click the Type down arrow to select the type of queue items to display. For Internet New Member applications, select New Members & Services from Category field and select Internet New Member from the Type drop-down list.
- If the Category field is Contact/Event, Demographic Maintenance, or Currency Transaction Reports, enter an ID number in the ID Number field to display a specific item.
- To search for query items by origination date, click the Origination option, then enter a beginning and ending date range. Click the Begin and End down arrows to select a date from the pop-up calendar or enter the date in MM/DD/YYYY format.
- To search for query items by follow-up date, click the Follow-up option, then enter a beginning and ending date range. Click the Begin and End down arrows to select a date from the pop-up calendar or enter the date in MM/DD/YYYY format.
- To view CTR reports, select from the Category drop-down list. To search by the Social Security Number (SSN), Employer Identification Number (EIN), or Individual Taxpayer Identification Number (ITIN) of the individual/company who benefited from the transaction, enter the taxpayer ID number in the TIN field.
Click Search to search for the queue items. Click Reset to reset the search criteria.
You can define your default options for the Selection Criteria group box and receive notification when an item is assigned to you or when an item is assigned to a department only [without an owner] using the User Profile – My Queue tab.
The My Queue grid will display the information based on the type of queue item. Regardless of the display option selected, the information from all the columns, can be exported to a Microsoft® Excel spreadsheet using the export icon. Items that have not been reviewed will appear in the My Queue grid in bold and at the top of the list.
| This column… | Displays the following… | ||||||||||||||
|---|---|---|---|---|---|---|---|---|---|---|---|---|---|---|---|
|
Select the check box in the column heading to select all the queue items, or select individual items. Depending on your assigned security permissions, you can select the check box next to an item to reassign it to a different user. The Assign To drop-down list contains a list of users and departments. Select a user and department from the Assign To drop-down list, then click Submit. When an item is assigned to a department, the owner/assigned for the department is deleted and it is reassigned to a department only. For demographic updates, Ad hoc documents and pending and new member applications, you can select the check box next to item and click Delete to delete the document or application. |
|||||||||||||||
| Origination |
The date the item was originated. For CTR, the date the CTR was originated. |
||||||||||||||
| Follow-up |
The date you should follow-up with the item. For CTR, the date you should follow-up with the CTR. Portico will calculate this date by adding the numbers of days in the Follow-Up Days field on the CTR Options window to the CTR origination date. If the Follow-Up Days field on the CTR Options window is blank, Portico will add 4 days to the CTR origination date. You can change the follow-up date on the Draft CTR dialog box. Not used for Ad hoc documents. |
||||||||||||||
| unlabeled |
For Contact Manager, Cross Sell and Tracking, and Demographic Maintenance, click the member information icon to display the Contact Information dialog box. For Contact Manager, the Contact Information dialog box contains a member’s contact information, the detailed information for the specific contact record selected, the member’s contact/event history, account information, ownership information, statements and reporting and notes and messages.
For Cross Sell and Tracking, the Contact Information dialog box contains a member’s contact information, the detailed information for the specific referral record selected, the member’s cross sell history, account information, ownership information, statements and reporting and notes and messages.
For Demographic Maintenance, the Contact Information dialog box contains a member’s contact information, ownership information, statements and reporting and notes and messages.
For CTR, click the details icon to display the Currency Transaction Details dialog box.
|
||||||||||||||
| unlabeled |
The icons in the unlabeled category column let you access detailed information about the contact.
|
||||||||||||||
| Member Number |
The member number associated with the item. For CTR, the member number that belongs to the individual the CTR is being generated for. The first member number listed on the Part I Section A tab of the Draft CTR dialog box will be displayed. Multiple member numbers will be displayed on a tool tip. |
||||||||||||||
| Name |
The name associated with the member number. For CTR, the name associated with the member number. The first member name listed on the Part I Section A tab of the Draft CTR dialog box will be displayed. |
||||||||||||||
| Department |
The department the item is assigned to. For CTR, the department the CTR is assigned to. The CTR can be assigned automatically by using the Department field on the CTR Options window. If the default Department field on the CTR Options window is blank, the Department field on the My Queue window will be blank. You add or change the department on the My Queue window or the Draft CTR dialog box. Not used for Ad hoc documents. |
||||||||||||||
| Assigned To/Other Associations |
The individual the item is assigned to. Click the View Other Associations button to display the Other Associations column in the My Queue grid. The Other Associations column will display the following information:
The Other Associations column will be blank for Ad Hoc Documents, New Members & Services, and Demographic Maintenance. Hover your cursor over the View Other Associations button or Other Associations column heading to view a tooltip listing the types of information that will appear in the Other Associations column. When the My Queue grid displays the Other Associations column, the toggle button label will be View Assigned To. Click the View Assigned To button to display the standard Assigned To column. The Assigned To column will initially appear when you access the My Queue window. |
||||||||||||||
| Description |
The description of the contact record or event or the cross sell opportunity. For New Members & Services, New Member Applicant or New Service will appear. For Demographic Maintenance, the maintenance record number will appear. For CTR, the taxpayer ID number being reported on the CTR. If there are multiple ID numbers being reported on one CTR, they will all display on a tool tip. Portico masks taxpayer ID numbers using asterisks followed by the last 4 digits of the number. For Ad hoc documents, Other Documents will appear. |
||||||||||||||
| Priority |
The priority of the item. For CTR, the default priority is specified on the CTR Options window. Not used for Cross Sell, New Members & Services, or Ad hoc documents. |
||||||||||||||
| Task Status |
The status of the item. For CTR, the status options are New, In Progress, and Approved. Not used for Ad hoc documents. |
||||||||||||||
| Doc Status |
Move your mouse over the Document Status icon to display the created and completed dates and the envelope number. An information icon will appear if more than one envelope is associated. For credit union using Web Signatures, anything older than 5 days with a status of Completed, Deleted, Draft, or Voided will be purged. For credit unions using IMMeSign, anything older than 5 days with a status of Completed, Deleted, Expired, Remote Session Expired, Remote Session Aborted, or Sent For Imaging will be purged. Not used for Contact/Event, Cross Sell, New Members & Services, Demographic Maintenance, or CTR. |


Cleaning up your My Queue
You can delete demographic maintenance items from My Queue using the Delete button. Select Demographic Maintenance from the Category drop-down list and change the Owner/Department drop-down list to blank. When you click Search, all the demographic maintenance items will appear. Select the check box in the header to select all the check boxes. Then, click Delete to delete the items.
For Ad hoc documents , you can select the check box for the document and click Delete to delete the document. Users can delete any document regardless of document status.
You can delete pending and new member applications from the New Members and Services Application Queue tab. Items deleted from the Application Queue tab will also be removed from the My Queue tab. New applications can also be deleted from My Queue by selecting the check box next to the item and clicking Delete. Pending items may also be deleted from My Queue depending on where the application is in the origination process.
Draft CTRs cannot be manually deleted from My Queue, but they will be purged automatically based on the purge criteria defined on the CTR Options window. The CTR purge process runs monthly after 12:00 AM Central Time on the last Saturday of the month. After 45 days, CTRs with a status of new, in progress, approved or pending eFile are changed to a canceled status with a canceled date of the current date and moved from the CTR Queue and My Queue to CTR History. Once a filed or canceled CTR reaches the purge days criteria defined on the CTR Options window, the CTR purges from the system and is no longer available in CTR History. Purged CTRs are reported on the Currency Transaction Reports Purge Report PNG961 found in the Reports Repository under Management Support in Nautilus Essentials.
You can delete contact and event records from the Contact History window. If you are a member of the Contact Manager – Administrator security group or your security group contains the Contact Manager – User can delete Contact/Event permission, you can select the Del check box, then click Save on the Contact History window. You can select one, several, or up to 200 records on the Contact History window. Click the All button in the header row to select all the records or select individual Delete check boxes. When completing a mass delete and there are more than 200 records, a More button will appear at the top of the grid. Click the More button until the button disappears. Then, click the All button in the header row. Click Save and Portico will delete 200 records at a time. When the confirmation message appears, click OK. Items deleted from the Contact History window will also be removed from the My Queue tab.
Cross Sell and Tracking referrals cannot be manually deleted from My Queue, but once declined, they will be purged automatically based on the purge criteria defined on the Purge - Update window. Cross Sell and Tracking referrals can be declined from the Open Referral History - View window. To decline multiple referrals, select the check boxes for the referrals you wish to decline. You can click the All button in the header row to select all the records on the page. Then, choose the decline reason from the Decline Reason drop–down list and the origin of sale from the Origin of Sale drop-down list, and click Decline. A confirmation message will appear. When you click OK, the referrals will be removed from the Search Results grid and the grid will refresh with the next list of referrals.
Click Cancel to cancel your changes to My Queue.
Click the Add New CTR icon button to manually create a CTR.
Select the IMMeSign icon button to display the IMMeSign Search Active Sessions page.
Click the Loancierge icon buttons to open the Loancierge Queue tab, Queue Search tab, or New Application window. When you click the Loancierge Queue Search icon button, Portico will pass the member number or Social Security Number of a non-member to the Queue Search tab. The Queue Search tab will appear and the search results will be filtered based on the criteria passed from Portico:
- If the member number is passed, the search results will list all applications for that member.
- If the SSN is passed, the search results will list all applications for that individual.
To view or maintain an application, select the desired application from the Search Results grid. If no applications appear, you can click New Application on the Loancierge left navigation bar to start a new application. Loancierge security permissions will govern user access to the applications displayed on the Search Results grid. Users must belong to the Loancierge – User security group in Portico and have the appropriate security permissions in Loancierge.
Items are purged from the My Queue window using the purge criteria specified on the Application Queue Purge Criteria – Update window.


System Tray Queue Notification
You can move your cursor over the My Queue icon in your Windows system tray to see the last time My Queue was checked for new assignments.

Last Polled
You can right-click the icon to display a pop-up menu and access the last polled results or open the My Queue window in Portico.
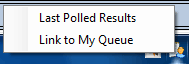
Right-Click Menu
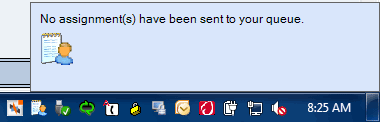
No Assignment(s)
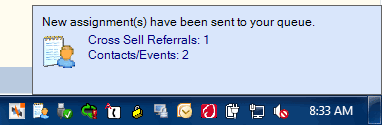
New Assignment(s)
Security Permissions
To use and administer My Queue, you must first assign the My Queue - User or My Queue – Administrator security group to one or more of your Portico users.
| Permissions | Security Groups |
|---|---|
| Portico - Explorer Home - My Queue Menu Option: Lets the user select My Queue from the Portico Explorer Bar | My Queue - User My Queue - Administrator |
MyQueue - View Self;
Dept: The Owner/Department
drop-down list will be enabled and will contain:
|
My Queue - User My Queue - Administrator |
|
MyQueue - View Self; Dept; Dept Members: The Owner/Department drop-down list will be enabled and will contain: In the Users section:
In the Department section:
|
My Queue - User My Queue - Administrator |
|
MyQueue - View All: The Owner/Department drop-down list will be enabled and will contain: In the Users section:
In the Department section:
|
My Queue - Administrator |
| My Queue – User Can Assign Items to Self: Allows a user to assign one or more items in the queue using the Assign To drop-down list. The Assign To drop-down list will be enabled and will contain: The user name of the user signed into Portico | My Queue - User My Queue - Administrator |
My Queue – User Can
Assign Items to Self;Dept Members: Allows a user to assign one or more items in the
queue using the Assign To
drop-down list. The Assign To
drop-down list will be enabled and will contain:
|
My Queue - User My Queue - Administrator |
MyQueue - User Can Assign
Items: Allows a user to assign one or more items in the
queue using the Assign To
drop-down list. The Assign To
drop-down list will be enabled and will contain:
|
My Queue - Administrator |
|
Portico - Profile - User Profile – My Queue – Maintain: Lets the user maintain the User Profile – My Queue tab. |
My Queue - User My Queue - Administrator |
| Portico - Profile - User Profile - Queue Notification: Lets the user maintain the User Profile – Queue Notifications tab. | My Queue - User My Queue - Administrator |
| CrossSell - User Can Sell: Lets the user click the Sale icon button on the My Queue window | |
| CrossSell - User Can Decline: Lets the user click the Decline icon button on the My Queue window |