Step 5: Entering Member Information
|
|
|
|
|
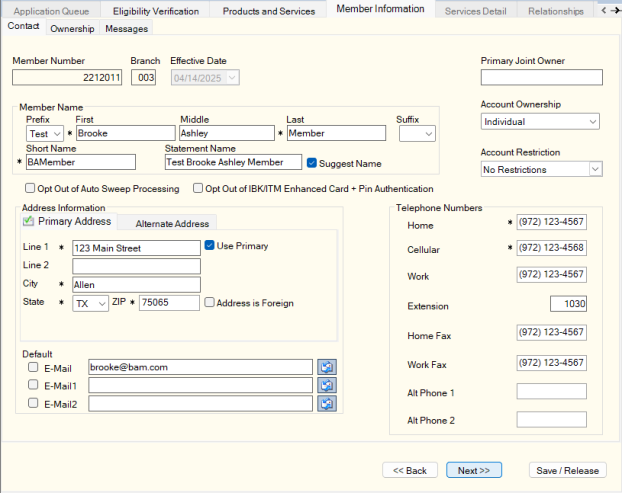
When you select Next on the Products and Services tab, the Member Information tab appears. The Member Information tab is split into three sub tabs to mimic the tabs found under Member Services – Member information about the Portico Explorer Bar. Required fields are indicated with an asterisk. Complete the required fields on each of the sub tabs before you can select Next to move to the next sub tab.
On the Contact tab, you can add a member number for the new member, phone numbers, and email addresses.

How do I? and Field Help
Credit unions can assign the member number in one of two ways:
- The credit union defines the member number.
- The system defines the member number. By entering zero as the member number, the system will assign the member number based on criteria on the Credit Union Profile - Member tab. The member number will not be issued until you select Next.
In the Member Number field, enter the new member number. Type 0 to have the system automatically assign the member number. Portico crosses check member numbers and share draft IDs when adding a member or share draft ID. A new member number may not match an existing share draft ID, and a new share draft ID may not match an existing member number. Length: 12 numeric / Format: 1 through 9 - Base Member Number; 10 through 11 - Special or Family ID; 12 - Check Digit
In the Branch field, enter the new member's branch. Length: 3 numeric / Keyword: BR
Select the Effective Date down arrow to select the effective date of the transaction from the pop-up calendar or enter the date in MM/DD/YYYY format.
If your credit union uses Driver’s License/ID Capture and you have a Magtek card swipe device attached to your workstation, a Driver’s License/ID Capture icon will appear next to the Use Primary and Use Alternate options on the Contact Information tab. Portico can capture the name, address (street, city, state, and ZIP code), date of birth, driver’s license or identification number, and driver’s license or identification card expiration date from state-issued driver’s licenses or identification cards when it is included on the magnetic stripe. When you click the Driver’s License/ID Capture icon, you are prompted to swipe the identification card. Swipe the customer’s driver’s license or ID, then click OK. The ID Information dialog box will appear for you to import the data into Portico.
Use the following fields to maintain the member name, joint, and account ownership information:
| Field | Description |
|---|---|
|
The prefix to member's name, e.g. Mr., Mrs., Dr. You can customize this field and make it a required field in New Members & Services using the Customized Fields window. Keyword: PR Reporting Analytics: PR MBR Prefix (Member Base subject in the Member Information folder and ME Member Base subject in the Month-end Information\Member Month-end folder) |
|
|
The member's first name. Length: 25 alphanumeric Keyword: FN | New Members & Services Keyword: N1 Reporting Analytics: PR MBR FST NM (Member Base subject in the Member Information folder and ME Member Base subject in the Month-end Information\Member Month-end folder) Required field. |
|
|
The member's middle name. Length: 25 alphanumeric Keyword: MN | New Members & Services Keyword: N2 Reporting Analytics: PR MBR MID NM (Member Base subject in the Member Information folder and ME Member Base subject in the Month-end Information\Member Month-end folder) |
|
|
The member's last name. Length: 25 alphanumeric Keyword: LN | New Members & Services Keyword: N3 Reporting Analytics: PR MBR LST NM (Member Base subject in the Member Information folder and ME Member Base subject in the Month-end Information\Member Month-end folder) |
|
|
The suffix to the member's name, e.g. Jr., Sr.,PhD. You can customize this field and make it a required field in New Members & Services using the Customized Fields window. Keyword: SF Reporting Analytics: PR MBR Suffix (Member Base subject in the Member Information folder and ME Member Base subject in the Month-end Information\Member Month-end folder) |
|
|
The name of the business that owns the account. Length: 23 alphanumeric |
|
|
BizChex requires the business type to categorize a specific business to complete the appropriate verification screening. The valid values for the Business Type drop-down list are:
Required for BizChex screening. Reporting Analytics: Business Type (Member Base subject in the Member Information folder) |
|
|
The member's first and second initials followed by the last name. No spaces between first and second initials and last name. Length: 20 alphanumeric Keyword: NM |
|
|
The name that will appear on the member's statement. The member name reported in the Credit Bureau Listing Report 350, Member Transaction Monitoring Report 844, and Temenos File Extract Report 739 is derived from the Statement Name field. Due to the parsing of the statement name into first, middle and last name for these transmissions, statement names with a prefix (e.g. Miss, Mrs, Mr, Ms, and Dr) will be reviewed and the prefix will be removed from the transmissions. To ensure that the prefix is identified and removed, a period or space must appear after the prefixes Mrs, Mr, Ms, and Dr in the Statement Name field. For the prefix Miss, a space must appear after the prefix in the Statement Name field. Length: 25 alphanumeric Keyword: N1 |
|
|
Select this check box to instruct Portico to update the Short Name and Statement Name fields when the separate name fields are modified. If unchecked, any changes to the separate name fields will not update the Short Name and Statement Name fields. The user must manually update these fields. System default is checked. |
|
|
The joint owner or secondary member for this account. If the Joint Member check box is selected on the Credit Union Profile - Member tab, you cannot enter a new joint owner in the Primary Joint Owner field. Length: 25 alphanumeric Keyword: N2 |
|
|
Click the down arrow to select the appropriate account ownership from the drop-down list. You can make this field required in New Members & Services using the Customized Fields window. Keyword: OC If the Account Ownership field is business, Portico will not require the birth date, driver’s license, ID issue, or ID expiration. |
|
|
Click the down arrow to select the account restrictions: No Restrictions, CU Employee - Restricted, Report Only - No Restrictions, Special Account - Restricted, and Non Employee - Extended Restriction. Maintenance to the Account Restriction field is controlled by the MbrInfo - Field - Account Restriction - Maintain security permission included in the Employee Security - Administrator, Teller - Advanced, and Member Services - User security groups. Refer to Employee and Restricted Accounts Security for more information on restricting account access. Keyword: EM |
|
|
Select the checkbox to exclude the member's accounts from the sweep process. Reporting Analytics: Auto Sweep Opt Out (Member Information > Member Base) |
|
|
Select the checkbox to exclude the member's accounts from the enhanced card and PIN authentication process. |
Use the following fields to add the address information.
| Field | Description |
|---|---|
|
Select the Use Primary check box to use the primary address for member notices and statements. An active address icon will appear on the tab. Keyword: A1 or AD |
|
|
Select the Address is Invalid check box to flag the address as invalid when a statement or notice is returned due to an invalid address. If your credit union uses Member-Level Warnings and Alerts and the System-Generated Alerts check box is selected on the Credit Union Profile - Products & Services tab, Portico will add a system-generated warning message to the member’s Notes, Warning and Alerts grid when the Address is Invalid check box is selected for the primary or alternate address. The system-generated warning message cannot be deleted from the Notes, Warning and Alerts grid. When updates are made to the primary or alternate address, you must clear/uncheck the Address is Invalid check box. If your credit union uses the Demographic Updates feature, Portico will automatically update the check box and delete the warning message. The mailing and delivery of statements or notices are not controlled by the Address is Invalid check box at this time. Courtesy Pay Note: You can use the Address is Invalid check box with Extended Courtesy Pay. If the Consider Invalid Address check box is selected on the Credit Union Profile – Shares tab, Portico will identify the active address, and then review theAddress is Invalid check box on the Contact Information tab to determine if the member has an invalid address. If deemed invalid, Portico will not use Courtesy Pay funds to authorize debit card transactions and ATM transactions. Cross Sell and Tracking: You can also use the Address is Invalid check box with Cross Sell and Tracking to remind tellers to ask for a valid address on the account. The Invalid Address attribute on the Member – Update window lets you include or exclude members based on either the primary or alternate Address is Invalid check box on the Contact Information tab. Reporting Analytics: Invalid Primary Address (Located in Member Information/Member Base subject and Month-end Information/Member Month-end/ME Member Base subject) |
|
|
Line 1 of the member's primary address. This field cannot contain all blanks. Length: 24 alphanumeric Keyword: A1 |
|
|
Line 2 of the member's primary address. If the Address is Foreign check box is selected, the Country drop-down list and State/Province field will appear. Enter the foreign city's name in the Address 2 field and the foreign country's name in the City field. For countries other than Canada or Mexico, enter the two character country code in the State field for mailing label purposes. Then, choose the country from the Country drop-down list and enter the appropriate 2-character state or province code or select the state or province from the State/Province drop-down list to provide this information for the Self Service Interface. For Canadian addresses, enter Canada in the City field and enter the two character province code in the State field for mailing label purposes. Then, choose Canada from the Country drop-down list and select the appropriate Canadian province from the State/Province drop-down list to provide this information for the Self Service Interface. For Mexican addresses, enter Mexico in the City field and enter the two character state code in the State field for mailing label purposes. Then, choose Mexico from the Country drop-down list and select the appropriate Mexican state from the State/Province drop-down list to provide this information for the Self Service Interface. If your credit union has foreign address support with Corillian Online Banking, member updates to foreign addresses via online banking will display a three-character abbreviation in the City field. For example, if a member updates their Canadian address using online banking, CAN will appear in the City field and Canada will appear in the Country field. When 3rd party vendors update Portico with foreign address changes, the foreign city's name will appear in the Address 2 field (e.g. Guadalajara), the foreign country code will appear in the State field (e.g. MX), and the Country field and State/Province field will be cleared. The Country and State/Province fields allow you to capture the foreign address information to be used by the Self Service Interfaces (SSI) for online banking online enrollment, online banking verification, and online banking demographic updates. The Country and State/Province fields do not impact address formats for labels, statements, or notices. Fiserv recommends reviewing the Self Service Member Request Report 941 to identify members that updated a foreign address. Then, use the member's non-financial history to verify that the address information was entered correctly. Length: 24 alphanumeric Keyword: A2 |
|
|
The city where the individual resides. If the Address is Foreign check box is selected, the Country drop-down list and State/Province field will appear. Enter the foreign city's name in the Address 2 field and the foreign country's name in the City field. For countries other than Canada or Mexico, enter the two character country code in the State field for mailing label purposes. Then, choose the country from the Country drop-down list and enter the appropriate 2-character state or province code or select the state or province from the State/Province drop-down list to provide this information for the Self Service Interface. For Canadian addresses, enter Canada in the City field and enter the two character province code in the State field for mailing label purposes. Then, choose Canada from the Country drop-down list and select the appropriate Canadian province from the State/Province drop-down list to provide this information for the Self Service Interface. For Mexican addresses, enter Mexico in the City field and enter the two character state code in the State field for mailing label purposes. Then, choose Mexico from the Country drop-down list and select the appropriate Mexican state from the State/Province drop-down list to provide this information for the Self Service Interface. If your credit union has foreign address support with Corillian Online Banking, member updates to foreign addresses via online banking will display a three-character abbreviation in the City field. For example, if a member updates their Canadian address using online banking, CAN will appear in the City field and Canada will appear in the Country field. When 3rd party vendors update Portico with foreign address changes, the foreign city's name will appear in the Address 2 field (e.g. Guadalajara), the foreign country code will appear in the State field (e.g. MX), and the Country field and State/Province field will be cleared. The Country and State/Province fields allow you to capture the foreign address information to be used by the Self Service Interfaces (SSI) for online banking online enrollment, online banking verification, and online banking demographic updates. The Country and State/Province fields do not impact address formats for labels, statements, or notices. Fiserv recommends reviewing the Self Service Member Request Report 941 to identify members that updated a foreign address. Then, use the member's non-financial history to verify that the address information was entered correctly. Length: 18 alphanumeric Keyword: AC |
|
|
Click the down arrow to select the correct state abbreviation from the drop-down list. If the Address is Foreign check box is selected, the Country drop-down list and State/Province field will appear. Enter the foreign city's name in the Address 2 field and the foreign country's name in the City field. For countries other than Canada or Mexico, enter the two character country code in the State field for mailing label purposes. Then, choose the country from the Country drop-down list and enter the appropriate 2-character state or province code or select the state or province from the State/Province drop-down list to provide this information for the Self Service Interface. For Canadian addresses, enter Canada in the City field and enter the two character province code in the State field for mailing label purposes. Then, choose Canada from the Country drop-down list and select the appropriate Canadian province from the State/Province drop-down list to provide this information for the Self Service Interface. For Mexican addresses, enter Mexico in the City field and enter the two character state code in the State field for mailing label purposes. Then, choose Mexico from the Country drop-down list and select the appropriate Mexican state from the State/Province drop-down list to provide this information for the Self Service Interface. If your credit union has foreign address support with Corillian Online Banking, member updates to foreign addresses via online banking will display a three-character abbreviation in the City field. For example, if a member updates their Canadian address using online banking, CAN will appear in the City field and Canada will appear in the Country field. When 3rd party vendors update Portico with foreign address changes, the foreign city's name will appear in the Address 2 field (e.g. Guadalajara), the foreign country code will appear in the State field (e.g. MX), and the Country field and State/Province field will be cleared. The Country and State/Province fields allow you to capture the foreign address information to be used by the Self Service Interfaces (SSI) for online banking online enrollment, online banking verification, and online banking demographic updates. The Country and State/Province fields do not impact address formats for labels, statements, or notices. Fiserv recommends reviewing the Self Service Member Request Report 941 to identify members that updated a foreign address. Then, use the member's non-financial history to verify that the address information was entered correctly. Keyword: AS |
|
|
The postal ZIP Code for the address listed. For domestic addresses, the ZIP code must be either 5 or 9 digits. For foreign addresses, the ZIP code can be up to 10 characters. If the Address is Foreign check box is not selected:
If the Address is Foreign check box is selected:
Length: 9 numeric (10 alphanumeric if the Address is Foreign check box is selected.) Keyword: ZP Reporting Analytics for Primary Member Address: MBR Zip Code Dash (Located in Member Information/Member Base subject and Month-end Information/Member Month-end/ME Member Base subject) |
|
|
The country associated with the foreign address. If the Address is Foreign check box is selected, the Country drop-down list and State/Province field will appear. Enter the foreign city's name in the Address 2 field and the foreign country's name in the City field. For countries other than Canada or Mexico, enter the two character country code in the State field for mailing label purposes. Then, choose the country from the Country drop-down list and enter the appropriate 2-character state or province code or select the state or province from the State/Province drop-down list to provide this information for the Self Service Interface. For Canadian addresses, enter Canada in the City field and enter the two character province code in the State field for mailing label purposes. Then, choose Canada from the Country drop-down list and select the appropriate Canadian province from the State/Province drop-down list to provide this information for the Self Service Interface. For Mexican addresses, enter Mexico in the City field and enter the two character state code in the State field for mailing label purposes. Then, choose Mexico from the Country drop-down list and select the appropriate Mexican state from the State/Province drop-down list to provide this information for the Self Service Interface. If your credit union has foreign address support with Corillian Online Banking, member updates to foreign addresses via online banking will display a three-character abbreviation in the City field. For example, if a member updates their Canadian address using online banking, CAN will appear in the City field and Canada will appear in the Country field. When 3rd party vendors update Portico with foreign address changes, the foreign city's name will appear in the Address 2 field (e.g. Guadalajara), the foreign country code will appear in the State field (e.g. MX), and the Country field and State/Province field will be cleared. The Country and State/Province fields allow you to capture the foreign address information to be used by the Self Service Interfaces (SSI) for online banking online enrollment, online banking verification, and online banking demographic updates. The Country and State/Province fields do not impact address formats for labels, statements, or notices. Fiserv recommends reviewing the Self Service Member Request Report 941 to identify members that updated a foreign address. Then, use the member's non-financial history to verify that the address information was entered correctly. Reporting Analytics: MBR Country Code (Located in Member Information/Member Base subject and Month-end Information/Member Month-end/ME Member Base subject) |
|
|
The state or province associated with the foreign address. The State/Province field changes to a drop-down list if the Country drop-down list is Canada or Mexico. If the Address is Foreign check box is selected, the Country drop-down list and State/Province field will appear. Enter the foreign city's name in the Address 2 field and the foreign country's name in the City field. For countries other than Canada or Mexico, enter the two character country code in the State field for mailing label purposes. Then, choose the country from the Country drop-down list and enter the appropriate 2-character state or province code or select the state or province from the State/Province drop-down list to provide this information for the Self Service Interface. For Canadian addresses, enter Canada in the City field and enter the two character province code in the State field for mailing label purposes. Then, choose Canada from the Country drop-down list and select the appropriate Canadian province from the State/Province drop-down list to provide this information for the Self Service Interface. For Mexican addresses, enter Mexico in the City field and enter the two character state code in the State field for mailing label purposes. Then, choose Mexico from the Country drop-down list and select the appropriate Mexican state from the State/Province drop-down list to provide this information for the Self Service Interface. If your credit union has foreign address support with Corillian Online Banking, member updates to foreign addresses via online banking will display a three-character abbreviation in the City field. For example, if a member updates their Canadian address using online banking, CAN will appear in the City field and Canada will appear in the Country field. When 3rd party vendors update Portico with foreign address changes, the foreign city's name will appear in the Address 2 field (e.g. Guadalajara), the foreign country code will appear in the State field (e.g. MX), and the Country field and State/Province field will be cleared. The Country and State/Province fields allow you to capture the foreign address information to be used by the Self Service Interfaces (SSI) for online banking online enrollment, online banking verification, and online banking demographic updates. The Country and State/Province fields do not impact address formats for labels, statements, or notices. Fiserv recommends reviewing the Self Service Member Request Report 941 to identify members that updated a foreign address. Then, use the member's non-financial history to verify that the address information was entered correctly. Reporting Analytics: MBR Province Code (Located in Member Information/Member Base subject and Month-end Information/Member Month-end/ME Member Base subject) |
|
|
Select this check box if the address is foreign. If the Address is Foreign check box is selected, the Country drop-down list and State/Province field will appear. Enter the foreign city's name in the Address 2 field and the foreign country's name in the City field. For countries other than Canada or Mexico, enter the two character country code in the State field for mailing label purposes. Then, choose the country from the Country drop-down list and enter the appropriate 2-character state or province code or select the state or province from the State/Province drop-down list to provide this information for the Self Service Interface. For Canadian addresses, enter Canada in the City field and enter the two character province code in the State field for mailing label purposes. Then, choose Canada from the Country drop-down list and select the appropriate Canadian province from the State/Province drop-down list to provide this information for the Self Service Interface. For Mexican addresses, enter Mexico in the City field and enter the two character state code in the State field for mailing label purposes. Then, choose Mexico from the Country drop-down list and select the appropriate Mexican state from the State/Province drop-down list to provide this information for the Self Service Interface. If your credit union has foreign address support with Corillian Online Banking, member updates to foreign addresses via online banking will display a three-character abbreviation in the City field. For example, if a member updates their Canadian address using online banking, CAN will appear in the City field and Canada will appear in the Country field. When 3rd party vendors update Portico with foreign address changes, the foreign city's name will appear in the Address 2 field (e.g. Guadalajara), the foreign country code will appear in the State field (e.g. MX), and the Country field and State/Province field will be cleared. The Country and State/Province fields allow you to capture the foreign address information to be used by the Self Service Interfaces (SSI) for online banking online enrollment, online banking verification, and online banking demographic updates. The Country and State/Province fields do not impact address formats for labels, statements, or notices. Fiserv recommends reviewing the Self Service Member Request Report 941 to identify members that updated a foreign address. Then, use the member's non-financial history to verify that the address information was entered correctly. Keyword: FF |
|
|
Select this check box to extract the address for standardization. Select the Extract Address for Standardization check box to extract the primary address for standardization from the 505 Report. Using the Address Standardization option(s) saves postage by using U. S. Postal Service (USPS) standardized address information. Portico can run the 505 Report program up to four times per year on the first Friday of March, June, September and December. To take advantage of the savings offered by the USPS, Portico recommends that you schedule to run the 505 Report program at least twice a year. The 505 Report program compares names and addresses from the Contact Information tab to the USPS database. The name and address matches found are standardized and added to each member’s Contact Information tab. Portico provides you with a Coding Accuracy Support System (CASS) Report valid for six months after the 505 Report program runs, which may be used for any member mass mailings during that time. For complete details, refer to the 505 Report documentation. Keyword: EX |
|
|
The date that the address was changed. An informational alert will display on the Member Information dialog box when the in-use address is changed today or in the past 45 days. Reporting Analytics: Primary Addr Last Chg Date (Located in Member Information/Member Base subject and Month-end Information/Member Month-end/ME Member Base subject) |
|
|
Select this check box to use the postal standardized address instead of the primary address on the member statement. If the Standardize New Members and Services Addresses check box has been selected in the Products section on the Credit Union Profile - Products & Services tab, the Request USPS icon will appear in the Address group box. Address standardization will occur when an existing address is changed and you click Next or Save/Release on the Member Verification tab. The Address Standardization dialog box will appear displaying the standardized address. If the address entered is identical to the USPS standardized address, an informational pop-up message will appear. If you clicked Next or Save/Release on the Member Verification tab and the address is identical to the USPS standardized address, no message will appear and you will continue with the next step of the New Members & Services workflow. |
|
|
The standardized delivery address that will print on the member's statement. Portico automatically updates this field when the ZIP+4® Audit Report 505 is produced. The standardized format lets your credit union obtain postal discounts. If you manually maintain the member's address, Portico changes the Standardized Postal Address fields to blank and clears the Use Standardized Address check box. Keyword: AD |
|
|
Select the Use Alternate check box to use the alternate address for member notices and statements. Portico will also print the member's alternate address on receipts and envelopes when the Use Alternate check box is selected. An active address icon will appear on the tab. |
|
|
Select the Address is Invalid check box to flag the address as invalid when a statement or notice is returned due to an invalid address. If your credit union uses Member-Level Warnings and Alerts and the System-Generated Alerts check box is selected on the Credit Union Profile - Products & Services tab, Portico will add a system-generated warning message to the member’s Notes, Warning and Alerts grid when the Address is Invalid check box is selected for the primary or alternate address. The system-generated warning message cannot be deleted from the Notes, Warning and Alerts grid. When updates are made to the primary or alternate address, you must clear/uncheck the Address is Invalid check box. If your credit union uses the Demographic Updates feature, Portico will automatically update the check box and delete the warning message. The mailing and delivery of statements or notices are not controlled by the Address is Invalid check box at this time. Courtesy Pay Note: You can use the Address is Invalid check box with Extended Courtesy Pay. If the Consider Invalid Address check box is selected on the Credit Union Profile – Shares tab, Portico will identify the active address, and then review theAddress is Invalid check box on the Contact Information tab to determine if the member has an invalid address. If deemed invalid, Portico will not use Courtesy Pay funds to authorize debit card transactions and ATM transactions. Cross Sell and Tracking: You can also use the Address is Invalid check box with Cross Sell and Tracking to remind tellers to ask for a valid address on the account. The Invalid Address attribute on the Member – Update window lets you include or exclude members based on either the primary or alternate Address is Invalid check box on the Contact Information tab. Reporting Analytics: Invalid Alternate Address (Located in Member Information/Member Base subject and Month-end Information/Member Month-end/ME Member Base subject) |
|
|
Line 1 of the member's alternate address. Length: 24 alphanumeric Keyword: A1 |
|
|
Line 2 of the member's alternate address. If the Address is Foreign check box is selected, the Country drop-down list and State/Province field will appear. Enter the foreign city's name in the Address 2 field and the foreign country's name in the City field. For countries other than Canada or Mexico, enter the two character country code in the State field for mailing label purposes. Then, choose the country from the Country drop-down list and enter the appropriate 2-character state or province code or select the state or province from the State/Province drop-down list to provide this information for the Self Service Interface. For Canadian addresses, enter Canada in the City field and enter the two character province code in the State field for mailing label purposes. Then, choose Canada from the Country drop-down list and select the appropriate Canadian province from the State/Province drop-down list to provide this information for the Self Service Interface. For Mexican addresses, enter Mexico in the City field and enter the two character state code in the State field for mailing label purposes. Then, choose Mexico from the Country drop-down list and select the appropriate Mexican state from the State/Province drop-down list to provide this information for the Self Service Interface. If your credit union has foreign address support with Corillian Online Banking, member updates to foreign addresses via online banking will display a three-character abbreviation in the City field. For example, if a member updates their Canadian address using online banking, CAN will appear in the City field and Canada will appear in the Country field. When 3rd party vendors update Portico with foreign address changes, the foreign city's name will appear in the Address 2 field (e.g. Guadalajara), the foreign country code will appear in the State field (e.g. MX), and the Country field and State/Province field will be cleared. The Country and State/Province fields allow you to capture the foreign address information to be used by the Self Service Interfaces (SSI) for online banking online enrollment, online banking verification, and online banking demographic updates. The Country and State/Province fields do not impact address formats for labels, statements, or notices. Fiserv recommends reviewing the Self Service Member Request Report 941 to identify members that updated a foreign address. Then, use the member's non-financial history to verify that the address information was entered correctly. Length: 24 alphanumeric Keyword: A2 |
|
|
The city where the individual resides. If the Address is Foreign check box is selected, the Country drop-down list and State/Province field will appear. Enter the foreign city's name in the Address 2 field and the foreign country's name in the City field. For countries other than Canada or Mexico, enter the two character country code in the State field for mailing label purposes. Then, choose the country from the Country drop-down list and enter the appropriate 2-character state or province code or select the state or province from the State/Province drop-down list to provide this information for the Self Service Interface. For Canadian addresses, enter Canada in the City field and enter the two character province code in the State field for mailing label purposes. Then, choose Canada from the Country drop-down list and select the appropriate Canadian province from the State/Province drop-down list to provide this information for the Self Service Interface. For Mexican addresses, enter Mexico in the City field and enter the two character state code in the State field for mailing label purposes. Then, choose Mexico from the Country drop-down list and select the appropriate Mexican state from the State/Province drop-down list to provide this information for the Self Service Interface. If your credit union has foreign address support with Corillian Online Banking, member updates to foreign addresses via online banking will display a three-character abbreviation in the City field. For example, if a member updates their Canadian address using online banking, CAN will appear in the City field and Canada will appear in the Country field. When 3rd party vendors update Portico with foreign address changes, the foreign city's name will appear in the Address 2 field (e.g. Guadalajara), the foreign country code will appear in the State field (e.g. MX), and the Country field and State/Province field will be cleared. The Country and State/Province fields allow you to capture the foreign address information to be used by the Self Service Interfaces (SSI) for online banking online enrollment, online banking verification, and online banking demographic updates. The Country and State/Province fields do not impact address formats for labels, statements, or notices. Fiserv recommends reviewing the Self Service Member Request Report 941 to identify members that updated a foreign address. Then, use the member's non-financial history to verify that the address information was entered correctly. Length: 18 alphanumeric Keyword: AC |
|
|
Click the down arrow to select the correct state abbreviation from the drop-down list. If the Address is Foreign check box is selected, the Country drop-down list and State/Province field will appear. Enter the foreign city's name in the Address 2 field and the foreign country's name in the City field. For countries other than Canada or Mexico, enter the two character country code in the State field for mailing label purposes. Then, choose the country from the Country drop-down list and enter the appropriate 2-character state or province code or select the state or province from the State/Province drop-down list to provide this information for the Self Service Interface. For Canadian addresses, enter Canada in the City field and enter the two character province code in the State field for mailing label purposes. Then, choose Canada from the Country drop-down list and select the appropriate Canadian province from the State/Province drop-down list to provide this information for the Self Service Interface. For Mexican addresses, enter Mexico in the City field and enter the two character state code in the State field for mailing label purposes. Then, choose Mexico from the Country drop-down list and select the appropriate Mexican state from the State/Province drop-down list to provide this information for the Self Service Interface. If your credit union has foreign address support with Corillian Online Banking, member updates to foreign addresses via online banking will display a three-character abbreviation in the City field. For example, if a member updates their Canadian address using online banking, CAN will appear in the City field and Canada will appear in the Country field. When 3rd party vendors update Portico with foreign address changes, the foreign city's name will appear in the Address 2 field (e.g. Guadalajara), the foreign country code will appear in the State field (e.g. MX), and the Country field and State/Province field will be cleared. The Country and State/Province fields allow you to capture the foreign address information to be used by the Self Service Interfaces (SSI) for online banking online enrollment, online banking verification, and online banking demographic updates. The Country and State/Province fields do not impact address formats for labels, statements, or notices. Fiserv recommends reviewing the Self Service Member Request Report 941 to identify members that updated a foreign address. Then, use the member's non-financial history to verify that the address information was entered correctly. Keyword: AS |
|
|
The postal ZIP Code for the address listed. For domestic addresses, the ZIP code must be either 5 or 9 digits. For foreign addresses, the ZIP code can be up to 10 characters. If the Address is Foreign check box is not selected:
If the Address is Foreign check box is selected:
Length: 9 numeric (10 alphanumeric if the Address is Foreign check box is selected.) Keyword: ZP |
|
|
The country associated with the foreign address. If the Address is Foreign check box is selected, the Country drop-down list and State/Province field will appear. Enter the foreign city's name in the Address 2 field and the foreign country's name in the City field. For countries other than Canada or Mexico, enter the two character country code in the State field for mailing label purposes. Then, choose the country from the Country drop-down list and enter the appropriate 2-character state or province code or select the state or province from the State/Province drop-down list to provide this information for the Self Service Interface. For Canadian addresses, enter Canada in the City field and enter the two character province code in the State field for mailing label purposes. Then, choose Canada from the Country drop-down list and select the appropriate Canadian province from the State/Province drop-down list to provide this information for the Self Service Interface. For Mexican addresses, enter Mexico in the City field and enter the two character state code in the State field for mailing label purposes. Then, choose Mexico from the Country drop-down list and select the appropriate Mexican state from the State/Province drop-down list to provide this information for the Self Service Interface. If your credit union has foreign address support with Corillian Online Banking, member updates to foreign addresses via online banking will display a three-character abbreviation in the City field. For example, if a member updates their Canadian address using online banking, CAN will appear in the City field and Canada will appear in the Country field. When 3rd party vendors update Portico with foreign address changes, the foreign city's name will appear in the Address 2 field (e.g. Guadalajara), the foreign country code will appear in the State field (e.g. MX), and the Country field and State/Province field will be cleared. The Country and State/Province fields allow you to capture the foreign address information to be used by the Self Service Interfaces (SSI) for online banking online enrollment, online banking verification, and online banking demographic updates. The Country and State/Province fields do not impact address formats for labels, statements, or notices. Fiserv recommends reviewing the Self Service Member Request Report 941 to identify members that updated a foreign address. Then, use the member's non-financial history to verify that the address information was entered correctly. Reporting Analytics: ALT Country Code (Located in Member Information/Member Base subject and Month-end Information/Member Month-end/ME Member Base subject) |
|
|
The state or province associated with the foreign address. The State/Province field changes to a drop-down list if the Country drop-down list is Canada or Mexico. If the Address is Foreign check box is selected, the Country drop-down list and State/Province field will appear. Enter the foreign city's name in the Address 2 field and the foreign country's name in the City field. For countries other than Canada or Mexico, enter the two character country code in the State field for mailing label purposes. Then, choose the country from the Country drop-down list and enter the appropriate 2-character state or province code or select the state or province from the State/Province drop-down list to provide this information for the Self Service Interface. For Canadian addresses, enter Canada in the City field and enter the two character province code in the State field for mailing label purposes. Then, choose Canada from the Country drop-down list and select the appropriate Canadian province from the State/Province drop-down list to provide this information for the Self Service Interface. For Mexican addresses, enter Mexico in the City field and enter the two character state code in the State field for mailing label purposes. Then, choose Mexico from the Country drop-down list and select the appropriate Mexican state from the State/Province drop-down list to provide this information for the Self Service Interface. If your credit union has foreign address support with Corillian Online Banking, member updates to foreign addresses via online banking will display a three-character abbreviation in the City field. For example, if a member updates their Canadian address using online banking, CAN will appear in the City field and Canada will appear in the Country field. When 3rd party vendors update Portico with foreign address changes, the foreign city's name will appear in the Address 2 field (e.g. Guadalajara), the foreign country code will appear in the State field (e.g. MX), and the Country field and State/Province field will be cleared. The Country and State/Province fields allow you to capture the foreign address information to be used by the Self Service Interfaces (SSI) for online banking online enrollment, online banking verification, and online banking demographic updates. The Country and State/Province fields do not impact address formats for labels, statements, or notices. Fiserv recommends reviewing the Self Service Member Request Report 941 to identify members that updated a foreign address. Then, use the member's non-financial history to verify that the address information was entered correctly. Reporting Analytics: ALT Province Code (Located in Member Information/Member Base subject and Month-end Information/Member Month-end/ME Member Base subject) |
|
|
Select this check box if the alternate address is foreign. If the Address is Foreign check box is selected, the Country drop-down list and State/Province field will appear. Enter the foreign city's name in the Address 2 field and the foreign country's name in the City field. For countries other than Canada or Mexico, enter the two character country code in the State field for mailing label purposes. Then, choose the country from the Country drop-down list and enter the appropriate 2-character state or province code or select the state or province from the State/Province drop-down list to provide this information for the Self Service Interface. For Canadian addresses, enter Canada in the City field and enter the two character province code in the State field for mailing label purposes. Then, choose Canada from the Country drop-down list and select the appropriate Canadian province from the State/Province drop-down list to provide this information for the Self Service Interface. For Mexican addresses, enter Mexico in the City field and enter the two character state code in the State field for mailing label purposes. Then, choose Mexico from the Country drop-down list and select the appropriate Mexican state from the State/Province drop-down list to provide this information for the Self Service Interface. If your credit union has foreign address support with Corillian Online Banking, member updates to foreign addresses via online banking will display a three-character abbreviation in the City field. For example, if a member updates their Canadian address using online banking, CAN will appear in the City field and Canada will appear in the Country field. When 3rd party vendors update Portico with foreign address changes, the foreign city's name will appear in the Address 2 field (e.g. Guadalajara), the foreign country code will appear in the State field (e.g. MX), and the Country field and State/Province field will be cleared. The Country and State/Province fields allow you to capture the foreign address information to be used by the Self Service Interfaces (SSI) for online banking online enrollment, online banking verification, and online banking demographic updates. The Country and State/Province fields do not impact address formats for labels, statements, or notices. Fiserv recommends reviewing the Self Service Member Request Report 941 to identify members that updated a foreign address. Then, use the member's non-financial history to verify that the address information was entered correctly. Keyword: FF |
|
|
The date that the address was changed. An informational alert will display on the Member Information dialog box when the in-use address is changed today or in the past 45 days. Reporting Analytics: Alt Addr Last Chg Date (Located in Member Information/Member Base subject and Month-end Information/Member Month-end/ME Member Base subject) |
|
|
The standardized delivery address that will print on the member's statement. Portico automatically updates this field when the ZIP+4® Audit Report 505 is produced. The standardized format lets your credit union obtain postal discounts. If you manually maintain the member's address, Portico changes the Standardized Postal Address fields to blank and clears the Use Standardized Alt Address check box. If the Standardize New Members and Services Addresses check box has been selected in the Products section on the Credit Union Profile - Products & Services tab, the Request USPS icon will appear in the Address group box. Address standardization will occur when an existing address is changed and you click Next or Save/Release on the Member Verification tab. The Address Standardization dialog box will appear displaying the standardized address. If the address entered is identical to the USPS standardized address, an informational pop-up message will appear. If you clicked Next or Save/Release on the Member Verification tab and the address is identical to the USPS standardized address, no message will appear and you will continue with the next step of the New Members & Services workflow. Keyword: TD |
|
|
To support members with seasonal addresses, specify the time period that a member lives at an alternate address in the From and Through date fields. Click the From down arrow to select the beginning date from the pop-up calendar or enter the date in MM/DD/YYYY format. When the date expires, Portico will automatically change the member’s primary address to the active address. For recurring seasonal addresses, you must manually update the dates each year. Reporting Analytics: Seasonal Address Start (Located in Member Information/Member Base subject and Month-end Information/Member Month-end/ME Member Base subject) |
|
|
To support members with seasonal addresses, specify the time period that a member lives at an alternate address in the From and Through date fields. Click the Through down arrow to select the ending date from the pop-up calendar or enter the date in MM/DD/YYYY format. When the date expires, Portico will automatically change the member’s primary address to the active address. For recurring seasonal addresses, you must manually update the dates each year. Reporting Analytics: Seasonal Address Stop (Located in Member Information/Member Base subject and Month-end Information/Member Month-end/ME Member Base subject) |

Use the following fields to add the email address information.
| Field | Description |
|---|---|
| Member has no email address |
If the email address is required in New Members and Services, the Member has no email address check box appears on the Eligibility Verification - Member Verification tab and Member Information - Contact tab. Select the check box to leave the E-Mail address fields blank. If you select the Member has no email address check box, Portico disables the E-Mail address fields and Default check boxes in New Members and Services. |
|
The member's e-mail addresses. The member can have up to three e-mail addresses listed. If your credit union generates electronic receipts, Default check boxes appear. Select the Default check box to indicate the default email address that should be used for electronic receipts. If all three Default check boxes are selected as default email addresses, all three email addresses will be used to send the email receipt. At least one Default check box must be selected to send an email receipt. You can make this a required field in New Members & Services using the Customized Fields window. If the email address is required in New Members and Services, the Member has no email address check box appears on the Eligibility Verification - Member Verification tab and Member Information - Contact tab. Select the check box to leave the E-Mail address fields blank. If you select the Member has no email address check box, Portico disables the E-Mail address fields and Default check boxes in New Members and Services. Length: 50 characters Keyword: EA, E1, and E2 |
|
|
Click the Send to E-mail icon button to send an e-mail to the member e-mail address specified. |
Use the following fields to add the telephone information.
| Field | Description |
|---|---|
|
The complete home phone number including area code for the member. You can make this field required in New Members & Services using the Customized Fields window. Length: 10 numeric Keyword: PH |
|
|
The complete home fax number including area code for the member. This field can be customized using the Customized Fields window. Length: 10 numeric Keyword: HF |
|
|
The complete cell phone number including area code for the member. You can make this field required in New Members & Services using the Customized Fields window. Length: 10 numeric Keyword: CP |
|
|
The complete work phone number including area code for the member. You can make this field required in New Members & Services using the Customized Fields window. Length: 10 numeric Keyword: BP |
|
|
The work phone number extension for the member. Length: 5 numeric Keyword: BX |
|
|
The complete work fax number including area code for the member. This field can be customized using the Customized Fields window. Length: 10 numeric Keyword: BF |
|
|
The complete alternate phone number including area code for the member. You can customize this field and make it a required field in New Members & Services using the Customized Fields window. Length: 10 numeric Keyword: P1 |
|
|
The complete alternate phone number including area code for the member. You can customize this field and make it a required field in New Members & Services using the Customized Fields window. Length: 10 numeric Keyword: P2 |
Select Next to continue with the next step of the application or select Save/Release to save the application for completion later
On the Ownership tab, you can enter the new member’s taxpayer ID number, birth date, employer information, and more.

Complete the following fields to add ownership information about the new member.
| Field | Description |
|---|---|
|
Select this checkbox if the new member does not have a tax ID number. The system assigns the next available tax ID placeholder number. When you select the checkbox, Portico disables the TIN Type/Number fields. |
|
|
From the Taxpayer ID Type drop-down list, select SSN, EIN or ITIN. Then, in the Taxpayer ID Number field, enter the new member's taxpayer ID. Portico partially masks taxpayer ID numbers. If you are assigned to the Portico – User Can View/Maintain TIN security group or a credit union-defined security group with the Portico – User Can View TIN permission or the Portico – User Can Maintain TIN permission, an eye indicator will appear within the field to indicate that you have permission to view the taxpayer ID number. You can click inside the field to show the taxpayer ID. When you tab out of the field, the taxpayer ID will be masked. The taxpayer ID will remain unmasked as long as the field has focus. This number must be a valid taxpayer ID number for IRS reporting. All zeros is not a valid number. The system will produce a W-9 notice (209 Report) if the SSN meets any of the following criteria:
ITIN is used by the Internal Revenue Service (IRS) for Federal tax reporting only. It is a nine-digit number that always begins with the number 9 and has a range of 70-88, 90-92 and 94-99 in the fourth and fifth digit. The IRS issues ITINs to individuals who are required to have a U.S. taxpayer identification number but who do not have, and are not eligible to obtain a Social Security Number (SSN) from the Social Security Administration (SSA). Length: 9 numeric Keyword: TI |
|
|
Click the down arrow to select the member's birthdate from the pop-up calendar or enter the date in MM/DD/YYYY format. You can make this field required in New Members & Services using the Customized Fields window. Portico masks birthdates. You can click inside the field to show the birthdate. When you tab out of the field, the birthdate is masked. The birthdate will remain unmasked as long as the field has focus. Portico logs each time a user clicks inside a field to view a birthdate in the View Sensitive Data Audit report. Keyword: DB |
|
|
Click the down arrow to select the date the member joined the credit union from the pop-up calendar or enter the date in MM/DD/YYYY format. Keyword: DJ |
|
|
Click the down arrow to select the correct marital status from the drop-down list: Single, Married, Divorced, or Widowed. Keyword: MS |
|
|
Click the down arrow to select the gender of the account's primary member. The recommended values are: B - Business C - Corporation D - Doing Business As F - Female M - Male O - Organization U - Unknown Keyword: SX |
|
|
The secondary ID used as an additional cross-reference to the account. If left blank, this field defaults to the taxpayer ID when the account is initially opened. You can customize this field and make it a required field in New Members & Services using the Customized Fields window. When the Secondary ID field contains 9 numeric digits and the first three numbers are not 000, 666, or 999 and no section is all zeros, Portico assumes that the field contains a taxpayer ID. Portico partially masks taxpayer ID numbers. If you are assigned to the Portico – User Can View/Maintain TIN security group or a credit union-defined security group with the Portico – User Can View TIN permission or the Portico – User Can Maintain TIN permission, an eye indicator will appear within the field to indicate that you have permission to view the taxpayer ID number. You can click inside the field to show the taxpayer ID. When you tab out of the field, the taxpayer ID will be masked. The taxpayer ID will remain unmasked as long as the field has focus. Length: 9 numeric Keyword: OI |
|
|
The number of dependent's the member has. You can customize this field and make it a required field in New Members & Services using the Customized Fields window. Length: 2 numeric Keyword: DE |
|
|
The third ID used as an additional cross-reference to the account. You can customize this field and make it a required field in New Members & Services using the Customized Fields window. Length: 9 alphanumeric Keyword: ID |
|
|
Click the down arrow to select the correct state abbreviation to represent the state that issued the driver's license. Keyword: DS |
|
|
The driver license number of the member. Portico masks driver license numbers. You can click inside the field to show the driver license number. When you tab out of the field, the driver license number will be masked. The driver's license number will remain unmasked as long as the field has focus. Portico will log each time a user clicks inside a field to view a driver license number in the View Sensitive Data Audit report. You can customize this field and make it a required field in New Members & Services using the Customized Fields window. If the Member has no DL information check box was selected on the Member Verification tab in New Members & Services, the text NOT APPLICABLE appears in the Driver’s License Number field and the Driver's License State, ID Issue and ID Expiration fields are disabled in New Members & Services. On the Contact Information tab, the text NOT APPLICABLE appears in the Driver’s License Number field; however, all the fields remain accessible so a driver's license can be added at a later date. Length: 17 alphanumeric Keyword: DL Reporting Analytics: MBR DRIVERS LICENSE (Member Base subject in the Member Information folder and the ME Member Information subject in the Month-end Information\Member Month-end folder) |
|
|
Click the down arrow to select the ID issue date from the pop-up calendar or enter the date in MM/DD/YYYY format. You can make this field required in New Members & Services using the Customized Fields window. Reporting Analytics: Driver License Issue Date (Member Base subject in the Member Information folder and the ME Member Information subject in the Month-end Information\Member Month-end folder) |
|
|
Click the down arrow to select the ID expiration date from the pop-up calendar or enter the date in MM/DD/YYYY format. You can make this field required in New Members & Services using the Customized Fields window. If your credit union uses Member-Level Warnings and Alerts and the System-Generated Alerts check box is selected on the Credit Union Profile - Products & Services tab, a member alert notifies credit union staff when a member’s driver’s license or identification has expired. If the member’s ID has expired according to the ID Expiration field on the Contact Information tab, the message 'Warning - ID Has Expired' will appear in the Notes, Warning and Alerts grid on the Member Information dialog box and the Notes/Alerts tab. The message will be removed automatically in the nightly back-office cycle after you update the ID Expiration field on the Contact Information tab. If the ID Expiration field is blank or 999999, Portico will not evaluate the ID expiration date and will not display the Warning message. Reporting Analytics: Driver License Expiry Date (Member Base subject in the Member Information folder and the ME Member Information subject in the Month-end Information\Member Month-end folder) |
|
|
The credit-union defined name or code use for verification of account access. You can customize this field and make it a required field in New Members & Services using the Customized Fields window. Length: 25 alphanumeric Keyword: MM |
|
|
The credit-union defined name or code used as a hint for the verification of account access. You can customize this field and make it a required field in New Members & Services using the Customized Fields window. Length: 21 alphanumeric Keyword: VH |
|
|
The special use code for this member's account. Statements can be sorted using the member's special use code. The sequence of a selective trial balance also can be based on the special use code. You can customize this field and make it a required field in New Members & Services using the Customized Fields window. Length: 2 alphanumeric Keyword: SU |
|
|
The special handling code defined by the credit union for this account. Statements can be sorted using the member's special handling code. The sequence of a selective trial balance also can be based on the special handling code. You can customize this field and make it a required field in New Members & Services using the Customized Fields window. Length: 1 alphanumeric Keyword: HC |
Complete the following fields to add the member's employer information.
| Field | Description |
|---|---|
|
The member’s employer. Click the details icon button to display the Employer Information dialog box and view or maintain the member’s employer information. You can customize this field and make it a required field in New Members & Services using the Customized Fields window. Length: 23 alphanumeric Keyword: EP |
|
|
The member's date of employment. Enter the date in MMYY format. This field can be customized using the Customized Fields window. Length: 4 alphanumeric Keyword: ED |
|
|
The ID of the Select Employee Group (SEG) that the member belongs to. Length: 10 alphanumeric Keyword: S1 |
|
|
The department, plant, or other employment location information. This field can be customized using the Customized Fields window. Length: 8 alphanumeric Keyword: DP |
|
|
The member's work position code. This field can be customized using the Customized Fields window. Length: 3 alphanumeric Keyword: PC |
|
|
The member's occupation. This field can be customized using the Customized Fields window. Length: 25 alphanumeric Reporting Analytics: Occupation (All Joint Account Information subject in the Member Information folder) |
|
|
The North American Industry Classification Source Code. Click the PDF link next to the NAICS Code field to view the list of acceptable NAICS codes. If you used the Industry Classification field on the Ownership Information tab prior to the November 2012 release, the field value from the Industry Classification field will appear in the NAICS Code field. This information is included in the transmission to AML Compliance Manager. Length: 6 numeric |
The Credit Bureau group box contains the hard pull scores and soft pull scores.
| Field | Description |
|---|---|
|
The last date a hard pull credit report was requested for the member. This can be the date saved from the Scores dialog box or it can be manually entered by selecting a date from the calendar or entering the date in MM/DD/YYYY format. Keyword: CB |
|
|
The credit bureau that supplied the credit score. This can be the credit bureau source saved from the Scores dialog box or it can be manually entered. This field can be customized using the Customized Fields window. |
|
|
The credit union-defined bankruptcy risk score for this account. This can be the score saved from the Scores dialog box or it can be manually entered. This field can be customized using the Customized Fields window. Length: 4 numeric Keyword: BR |
|
|
The hard pull credit score for the member. This can be the score saved from the Scores dialog box or it can be manually entered. This field can be customized using the Customized Fields window. Length: 4 numeric Security Permission: MbrInfo - Field - Credit Score - View Restricted Security Group: Member Level Credit Score - User is View Restricted |
|
|
Once a member number is assigned to a member, an Add New Score checkbox and a View Soft Pull Credit Scores icon appear in the Soft Pull Scores group box on the Member Information - Ownership tab. You can manually add a soft pull score by selecting the Add New Score checkbox. Portico saves the existing soft pull score information to credit score history and clear the fields. You can then enter the soft pull date, source, score, and model and select Save. You can use this option to manually add a soft pull score if your credit union obtains credit scores outside of Portico. Keyword: 1A Select the View Soft Pull Credit Scores icon to display the Credit Scores dialog box and view the soft pull score displayed on the Ownership Information tab plus four previous soft pull credit scores. |
|
|
The date the soft pull credit report was requested for the member. This can be the date saved from the Scores dialog box or it can be manually entered by selecting a date from the calendar or entering the date in MM/DD/YYYY format. Keyword: 1D |
|
|
The credit bureau source that supplied the soft pull credit report. This can be the source saved from the Scores dialog box or it can be manually entered. This field can be customized using the Customized Fields window. Keyword: 1O |
|
|
The soft pull credit score for the member. This can be the credit score saved from the Scores dialog box or it can be manually entered. This field can be customized using the Customized Fields window. Length: 4 numeric Security Permission: MbrInfo - Field - Credit Score - View Restricted Security Group: Member Level Credit Score - User is View Restricted Keyword: 1S |
|
|
The credit bureau model used to determine the soft pull score for the member. This can be the score model saved from the Scores dialog box or it can be manually entered. This field can be customized using the Customized Fields window. Keyword: 1X |
|
|
Click the down arrow to report a confirmed or verified address, or other information about the member's address to the credit bureau. Blank is the system default. The valid values are: B - Business Address - not consumer's residence C - Confirmed/verified address D - Data reporter's default address M - Military address N - Not confirmed address P - Bill Payer Service - not consumer's residence S - Secondary Address U - Non-deliverable address/Returned mail Y - Known to be address of primary consumer Portico will enter the value selected in the Address Indicator field on the Metro II transmission. The AD column on the Credit Bureau Listing Report 350 will display the address indicator. Note: If C – Confirmed/verified address is selected, the field should be changed back to blank after being reported to the credit bureau. This option supports the Identity Theft Red Flags and Address Discrepancies Under the Fair and Accurate Credit Transactions Act of 2003 (known as the Red Flag Rule) which requires a consumer reporting agency (CRA) to provide the user of a consumer report “a notice of address discrepancy” if the address provided by the user is “substantially different” from the address the CRA has on the consumer. The Address Indicator field on the Metro II transmission enables you to report a confirmed or verified address to the credit bureau. Reporting Analytics: Metro2 Address Ind (Member Information folder > Member Base subject and Month-end Information > Member Month-end folder > ME Member Base subject) |
|
|
Click the down arrow to assign the member a BSA risk code. This field can be customized using the Customized Fields window.Keyword: BI |
|
|
Click the down arrow to select the date the last time the member was reviewed regarding the BSA risk code from the pop-up calendar or enter the date in MM/DD/YYYY format. Keyword: BD |
In the Military Lending Act group box, indicate if the new member is an MLA covered borrower.
| Field | Description |
|---|---|
|
Select the Covered Borrower check box to indicate that the member has been verified as a covered borrower under the Military Lending Act (MLA). Reporting Analytics: MLA Covered Borrower Flag in Member Information – Member Base and Month-end Information – Member Month-end – ME Member Base Keyword: CE |
|
|
Click the Date down arrow to select a date from the pop-up calendar indicating when the Covered Borrower check box was selected. You can also specify a date when the covered borrower indicator no longer applies and the Covered Borrower check box is cleared. Reporting Analytics: MLA Covered Borrower Date in Member Information – Member Base and Month-end Information – Member Month-end – ME Member Base Keyword: DT |
Select Next to continue with the next step of the application or select Save/Release to save the application for completion later
The Messages tab lets you add comments about the member and statement messages.

To add comments or statement messages, complete the following fields as needed:
| Field | Description |
|---|---|
|
The customized message to print on the member's statement. The Print Statement Message check box must be selected in the Statement Options section on the Credit Union Profile - Member tab to print customized messages on member statements. All customized messages are detailed on the Name and Member Message Listing Report 015. If your credit union does not customize statement messages, this field can be used for miscellaneous information. Length: 30 alphanumeric Keyword: SM Security Permission: MbrInfo - Messages - Maintain Statement & Message Only Security Group: Member Services - User and Teller Advanced |
|
|
The credit union-defined internal message regarding this member. This message will appear on some member inquiries. Length: 60 alphanumeric Keyword: MG Security Permission: MbrInfo - Messages - Maintain Statement & Message Only Security Group: Member Services - User and Teller Advanced |
|
|
Additional credit union-defined information about the member. These fields can be customized using the Customized Fields window. Length: 25 alphanumeric Keywords: I1 and I2 |
|
|
Select these check boxes to indicate if the member has chosen to Opt-In or Opt-Out of the credit unions information disclosure to third-party vendors by means of name and address and/or MCIF extracts under these credit union-defined categories. Credit union procedure will designate whether a selected check box indicates an Opt-In decision or an Opt-Out. The system default for the check boxes are not selected. These fields can be customized using the Customized Fields window. Keyword: OA, O1, O2, O3, O4, O5 Security Permission: MbrInfo - Fields - Disclosure Information - Maintain Security Group: Member Services - User |
|
|
Select this check box to indicate if the member has chosen to receive information from your credit union via email. System default is selected. The field label can be customized using the Customized Fields window. Keyword: ME Reporting Analytics: Email Opt-out Ind (Notice and privacy information folder in the Member Base subject in the Member Information folder and Notice and privacy information folder in the ME Member Base subject in the Month-end Information\Member Month-end folder) |
|
|
Credit union-defined information or comments about the member. These fields can be customized using the Customized Fields window. Length: 14 alphanumeric (Comments 1) or 10 alphanumeric (Comments 2-9) Keywords: C1-C9 |
Select Next to continue with the next step of the application or select Save/Release to save the application for completion later.
Select Back to move back to the previous tab.
The following debits and credit only effect the general ledger if you make a deposit:
- DEBIT 739200 Teller cash general ledger account
- CREDIT 901XXX Share general ledger account specified on the Share Profiles - Account Information tab
- CREDIT XXXXXX Fees general ledger account specified on the Credit Union Profile - Shares tab
Related Reports:
- Non-Financial Transaction Register Report 030
- New Share Accounts Report 070
- Member Statements Reports 390 and 391
- Selective Trial Balances Reports 411, 413, 414, 415, 416, and 417
- New Share Accounts Report 070 - Displays I for new account applications by using Internet
- Self-Service Activity Report 940- Displays MA0000 new member processing code
- Self-Service Member Request Report 941- Displays memo for teller intervention on SSI requests, memo line for new member applications
- Self-Service Audit Report 946- Displays activity on requests
- Self-Service Purge Report 947- Displays purged and completed request transaction
You can create the Selective Trial Balance Reports (411, 413 - 417) based on the information you enter on the Member Information tab and the options selected on the report rules.
You can use the information you enter on the Member Information tab to sort member statements produced by the Member Statement Report 390 and the Member Statement - Share Drafts Report 391. The system sorts statements in the following order: blanks, special characters, alpha, and numeric.
The Balancing and Close tab reflects the following information:
- Adds the total receipts deposited to shares to the Total Deposit field
- Adds the total receipts collected as fees to the Other Receipts field (non-Teller Administration)
- Adds the amount of cash received to the Cash Received field
- Adds the number of checks received to the Check Received field
If the member receives a refund, the Balancing and Close tab reflects the following information:
- Adds the check refund amount from the Cash Disbursed field and Refunds Disbursed field (non-Teller Administration)
- Adds the cash refund amount from the Cash Disbursed field and Refunds Disbursed field (non-Teller Administration)
- To change an incorrect member number, use the Member Number Change dialog box.
- To delete an incorrect member number, use the Member Delete dialog box.
- To correct an incorrect share type, add the desired share type to the member's account using the New Member Share dialog box. Transfer any deposited funds to the correct account.
- To change incorrect member information, use the Contact Information tab.
- To reverse the deposit or fee only, use the Reversals - Same-Day Reversals tab on the same day you added the member account.
- To reverse the deposit or fee made on a prior day, use the Adjustments - Share Withdrawal From General Ledger tab.
Portico Host: 105, 1SA, 1SB, 1SC