Setting Up a User
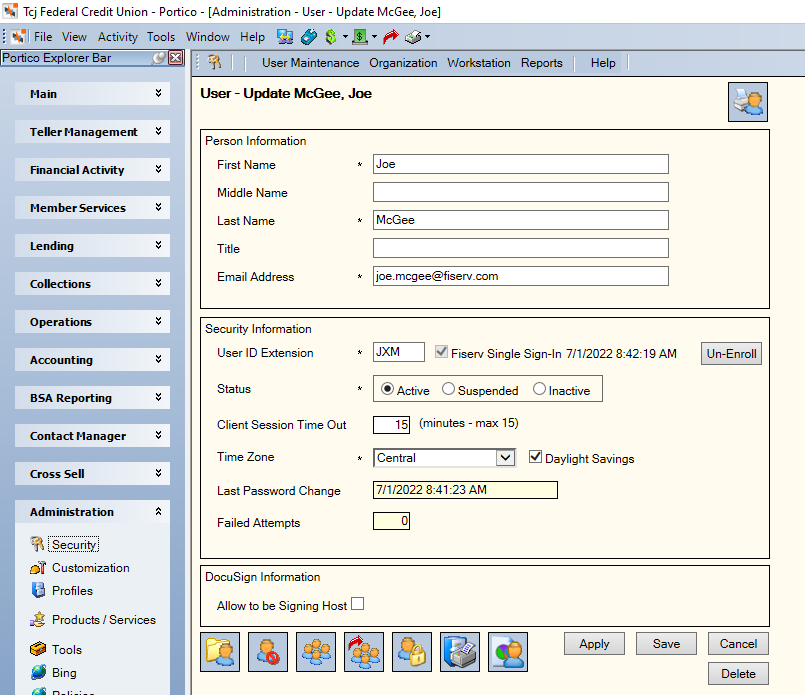
The User - New/Copy/Update window lets you set up the basic security information for a user. To open the User - New/Copy/Update window, under Administration on the Portico Explorer Bar, select Security. On the Security top menu bar, select User Maintenance, then select Users. The Users - List window appears.
- To add a new user, select New. The User - New window appears for you to set up the new user.
- To modify the base information for an existing user, select the name of the user to open the User - Update window.
- To add a new user by copying an existing user, select the user, then select Copy. The User - Copy window appears.

How do I? and Field Help
Select Apply if changes were made to the User – Update window (such as changing the time zone). Portico saves the changes and remains on the User – Update window. Select Save button to save the information if there are no modifications to be made. Portico will automatically close the window and display the Users - List window. A warning message notifies you when save a new user with an email address that is already tied to another credit union user. After your credit union enables Fiserv Single Sign-In and the optional enrollment period has expired, the email address must be unique for each user. If you attempt to update the User - Update window for a user that is assigned an email address used by another, an error message appears.
To generate an initial temporary password for the new user, select the user row on Users - List window and select Reset Password. The temporary password generated by Portico will only be valid for 15 minutes. If the user attempts to enter the temporary password after 15 minutes, it will not work, and your credit union administrator will need to generate a new temporary password. If a user is enrolled in Portico Single Sign-In, a credit union administrator can no longer reset the user's password. An error message appears if a credit union administrator selects the Reset Password button for an active user enrolled in Fiserv Single Sign-In. The user must use the Portico Self Service Password Reset functionality to reset their password.
Select Delete if you have incorrectly added a new user. Portico will delete the new user and display the Users - List window.
Select Cancel to close the window and display the Users – List window. If you added a new user by copying an existing user, Portico will not cancel the copy function after you clicked Apply, it will only close the window and display the Users – List window.
The Last Password Change field lists the date and time the user's password was last changed.
The Failed Attempts field indicates the number of failed login attempts. The system will automatically suspend a user after 5 failed login attempts. The Last Failed Logon Reason field provides an indication on why a user was unable to log into Portico.
Select the User Status Report icon button to view a summary report of the user’s settings.
Use the icon buttons at the bottom of the window to set up the user's preferences, security groups and more.
- Select the User Profile icon button to open the User Profile - Update window and modify the user's preferences, logon settings and window options.
- Select the Security Restrictions icon button to open the Security Restrictions window and set up or modify the user's restrictions.
- Select the Security Groups icon button to open the Security Groups window and assign or modify the user to a security group.
- Select the Override/Approval Groups icon button to open the Override/Approval Groups window and assign or modify the user to an override group. If you added a new user by copying an existing user, be sure to adjust the priority of the new user on the Override/Approval Groups – Update window. The priority determines where the user will appear in the drop-down list of approvers. The system will automatically add the user to the end of the list.
- Select the Employee Restrictions – Associated Accounts icon button to open the Accounts Associated With window and add or modify employee member accounts that are restricted from the user.
- Select the Print Profile Preferences icon button to open the Print Profile - Preferences window and set up or modify the user’s print preferences.
- Select the My Reports icon button to open the My Reports window and set up or modify the user's reports they can view.
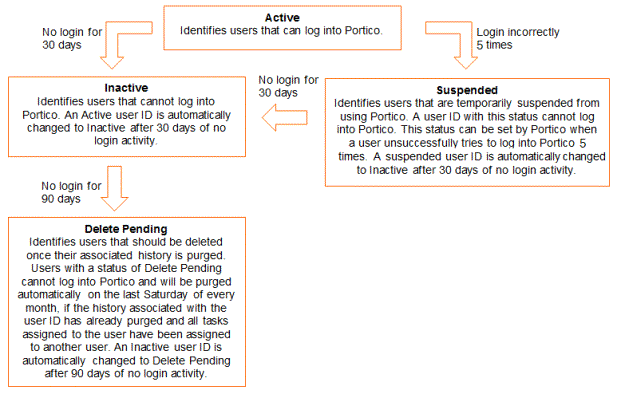
The following diagram describes the different user statuses and Portico’s process for changing a user status to Inactive or Delete Pending.

To add a new user by copying an existing user, select the user on the Users - List window, then Select Copy. The User - Copy window appears with the name of the user that the settings will be copied from. The fields on the User - Copy window will be blank except for the Title field, Session Time Out field, Time Zone field, and Daylight Savings Time check box (checked/unchecked). You can enter the new user’s information such as name, email address and user ID extension in the blank fields. You can Select the User Status Report icon button to view details of the existing user’s data and confirm that this is the appropriate user from which to copy.
To complete the copy process, enter the new user’s information in the fields provided, then select Apply. Once you select Apply, Portico will copy the following settings to the new user and the window will change from User - Copy to User - Update:
- User Profile options*
- Print Profile – Preferences options (not including Signature Name field on Checks tab)
- Override/Approval Groups – user assignment
- My Reports selections
- Security Group - user assignment
- Security Restrictions
*The following information from the User Profile dialog box will not be copied to the new user:
- Teller default settings on User Profile – Security tab
- ID and passwords on User Profile – Logons tab
- Options from User Profile – Imported Files tab
- Default options from User Profile – My Queue tab if Owner/Department field is the user name
- Department level notification options from User Profile – My Queue tab
- Sound file selections, internal notification options, and external notification options from User Profile – My Queue tab
- Sound file selections from User Profile – Session Management tab
Password Requirements
A user must change their Portico password every 90 days. The maximum failed attempts is 5. Portico requires that all user passwords meet the following criteria:
- Minimum of 14 characters.
- Maximum of 30 characters.
- Must use both upper and lower case characters.
- Must use both alpha and numeric characters.
- Must contain at least one of the following: ! @ # $ % ^ & * ( ) _ + -
- Cannot contain more than two repeating characters consecutively.
- Cannot contain your Portico login ID.
- Cannot contain the word Fiserv or any upper and lower case combination of Fiserv.
- Cannot contain the word password.
- Same password cannot be reused within the last 14 password changes.
Portico sends password expiration reminders to the user email address defined on the User - Update window beginning ten days prior to the user’s password expiration. Portico sends a reminder email daily until the user changes their password or until the user ID becomes inactive.