Viewing the Account Summary
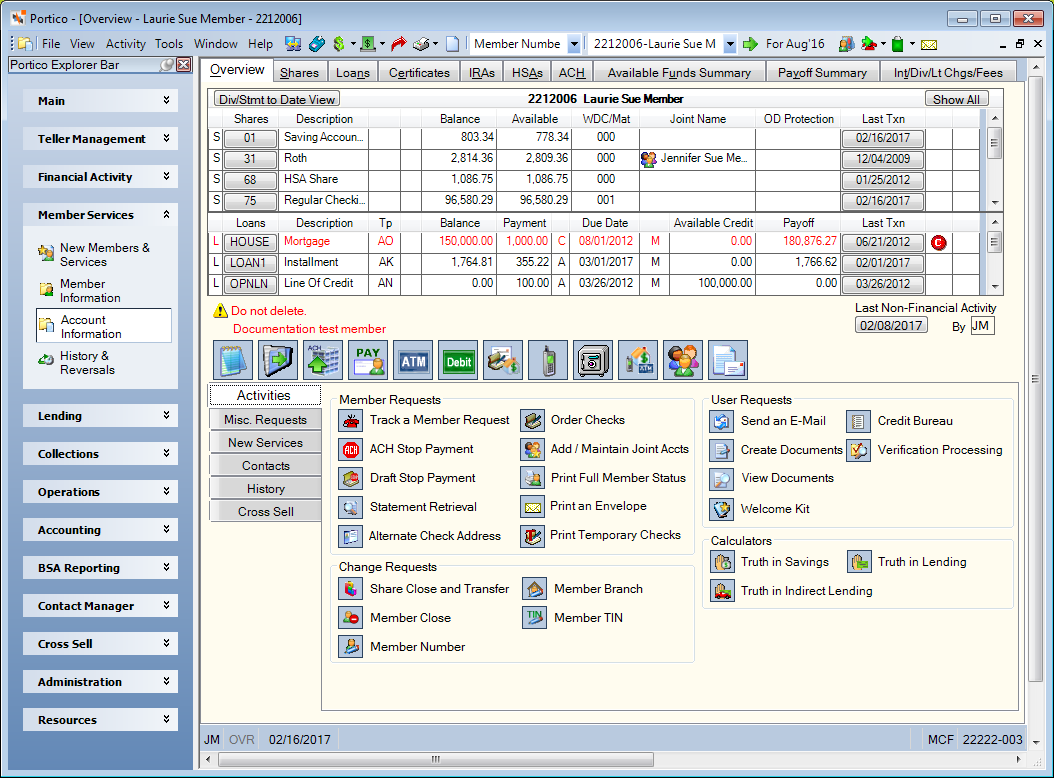
The Overview tab provides an inquiry-only view of a member's accounts. To access the Overview tab, under Member Services on the Portico Explorer Bar, click Account Information. The Overview tab appears on top. Locate the member using the search tool on the top menu bar. Select the down arrow to select the search method, then enter the search criteria. Select the green arrow or press ENTER to locate the member.
How do I? and Field Help
The member account listing appears on the Overview tab, Transactions tab, and Adjustments tab.
The bottom half of the Overview tab consists of three tabs: Activities, Misc. Requests and New Services.
The Activities tab provides easy access to a variety of member service options. Click the icon to access the appropriate dialog box.
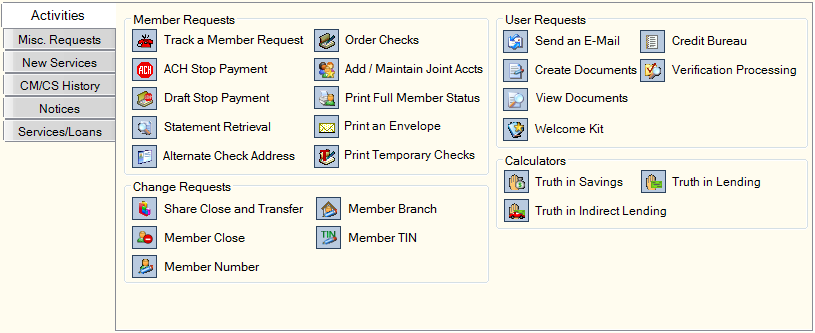
The following activities are accessible from the Member Requests group box on the Activities tab.
- Click the Track a Member Request button to open the Other Service Request window in Contact Manager. From the Other Service Request window, you can use the Select Action drop-down list to access any of the Contact Manager activities.
- Click the ACH Stop Payment icon button to open the ACH Stop Pays dialog box and add or delete a stop payment for the member.
- Click the Draft Stop Payment icon button to open the Share Draft Stop Pays dialog box and add or delete a stop payment for the member.
- Click the Statement Retrieval icon button to display the Statement Retrieval dialog box and retrieve a member statement.
- Click the Alternate Check Address icon button to display the Alternate Check Address dialog box and specify an alternate address for dividend checks.
- Click the Check Order icon button to open the Confirm Check Order dialog box and order checks for the new share draft account.
- Click the Add/Maintain Joint Accts icon button to display the Account Relationships dialog box and add a co-owner.
- Click the Print Full Member Status icon button to display the Print Full Member Status dialog box and print a member status report to the status printer defined on the Print Profile dialog box.
- Click the Print an Envelope icon button to display the Print Envelope dialog box and print an envelope for the member.
- Click the Print Temporary Checks icon button to display the Print Temporary Checks dialog box and print temporary checks.
The following activities are accessible from the User Requests group box on the Activities tab.
- Click the Send an E-mail icon button to send the member an e-mail.
- Click the Create Documents icon button to display the Document Preparation dialog box and prepare documents for the member.
- Click the View Documents icon button to display the View Documents dialog box with a default repository and member number already selected.
- Click the Welcome Kit icon button to open the Forms Maintenance dialog box and issue a welcome packet for a new member.
- Click the Credit Bureau icon button to open the Credit Bureau dialog box and pull a credit report for an existing member or nonmember.
- Click the Verification Processing icon button to display the Verification Processing dialog box and verify a member.
- Click the OFAC Request icon button to check the OFAC database for the member's name.
The following activities are accessible from the Change Requests group box on the Activities tab.
- Click the Share Close and Transfer icon button to display the Share Close and Transfer dialog box and close a share account, remove products/services from a share account that will be closed and transfer all or part of the same product/services to a new or existing share account.
- Click the Member Close icon button to display the Member Close dialog box and close a credit union member. Access to the Member Close icon is controlled by the MbrInfo-User Can Access Member Close permission found in the Member Services - User security group
- Click the Member Branch icon button to display the Member Branch Change dialog box and change a members branch.
- Click the Member Number icon button to display the Member Number Change dialog box and change a member number.
- Click the Member TIN icon button to display the Change Member TIN dialog box to assist you with changing a member's taxpayer ID number.
The Calculators group box lets you calculate truth in savings and truth in lending. The following activities are accessible from the Calculators group box.
- Click the Truth in Savings icon button to display the Truth in Savings dialog box and calculate dividend earnings based on various criteria.
- Click the Truth in Lending icon button to display the Truth in Lending dialog box and calculate the information for Federal Regulation Z Truth-in-Lending disclosure purposes.
- Click the Truth in Indirect Lending icon button to display the Truth in Indirect Lending dialog box and calculate the information for an indirect loan for Federal Regulation Z Truth-in-Lending disclosure purposes.
The Image Capture group box on the Activities tab lets you view and capture member signature and identification images. Click the browse images button to locate an image in temporary storage on your PC or network. Click the image capture button to open the Image Capture and Index dialog box and capture the image.
The Misc. Requests sub-tab lets you delete a member number, change a credit card limit, update a member's counters, and more.

The following activities are accessible from the Miscellaneous Requests group box on the Misc. Requests tab.
- Click the Delete Member Number icon button to display the Member Delete dialog box and delete a member.
- Click the Fees, Flags, & Counters icon button to display the Fees Flags and Counters dialog box and view a member's credit union-defined fees and counters.
- Click the Credit Card Information icon button to display the Credit Card Information dialog box and change a member's credit card limit.
- Click the Relational Information icon button to display the Account Relationships dialog box and record and maintain additional information about a co-owner.
- Click the Life Savings Insurance icon button to display the Life Savings Insurance dialog box and view a member's life savings insurance.
- Click the Draft IDs icon button to display the Draft ID Inquiry dialog box and view the list of loan and share draft IDs for the member.
- Click the Monetary Instruments Counter icon button to display the Monetary Instruments Counters dialog box and view the number of items purchased month-to-date.
- Click the Non-Member Year End icon button to display the Non-Member Year End dialog box and record interest and dividends for non-members.
- Click the IRA Beneficiary icon button to display the IRA Beneficiary Distribution List dialog box. If the Overview tab displays the account listing for a deceased member, the IRA Beneficiary Distribution List dialog box will display the distributions for that deceased member. If no member information appears on the Overview tab (no member look-up or non-member look-up), the IRA Beneficiary Distribution List dialog box will display all the distributions for the credit union. Access to the IRA Beneficiary icon button is controlled by the IRAs - IRA Beneficiary Maintenance – View Only permission found in the Teller - Basic, Teller - Advanced, and Member Services – User security groups.
The New Services tab lets you set up new or additional services for an existing member.

The following activities are accessible from the Self Service group box on the New Services tab.
- Click the ATM icon button to display the ATM Card Maintenancedialog box and create a new ATM ID.
- Click the Audio ID icon button to display the Add New Self Service ID dialog box and create a new Audio ID.
- Click the Bill Pay or Online Banking icon button to display the Online Banking Maintenance dialog box and create a new Online Banking or Bill Pay ID.
- Click the Debit icon button to display the Debit Card Maintenancedialog box and create a new debit ID.
The following activities are accessible from the CU Services group box on the New Services tab.
- Click the Automated Transfer icon button to display the Member Transfer File Information dialog box and set up an automatic account transfer for the member.
- Click the Payroll Deduction icon button to display the Member Payroll Maintenance dialog box and set up a payroll deduction and/or payroll distribution for the member.
- Click the Safe Deposit Box icon button to display the Safe Deposit Box dialog box and set up a safe deposit box for the member.
- Click the Account Analysis icon button to display the Account Analysis dialog box and set up Account Analysis for the member.
- Click the Relationship Pricing icon button to display the Relationship Pricing Plan dialog box and add a member to a relationship plan.
You can add up to four customized sub tabs to a members Overview tab using Member Activity Tracking. Once Member Activity Tracking has been activated, you can create your customized sub tabs. The Member Activity Tracking window lets you select the tabs and controls that will appear on each sub tab at the credit union level. The Member Activity tab on the User Profile - Update dialog box lets you select the tabs and controls that will appear on each sub tab at the user level.
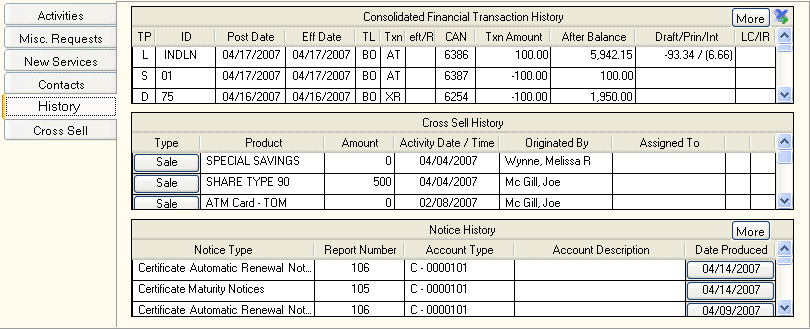
The sub tabs can display a member's Contact Manager History, Cross Sell History, Consolidated Financial Transaction History, Loan Origination History, New Products and Services, and Notice History.
Contact Manager History
Displays contact records for the member in descending contact date order. Click the contact type in the Type column to view or maintain the contact record.

Cross Sell History
Displays any referrals, declines or sales for the member in activity date order. Based on the Status column, you can click the icon buttons to display the Sale - Update dialog box, Referral - Update dialog box, or Decline - Update dialog box.

Consolidated Financial Transaction History
Displays current and prior-day financial transactions. Current day items have a blue background are displayed by type in shares, loans, and certificate order. Prior-day financial transactions appear in descending post date order, regardless of type. You can export the information to Microsoft Excel using the export icon. If your credit union uses Virtual Branch Links, click the underlined loan or share draft number to view an image of the check. If the transaction involved an EFT item, click the button in the TP column to display the ACH History Inquiry dialog box. Up to 30 rows will appear at one time. To see additional history, click More.

Notice History
Displays back-office notices, ACH online notices, and Share Draft online notices sent to the member. If your credit union uses Nautilus Essentials reports, click the date button in the Date Produced column to launch the report for the specified date in Nautilus Essentials.

Loan Origination History
Displays new loan applications associated with the member. Loan application information is transmitted to Portico when you book a new loan, or when you change the status of a loan application. The loan comments from Loancierge are also sent to Portico. Click the More Detail icon button to display additional information about the loan application.

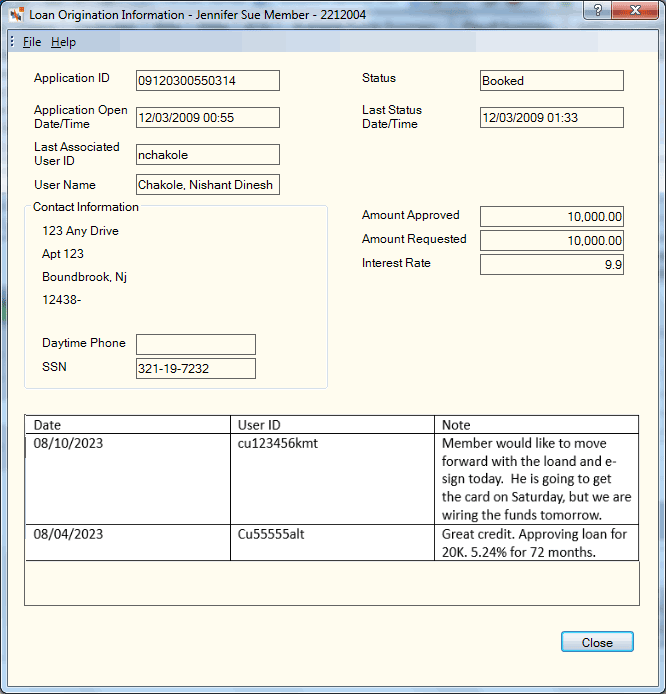
The Notes table displays the date, user ID, and the note. Portico displays a maximum of 250 characters of the note retrieved from Loancierge or other loan origination application.
New Products and Services
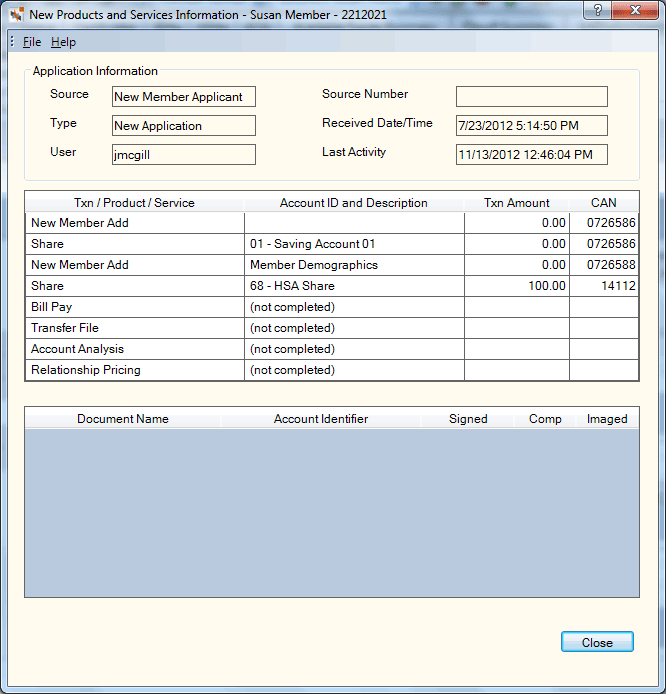
Displays new services added to the member using New Members and Services. Click the Detail icon button to display additional information about the service.

none | none
Portico Host: 186