Using the Menu Bar
The menu bar at the top of the main window can also be used to navigate through Portico.
How do I?
File Menu
Save preferences, print information from Portico or exit Portico.

View Menu
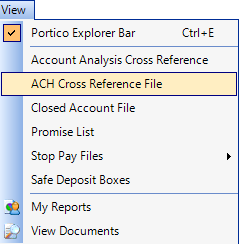
Show or hide the Portico Explorer Bar and access the following:
- Account Analysis Cross Reference dialog box
- ACH Cross Reference File
- Closed Account Files dialog box
- Promise List dialog box
- ACH Stop Pays dialog box
- Share Draft Stop Pays dialog box
- Safe Deposit Box List dialog box
- My Reports dialog box
- View Documents dialog box
Activity Menu
Access the following:
- Dispense dialog box to dispense cash using Cash Dispenser
- Capture Document Signature
- Process Card Swipe Info
- Fees, Flags & Counters dialog box to view a member’s credit union-defined fees and counters
- Old Member Number Search dialog box to look up a member using their old member number
- Draft ID Inquiry dialog box to view the list of loan and share draft IDs for the member.
- Confirm Check Order dialog box to order checks through Clarke American, Liberty, Harland, or Deluxe.
- Verification Processing dialog box
- Credit Bureau dialog box to pull a credit report for an existing member or non-member.
- Household Lookup to search for a household by household address, household name and household key.
- ProfIT360 to view ProfIT360 information for a household.
- Check Endorsement dialog box
- Check Writer dialog box to generate credit union checks.
- Check Scan dialog box to scan received checks after the transactions have been posted. (For Teller Item Capture only.)
- Adding Machine dialog box to calculate numbers.
- Quick Balance dialog box to review the current cash balance of your teller drawer and your checks received.
- Palm Scan Maintenance dialog box to delete the palm scan record from the Verifast database.
- Command Line window to complete transactions using string input.
- Interrupt command lets you display a Transactions dialog box containing the Transactions, Reversals, and Adjustments tabs, regardless of your location in Portico.
- Teller Override dialog box to enter your teller override code and process a restricted transaction.
- Employee Lockout dialog box to activate or deactivate employee lockout.
- Calculators, such as Truth in Lending and Truth in Savings.
- Text Member lets your credit union send and receive text messages to members using Eltropy’s user interface.
- Cross Sell Member History dialog box, Opportunities pop-up, Referral – New dialog box, Sale – New dialog box, and Decline - New dialog box
- Contact Manager history and requests to add a new contact record or event.
- Card Swipe to look up or import member and non-member information.
- Print Envelope dialog box to print an envelope for the member.
- Receipt Options, such as activate Portico receipts and display the account balance and name and address on the receipts. You can also access the Print Balances Options dialog box and select which account type balances to print and which accounts should be excluded

Tools Menu
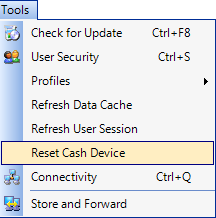
Check for Portico software updates and access the following:
- User Security dialog box
- Application Profile dialog box
- Print Profile dialog box
- User Profile dialog box
- Refresh Data Cache
- Refresh User Session
- Reset Cash Device
- Connectivity
- Store and Forward Processing
- Re-Entry Processing
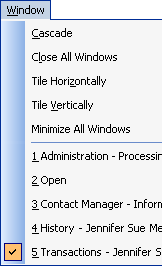
Window Menu
Change your window settings and view your window history.
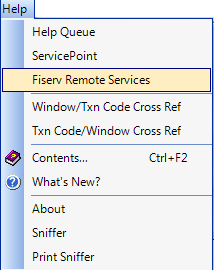
Help Menu
Access online help
Tool Bar
The top menu bar also contains icons that provide fast access to various functions.
| Icon | Description | ||||||||
|---|---|---|---|---|---|---|---|---|---|
|
|
Begin Store and Forward Processing mode. |
||||||||
|
|
Begin Re-Entry Processing for transactions completed in Offline Processing or Store and Forward Processing mode. |
||||||||
|
|
Begin Correction Processing for transactions that received errors during Re-Entry Processing. |
||||||||
|
|
Open the Adding Machine dialog box to calculate numbers. |
||||||||
|
|
Open the Quick Balance dialog box to review the current cash balance of your teller drawer and your checks received. |
||||||||
|
|
Open the Dispense dialog box to dispense cash using Cash Dispenser. |
||||||||
|
|
Open the Employee Lockout dialog box to activate or deactivate employee lockout. |
||||||||
|
|
Open the Teller Override dialog box to enter your teller override code and process a restricted transaction. |
||||||||
|
|
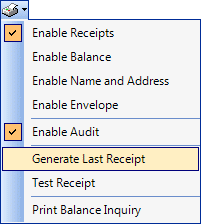
Change the receipt options for a transaction. You can also reprint a receipt, print a test receipt, or print a balance inquiry receipt. The balance inquiry receipt lists all the member’s share accounts, loans and certificates and the respective balances.
Select Enable Receipts to print a receipt or send an email receipt. If the Enable Receipts option is not selected, a receipt will not print or be sent via email regardless of the member’s receipt delivery preference; however, the receipt will be imaged to Nautilus Essentials. If using signature capture, the Enable Receipts option must be selected to display the signature capture prompt for cash disbursed transactions. Select Enable Balance to print the account balance on receipts. The Print Employee Balances check box on the Credit Union Profile – Print tab determines if balances will appear on receipts for members who are credit union employees. If this check box is not selected, balances will not appear on the receipt, even when the Enable Balanceoption is selected. Select Enable Name and Address to print the member's address on a wide receipt, such as a continuous form receipt or a laser printer receipt. This option is disabled if the member’s address fields are protected from view due to the user’s employee security restrictions. A member's address fields are protected when the user is assigned the EmplSec – User Has Restricted View of Employees/Option X Members; Can View Members on Employee Restriction Profile security permission and the member’s Account Restriction is Non-Employee – Special Restriction. Select Enable Envelopes to print an envelope for the receipt. For roll-receipt printers, you will be prompted to insert the envelope into the printer after the receipt has printed. This option is disabled if the member’s address fields are protected from view due to the user’s employee security restrictions. A member's address fields are protected when the user is assigned the EmplSec – User Has Restricted View of Employees/Option X Members; Can View Members on Employee Restriction Profile security permission and the member’s Account Restriction is Non-Employee – Special Restriction. Select Enable Audit to turn on the audit print. System default is on. Enable Audit will remain selected until you click the option again to turn off the audit print. To suspend audit print when running transaction processor, printing morning/evening reports and other scenarios where an audit isn’t needed, click Enable Audit so the check box no longer appears. Transactions continue to be reported on the Audit Trail Report 990 when Enable Audit is off. Select Generate Last Receipt to access the Teller Journal Inquiry – Generate Receipt dialog box. Select Test Receipt to print a test receipt when installing a new receipt printer. Select Print Balance Inquiry to access the Print Balances Options dialog box and select which account type balances to print and which accounts should be excluded. |
||||||||
|
|
If your credit union has implemented Verifast Palm Authentication, a palm icon will appear on the Portico toolbar to indicate that the teller workstation is ready to use Verifast Palm Authentication to verify members. |
||||||||
|
|
Clear the member search field on the menu bar. Click the down arrow to select a search option, enter the criteria in the blank field, and click the green arrow to locate the member. Enter alpha characters in the blank search field and the search option will automatically change to Short Name.
|
||||||||
|
Closed Account |
A Closed Account indicator will appear if the member account is closed. |
||||||||
|
Silver |
View or update the member’s Relationship Pricing plan. |
||||||||
|
|
Open the Member Notifications and Alerts dialog box to view the member’s information. |
||||||||
|
|
Click the down arrow to display a list of service requests. Then, click the desired service request to transfer directly to the appropriate Contact Manager window.
There are three versions of the Contact Manager/Event Tracking icon that can appear on the Portico toolbar.
|
||||||||
|
|
Open the Account Analysis Current Month Tracking dialog box. |
||||||||
|
|
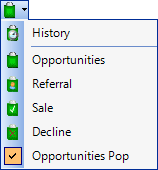
Display the Cross Sell Opportunities pop-up. Click the down arrow to access the History - Cross Sell History tab, Cross Sell Referral, Sale or Decline dialog boxes. Select or unselect the Opportunities Pop option to turn on or turn off the Opportunities popup dialog box when performing activities for multiple members not present in the teller line, such as account verifications or mail work transactions.
|
||||||||
|
|
Print an envelope for the member. |
||||||||
|
|
Text a member. |
Member Information Indicators
The following indicators can display on the top menu bar:
| Indicator | Description |
|---|---|

|
New Member- Appears if the date in the Date Joined field on the Contact Information tab is within the period defined in the New Member Period field on the Credit Union Profile – Member tab. |

|
Credit Union Employee - Appears if the Account Restriction field is CU Employee - Restricted on the Contact Information tab. |

|
Special Account – Restricted - Appears if the Account Restriction field is Special Account - Restricted on the Contact Information tab |

|
Report Only – No Restrictions - Appears if the Account Restriction field is Report Only - No Restrictions on the Contact Information tab. |

|
Non-Employee – Extended Restriction - Appears if the Account Restriction field is Non Employee - Extended Restriction on the Contact Information tab. |

|
Dormant Account - Appears if the Dormant check box selected on the Contact information tab. |

|
Deceased Member - Appears if the Deceased check box selected on the Contact information tab. |

|
Member birthday is within a few days of the current date - Appears if the current date is 8 days before or after the month and day in the Birth Date field on the Contact Information tab. |
